# Getting Started

How to create account and give the first run

Welcome to Drafter AI!

By using it you can create AI-powered features for your products or automations.

Let’s get started with creating an account.

## 1. Sign Up to Create an Account

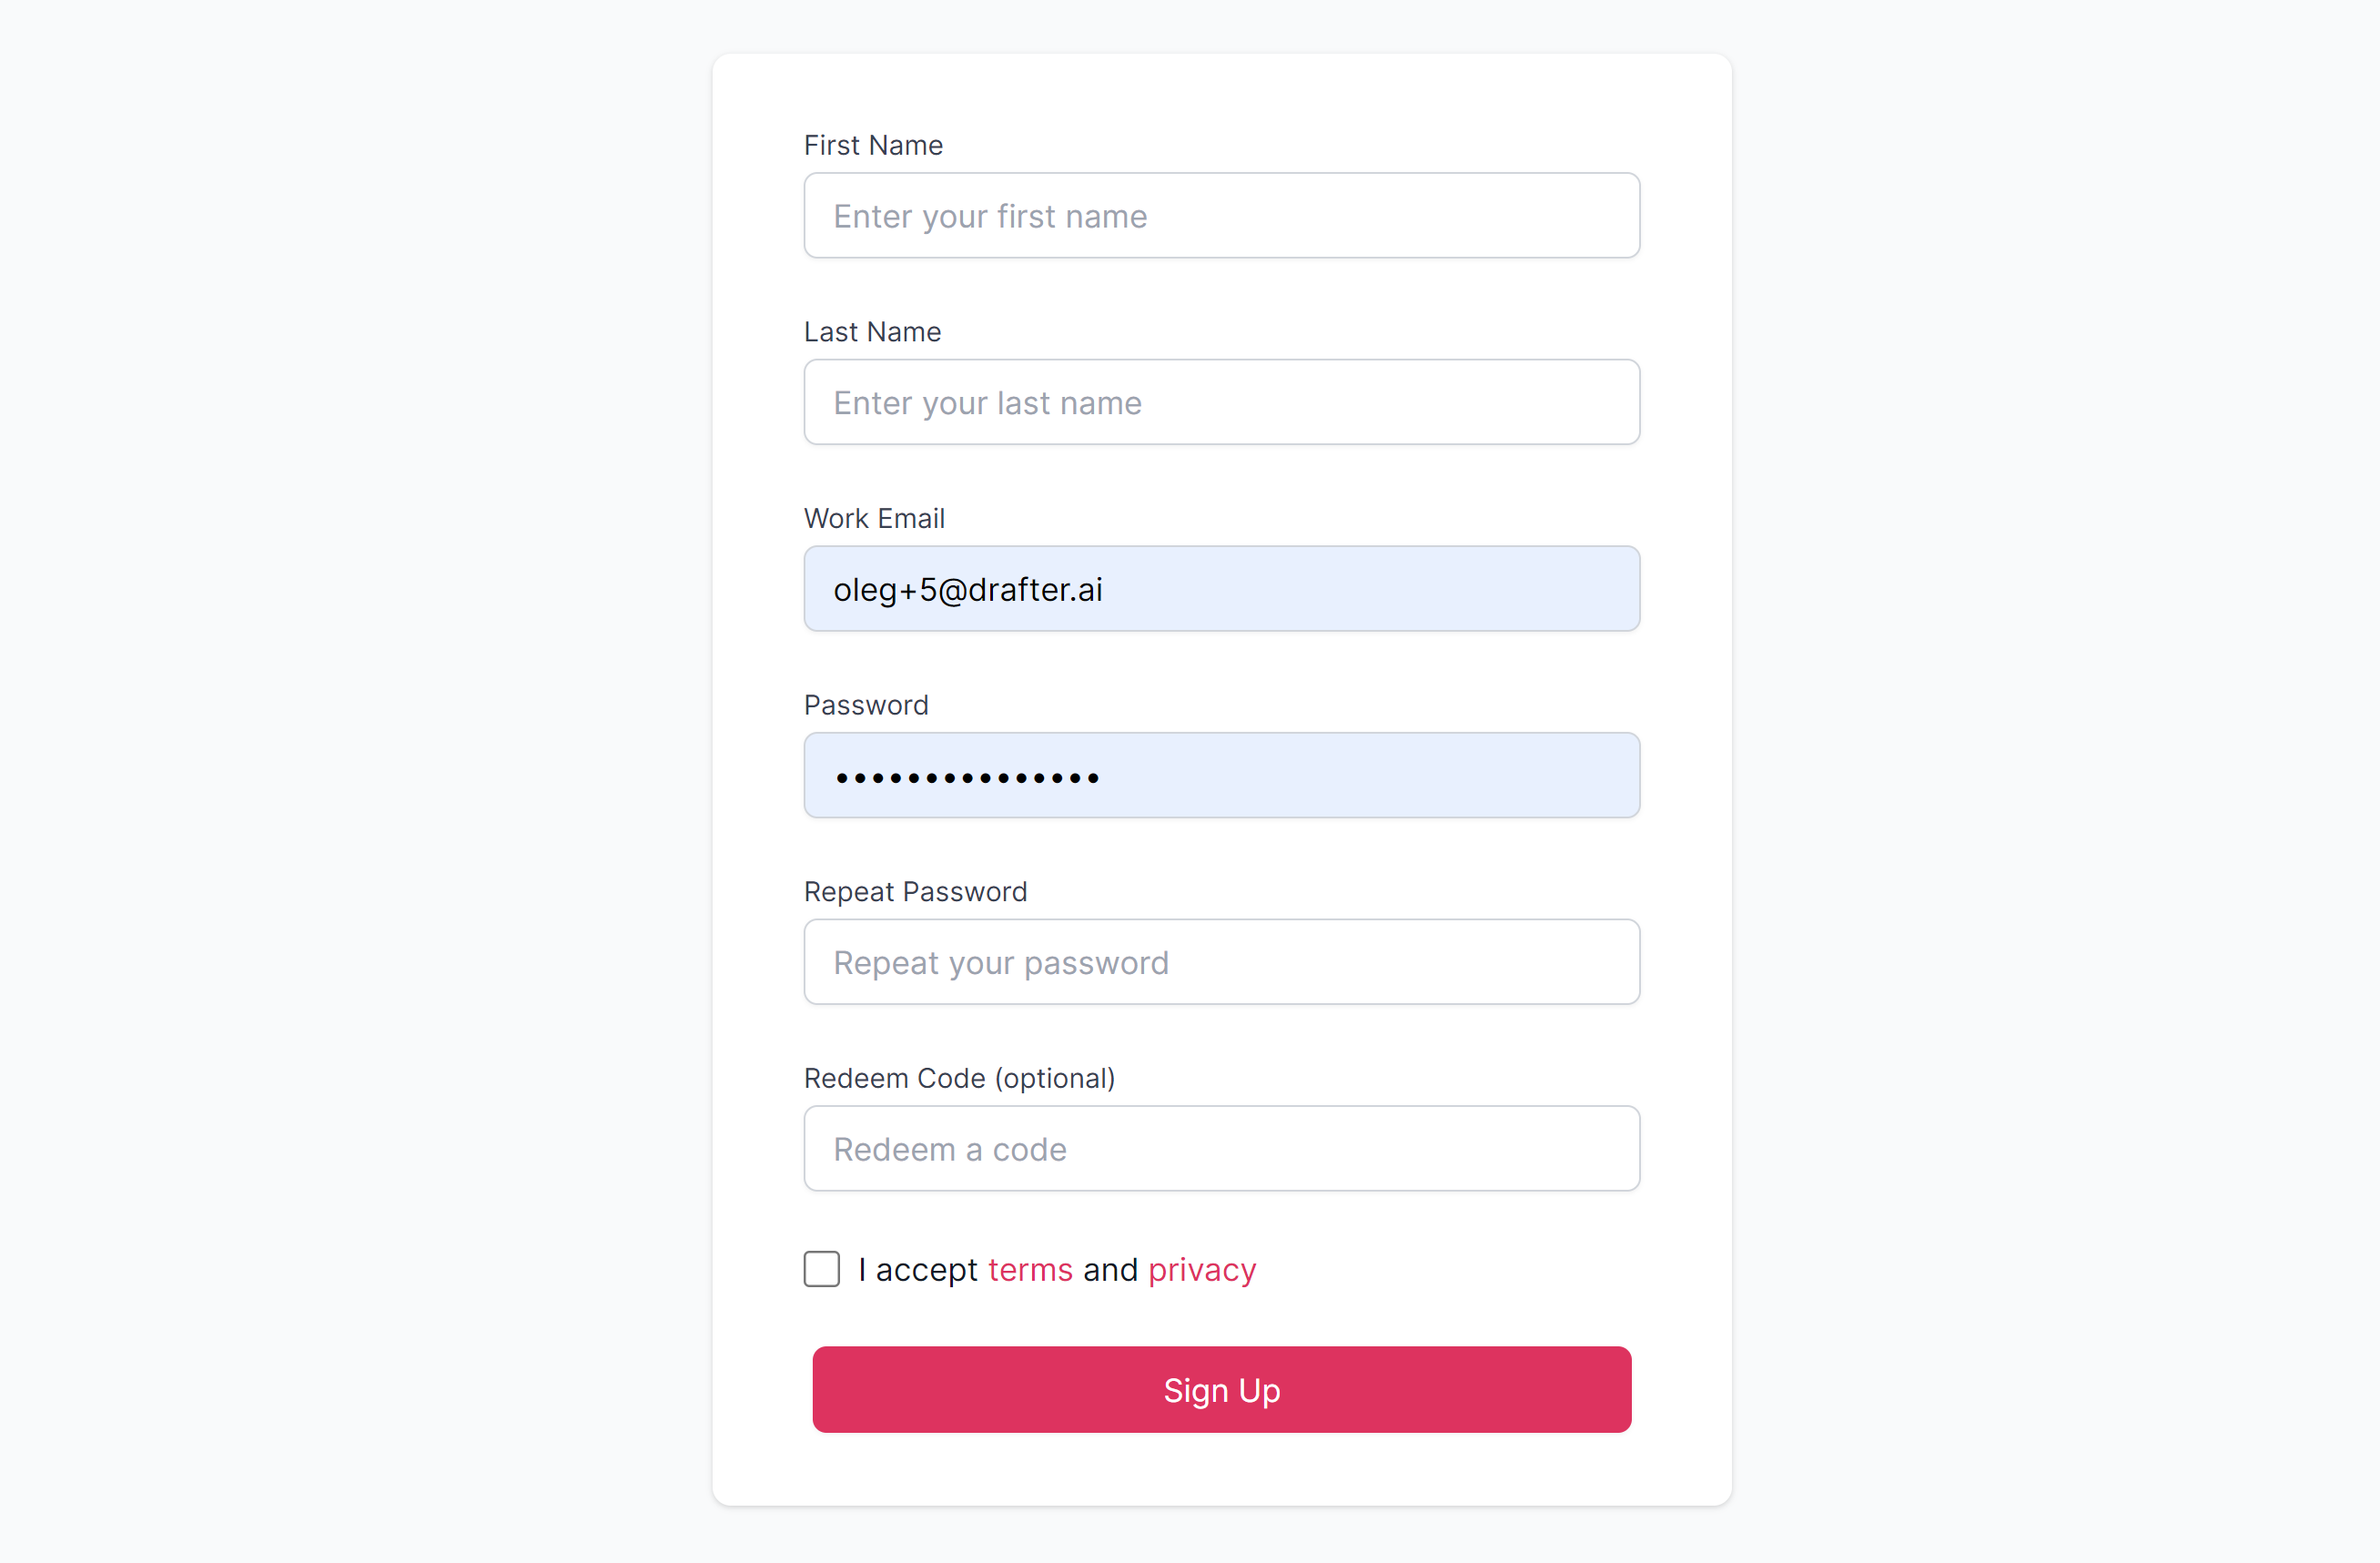
Fill in a short form to sign up for Drafter AI.

<figure><img src="/files/WmeutDoEL6G6WnQfT24n" alt=""><figcaption><p>Signing Up to Drafter AI</p></figcaption></figure>

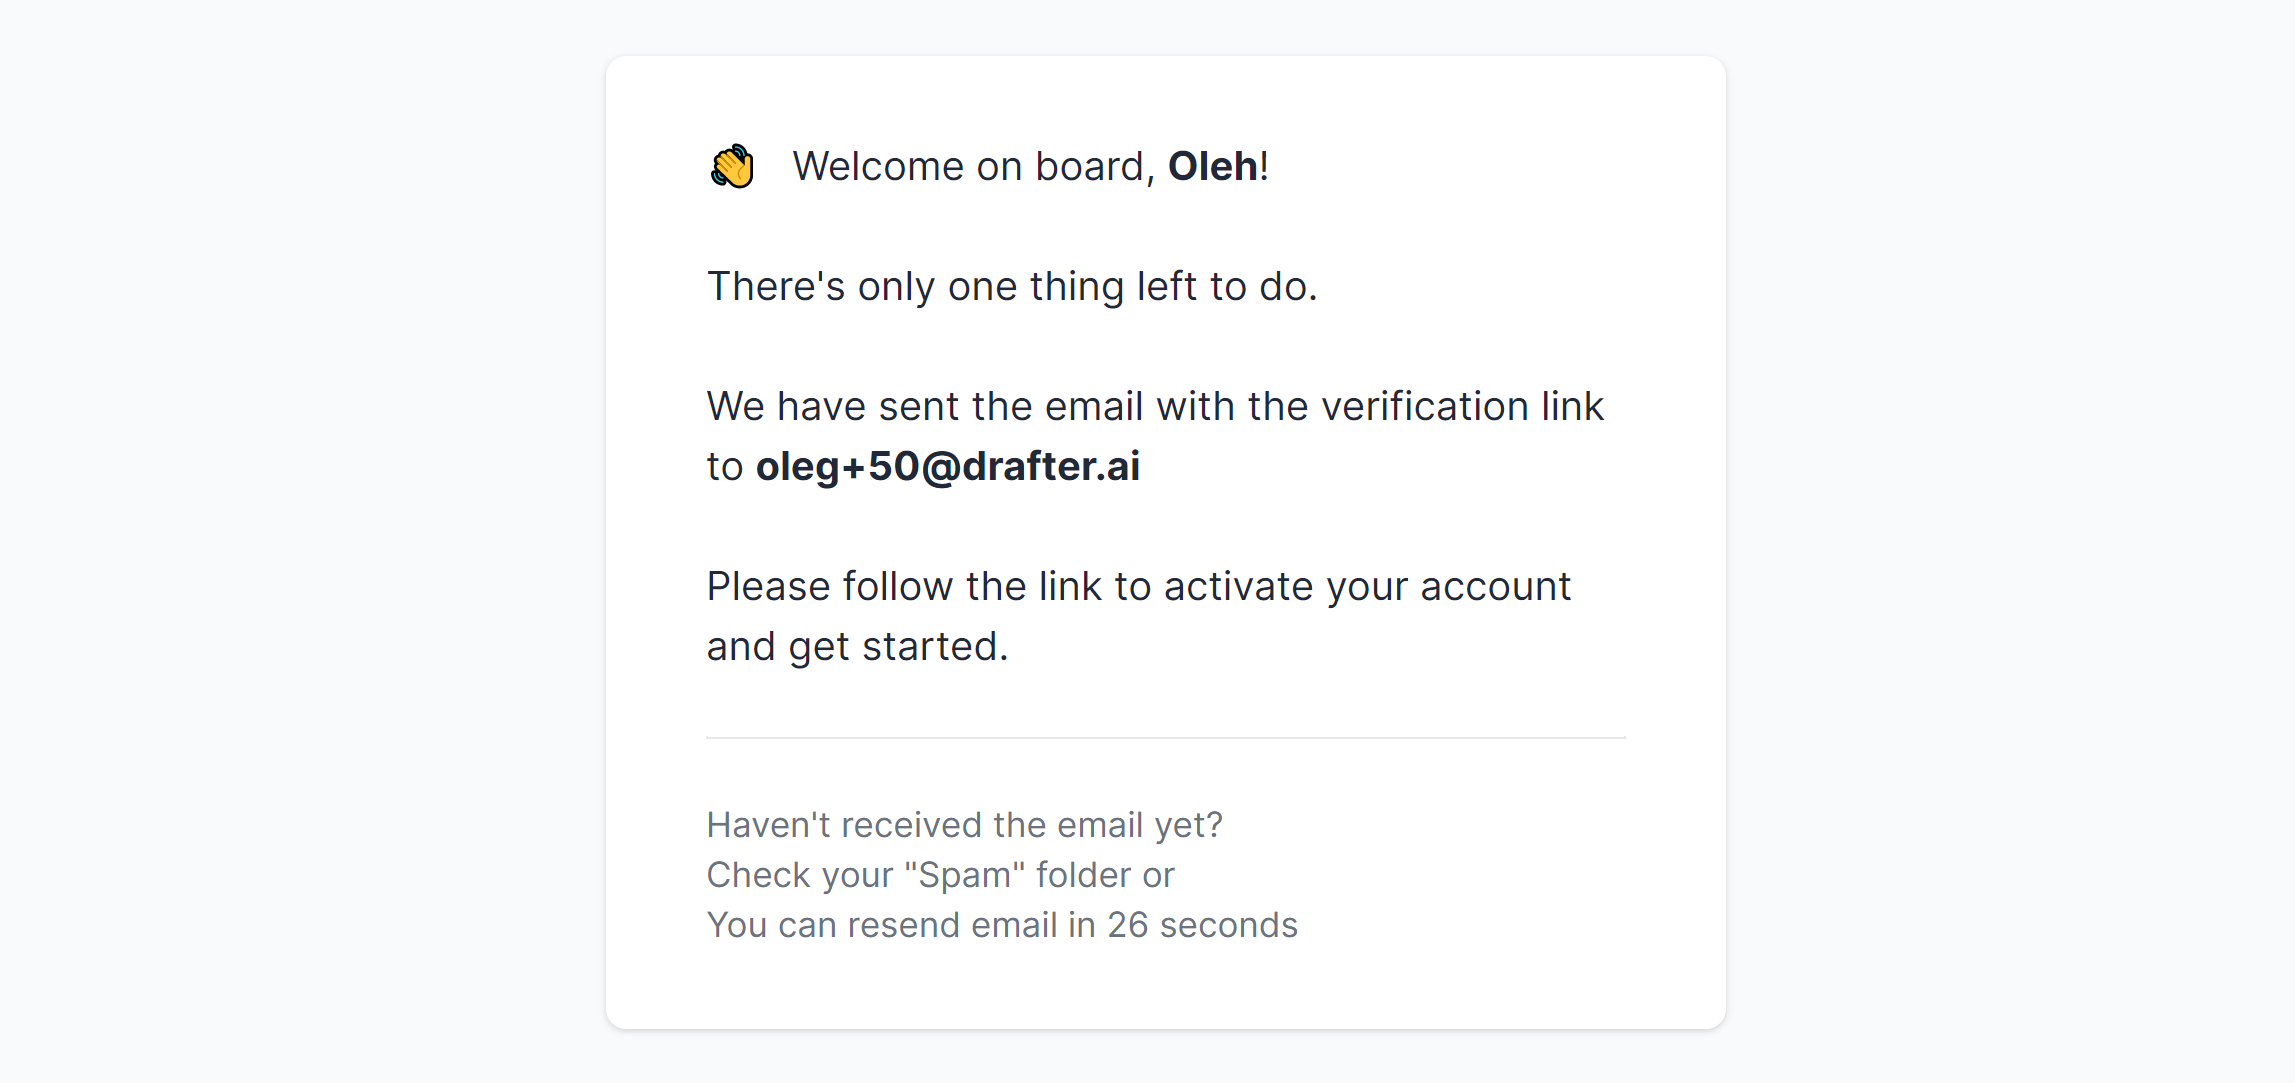
As soon as you signed up, the verification email is sent to your inbox.

<figure><img src="/files/ellq3HKmFiwgwXiJXTwG" alt=""><figcaption><p>Verifying email</p></figcaption></figure>

{% hint style="info" %}
Use a **business email** address to get verified.
{% endhint %}

## 2. Verify Email

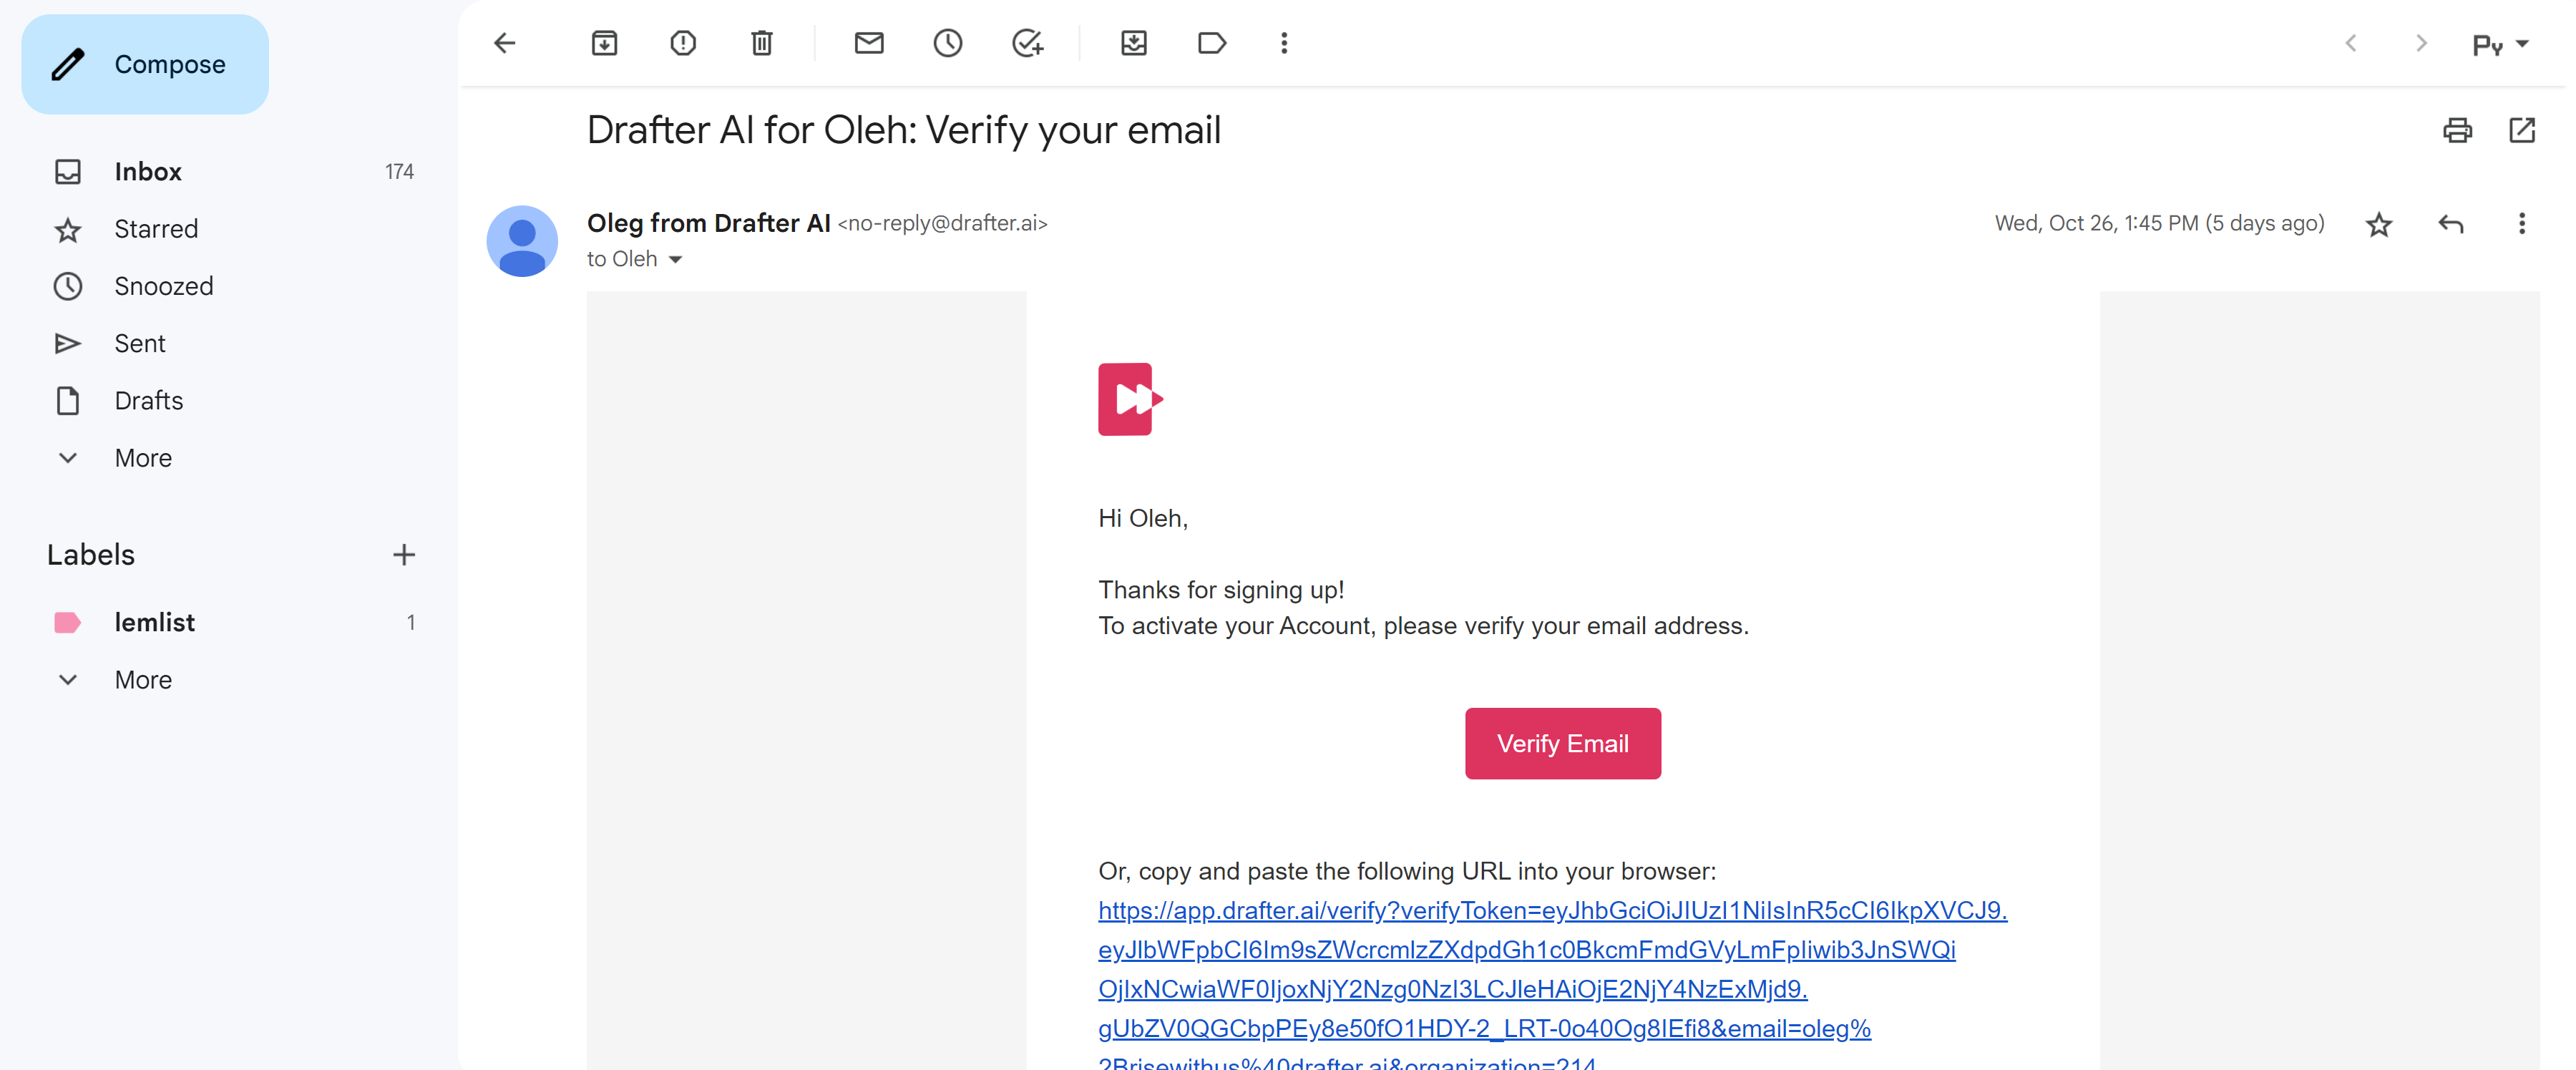
Look into your email inbox.

<figure><img src="/files/pxPbbyq8GSGebKowQaIb" alt=""><figcaption><p>Verification Email</p></figcaption></figure>

Sometimes, emails can’t be delivered successfully because of domain restrictions.

In this case:

a) check <mark style="background-color:blue;">**“Spam”**</mark> or b) sign up again using a **different email address**.

## 3. Access your instance

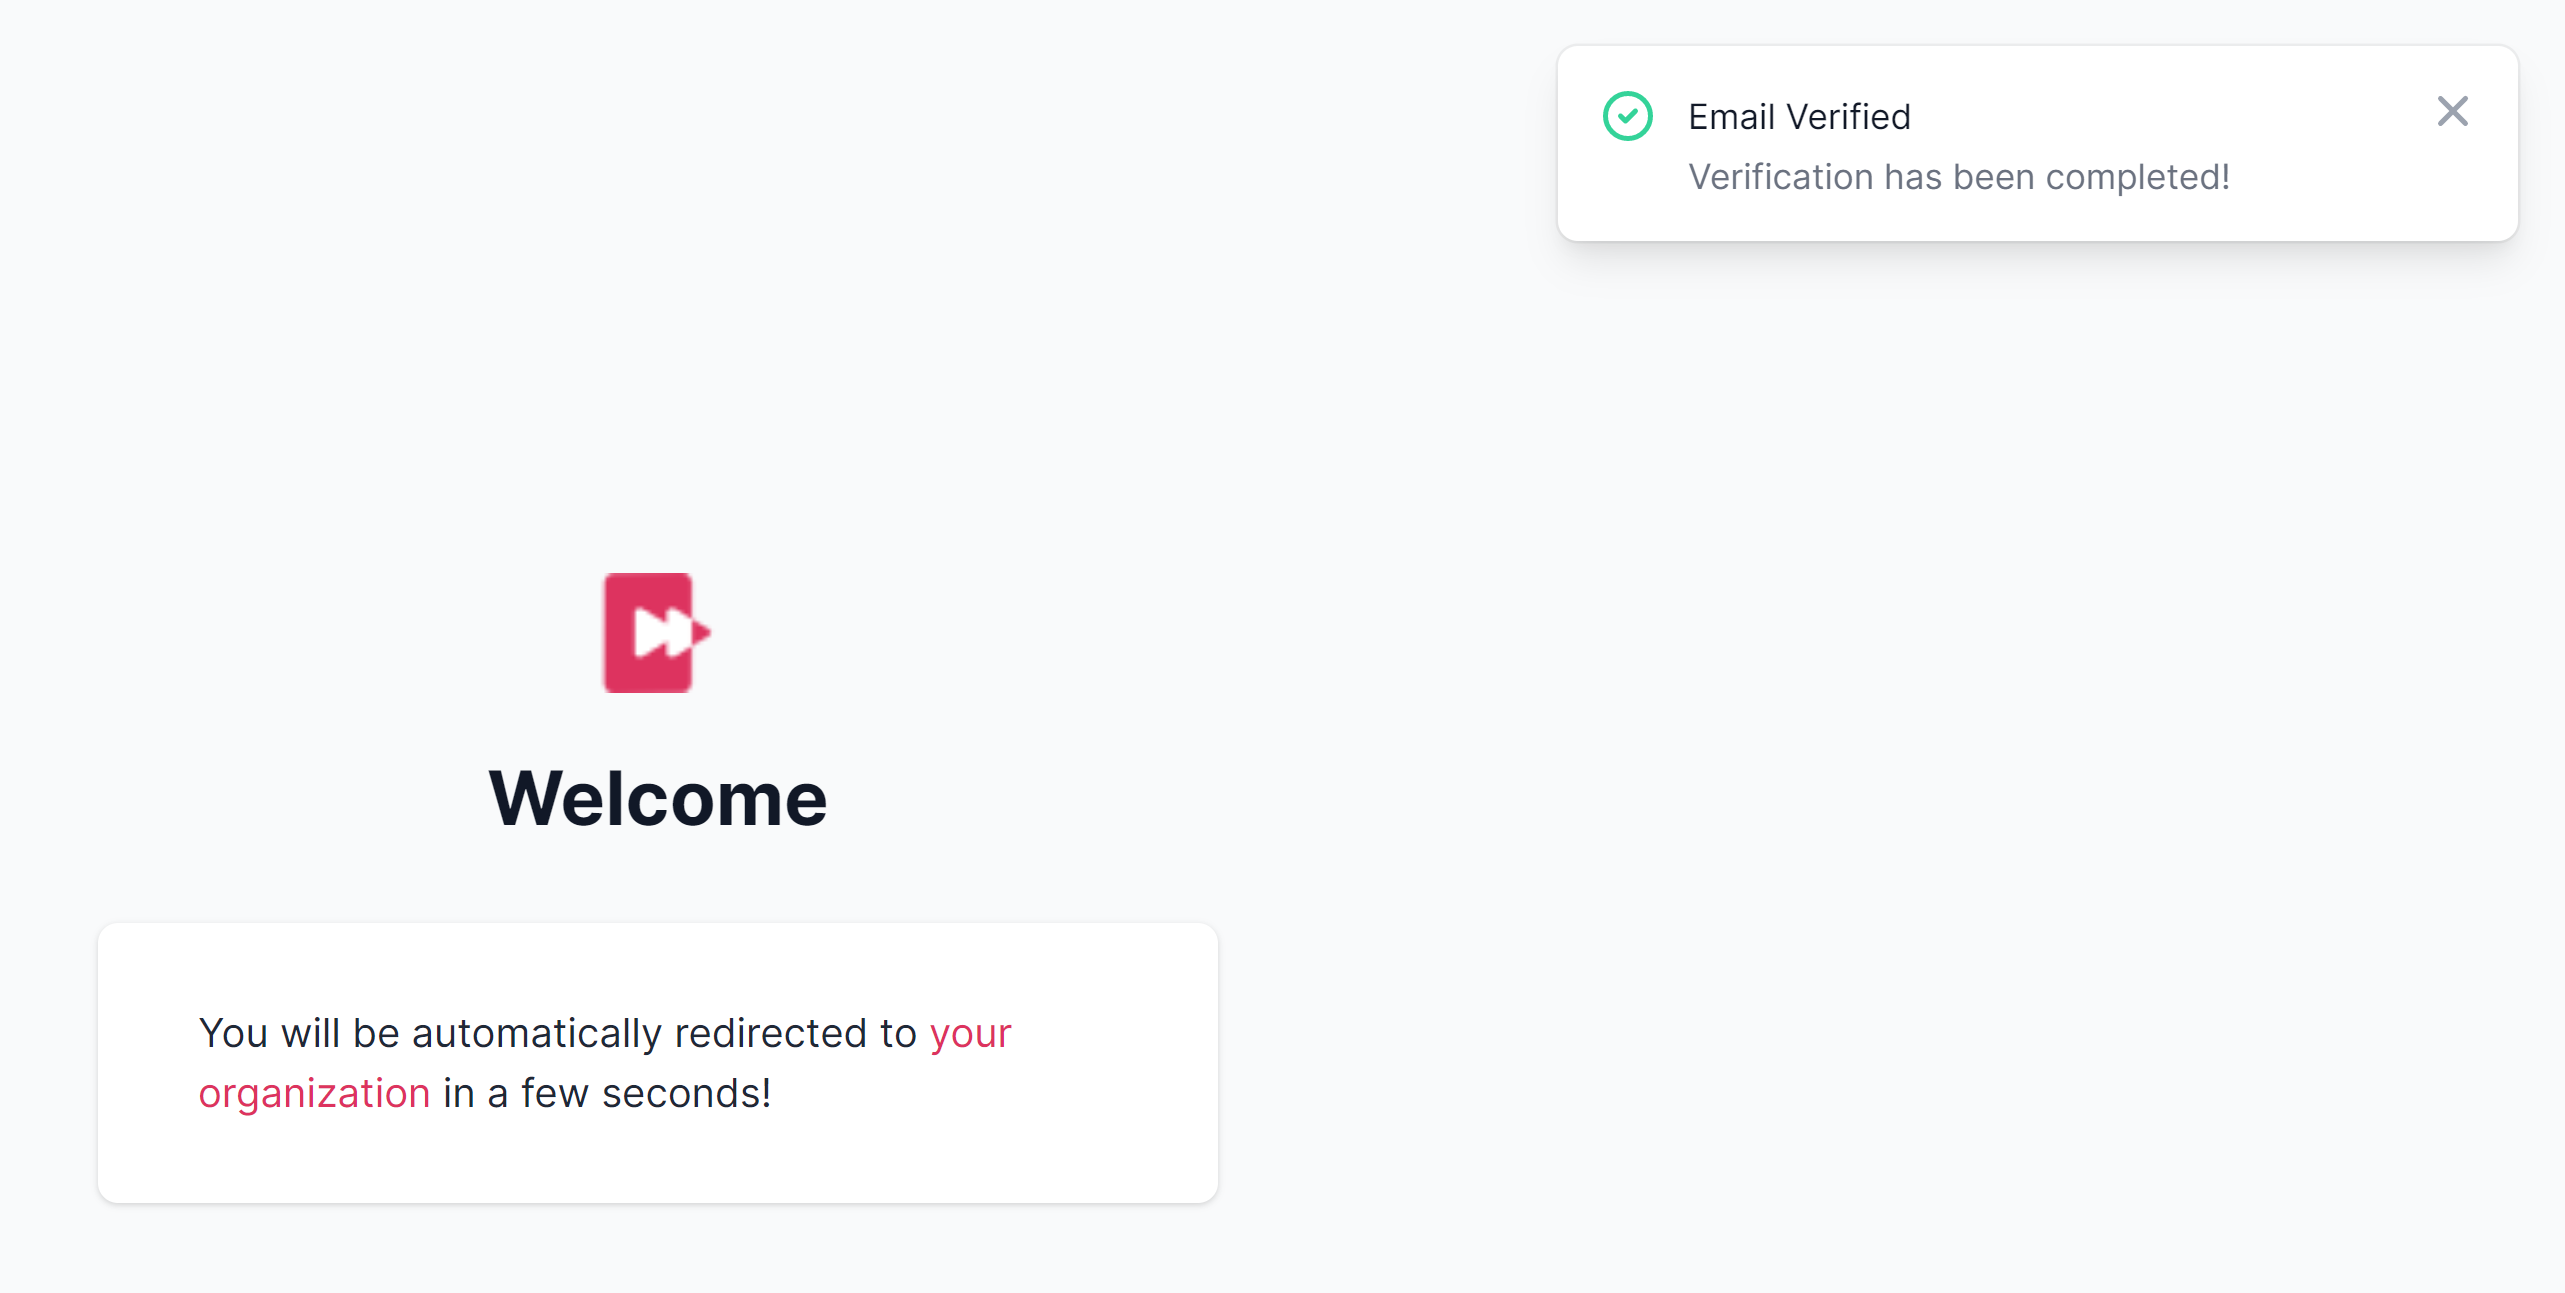
After proceeding by verification link, your instance of Drafter AI starts to deploy.

Wait for a few seconds patiently for the process to finish.

<figure><img src="/files/iWH3p2JMb06QSOPk52Gr" alt=""><figcaption><p>Verifying Account</p></figcaption></figure>

After that, you’ll be redirected to the app **automatically.**

{% hint style="info" %}
If something doesn’t work properly, please reach out to **<support@drafter.ai>**
{% endhint %}

## 4. Try Templates

Since the very beginning, you have had access to some sample mini-apps - workflows.

Give them a try.

Let’s see, how workflows work 👇


# Workflow Basics

What workflows are and how to use them

## What is a workflow?

{% hint style="info" %}
Workflow is a sequence of automated actions performed in order to achieve desirable results.
{% endhint %}

In fact, workflow is an independent application, that can be used separately, processed in batches, or integrated with other tools.

You can navigate across your favorite workflows fast **using the left bar**.

<figure><img src="/files/PYWe2HoAuPerpov7QqHh" alt=""><figcaption><p>Fast Navigation</p></figcaption></figure>

Let’s see, how they work.

##

## List of Workflows

All the workflows in your instance are organized into a list.

Access it by clicking the <mark style="background-color:blue;">**“Workflows”**</mark> menu item in the top menu bar.

<figure><img src="/files/lvuHgk1wy58zxkZ7NuNM" alt=""><figcaption><p>Main navigation</p></figcaption></figure>

###

### Fast Access

To access workflows with a click from any part of the system they should be marked as “favorite”.

Being “favorite” they are displayed in a left bar that is available constantly.

Mark them as favorites (and switch them off) by clicking a ⭐ icon.

<figure><img src="/files/Dyp0HtFabjrOZCO5P7iB" alt=""><figcaption><p>Choosing workflows to access fast</p></figcaption></figure>

How a list of workflows looks like

Regular workflows can be accessed using the list only.

### States of workflows

“**Active” (published)** workflows are visible to everyone and can be integrated/triggered by API.

“**Testing” (draft)** workflows are visible to owners only and can’t be integrated or triggered by API until they are published.

{% hint style="warning" %}
Publish your workflows **only if you tested them** and ensured they work properly.
{% endhint %}

###

### Creating workflows

You can start creating workflows in 2 ways:

In the list of workflows > Click **“New workflow”**

<figure><img src="/files/tUYtxy1GTnRqNzZq29r1" alt=""><figcaption><p>Creating workflow 1</p></figcaption></figure>

From any page by clicking the <mark style="background-color:blue;">**“+”**</mark> button on the left bar (Fast Access)

<figure><img src="/files/SstSeD2YNaTcHUlXatkg" alt=""><figcaption><p>Creating workflow 2</p></figcaption></figure>

### Editing workflows

If you need to edit current workflows, click the <mark style="background-color:blue;">**“Edit workflow”**</mark> button in the entry line on the list of workflows:

<figure><img src="/files/j1KDgj5HFcBZ1RJd8Bl7" alt=""><figcaption><p>Edit Workflow</p></figcaption></figure>

### Testing workflows

If you want to give the workflow a try, click the <mark style="background-color:blue;">**“Run workflow”**</mark> button in the entry line on the list of workflows:

<figure><img src="/files/1HAcBbTejf3tZnzeGDdu" alt=""><figcaption><p>Run Workflow</p></figcaption></figure>

### **Deleting workflows**

If you need to delete a workflow, unpublish it by using the <mark style="background-color:blue;">**“General Info”**</mark> tab first.

After that, click <mark style="background-color:blue;">**“Delete workflow”**</mark> in the entry line on the list of workflows:

<figure><img src="/files/bbQbdNOfuC5VcyfZkU8d" alt=""><figcaption><p>Delete workflow</p></figcaption></figure>

{% hint style="info" %}
Only workflows in the **Draft** state can be deleted.
{% endhint %}

{% hint style="danger" %}
**Important!** This action can’t be undone.&#x20;

Be sure you really don’t need this workflow and it’s not active in your 3rd party apps, integrations, and automations.
{% endhint %}

Let’s get started with learning about building workflows:


# Workflow Builder Overview

Basic interface and elements of the workflow builder

## Builder: Interface

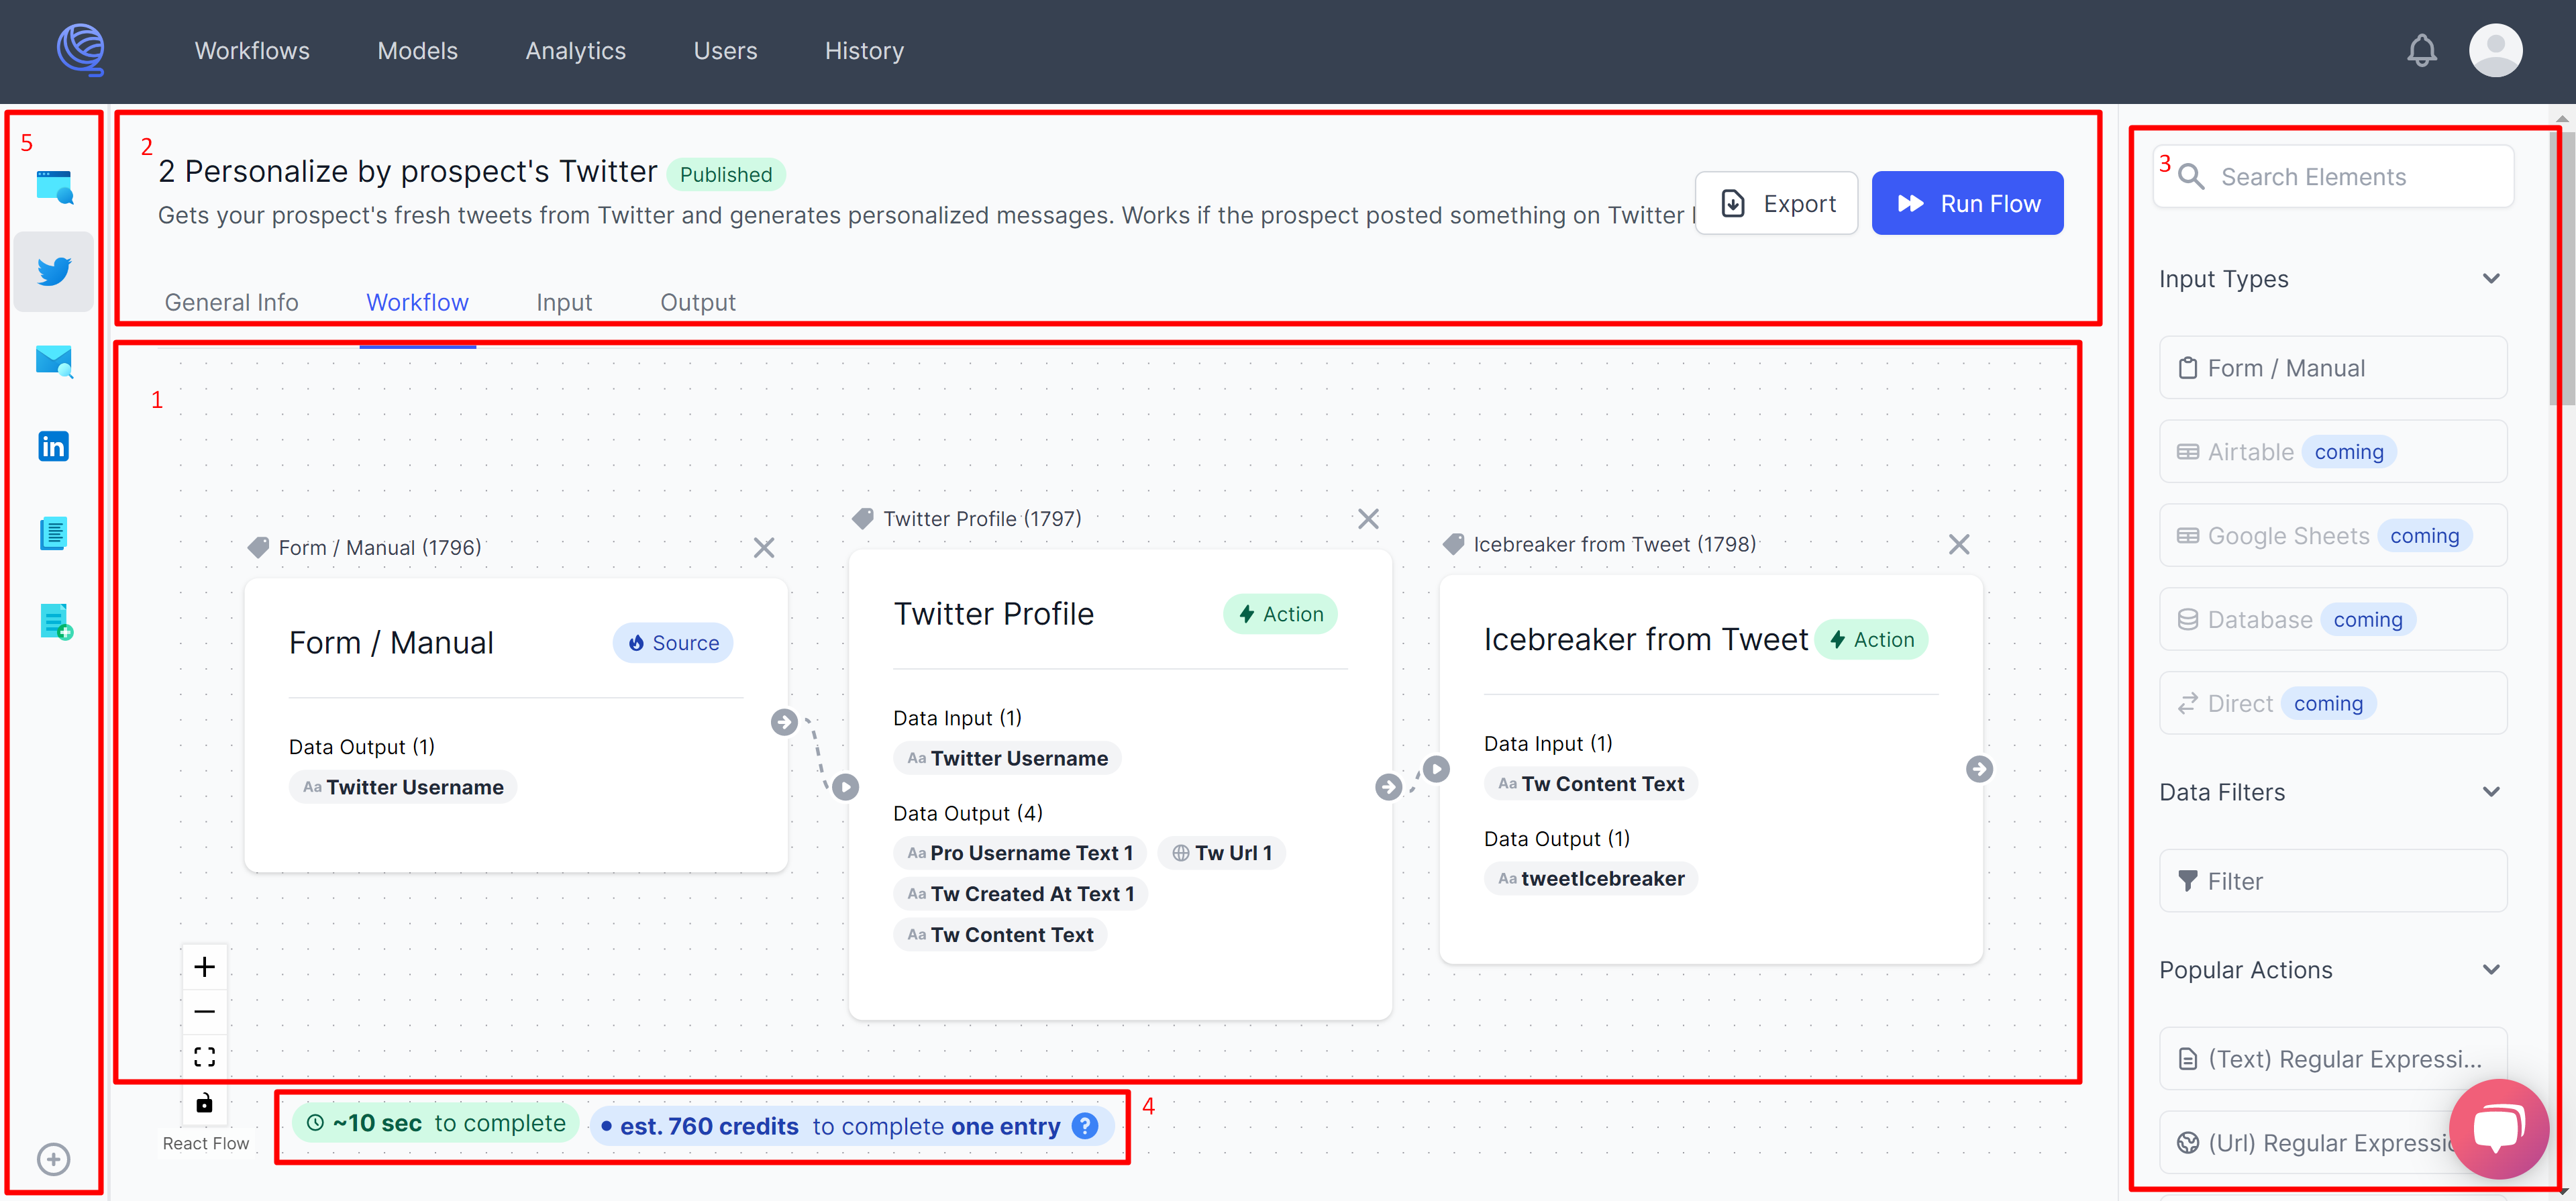
<figure><img src="/files/KL8GRGwEGKD3crzUC6Lm" alt=""><figcaption><p>Builder: Interface</p></figcaption></figure>

Builder consists of:

1. **Building area -** to add, connect and edit workflow elements (modules).
2. **Navigation & Actions bar -** to get basic info about the workflow, to navigate and perform actions on it.
3. **List of modules -** to search and add modules to the workflow by dragging them into the building area.
4. **Estimations -** to have approximate calculations of the time and credits that 1 workflow execution will take.
5. **Fast access bar -** to switch between popular workflows or create new ones.

## Building Workflow

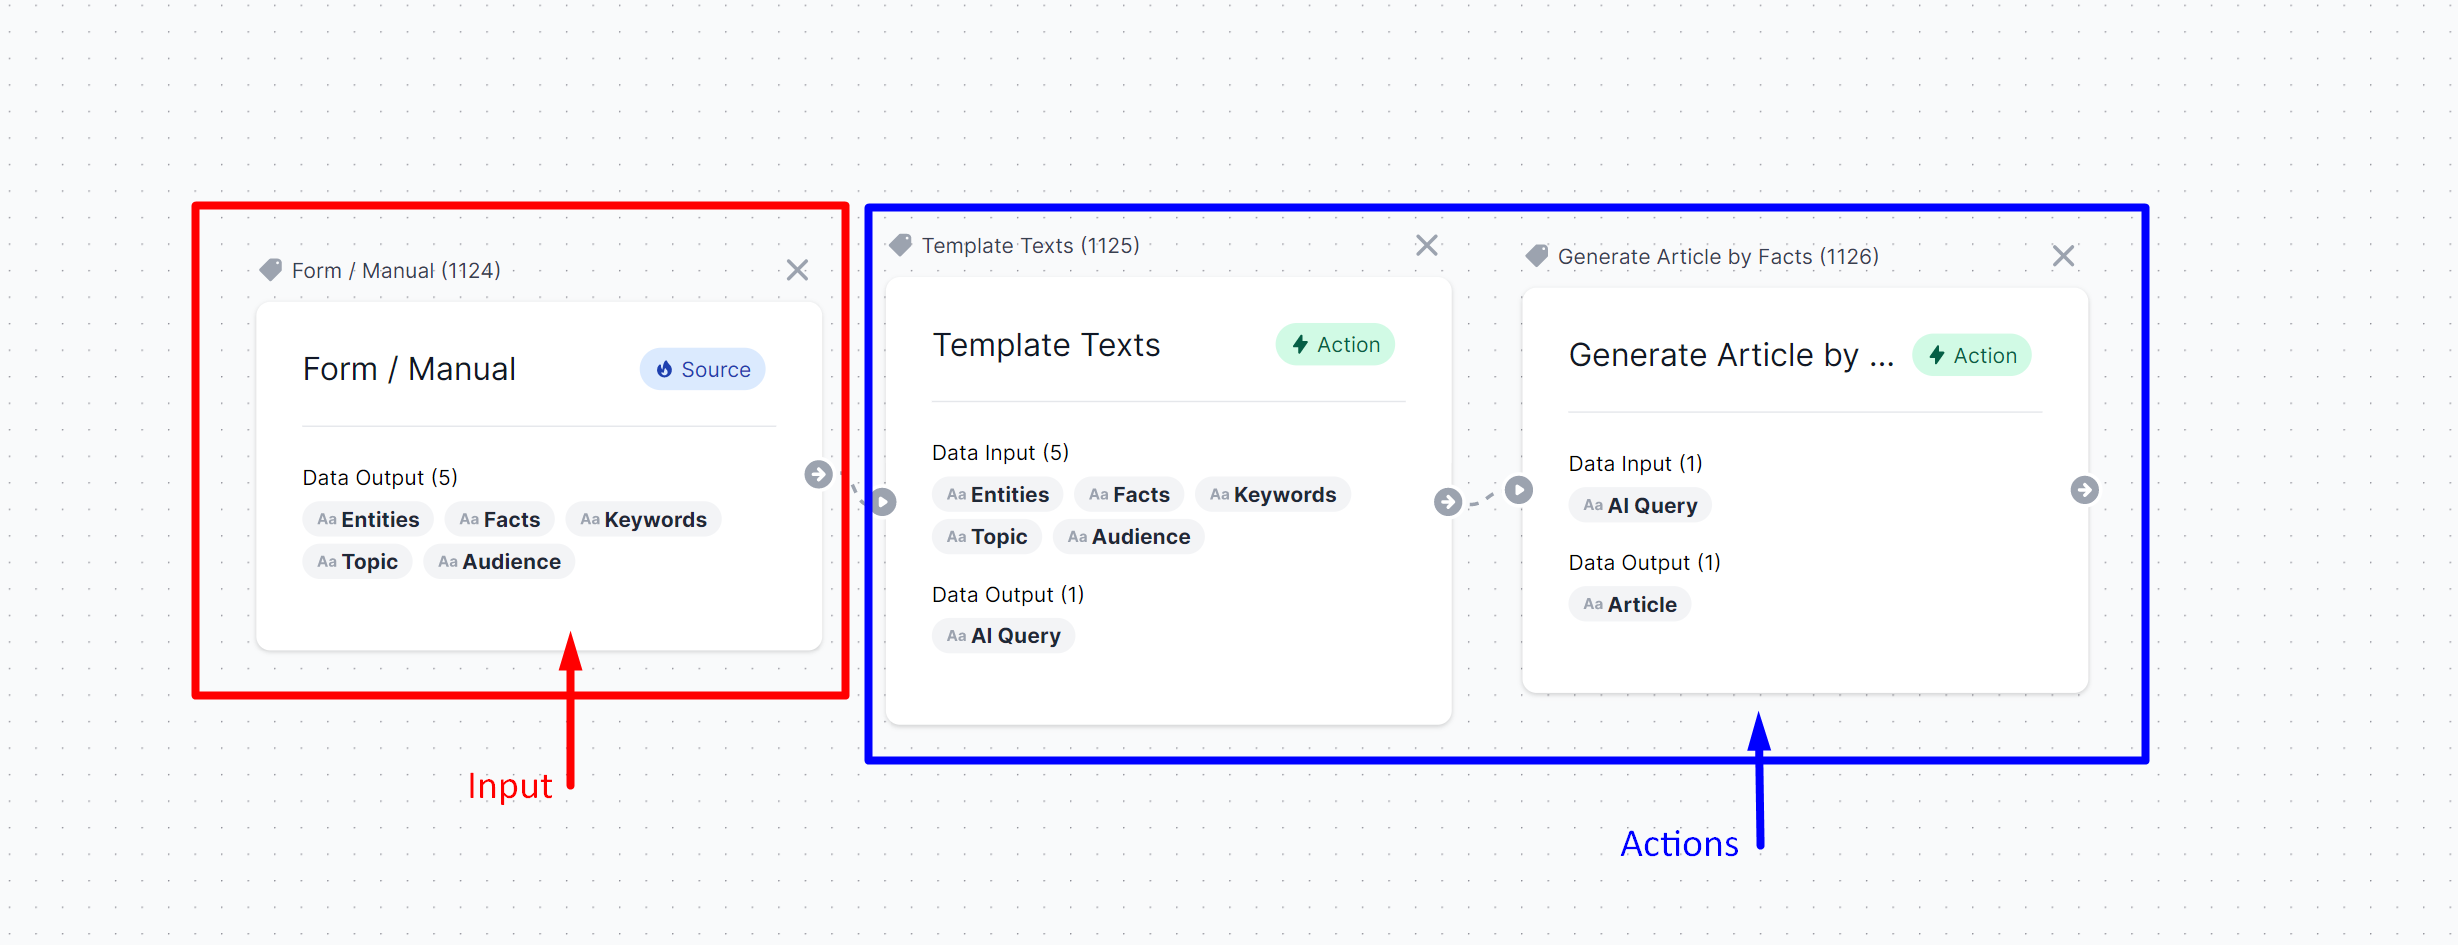
Every workflow consists of:

**a) Input** - a form to provide initial data. It’s an entry point for automation to start working.

It takes data from users or other tools and sends it to the actions.

**b) Actions** - modules, that perform different tasks upon input data - enrich it, transform (with AI or without it), or filter.

Every action takes data from previous modules, performs an action on it, and sends new data points to the inventory.

<figure><img src="/files/N6NDqKGHUyxRiPyzk9wk" alt=""><figcaption><p>Input and Action</p></figcaption></figure>

In fact, workflow is a process of taking input and processing it with multiple pre-built modules to get desired output.

{% hint style="info" %}
All the data points generated during the workflow processing can be accessible later.
{% endhint %}

Learn more about build elements:

{% content-ref url="/pages/1mYWo06Yh1Eu1AeTQNg7" %}
[Builder: Input](/build/workflow-basics/builder-input)
{% endcontent-ref %}


# Builder: Input

How to configure workflow input

## Workflow Builder: Input

Each workflow starts with the “Input”.

It defines:

a) Properties of the data necessary for the workflow to get started.

b) How the input form looks like for the end users.

#### How to add input to the workflow

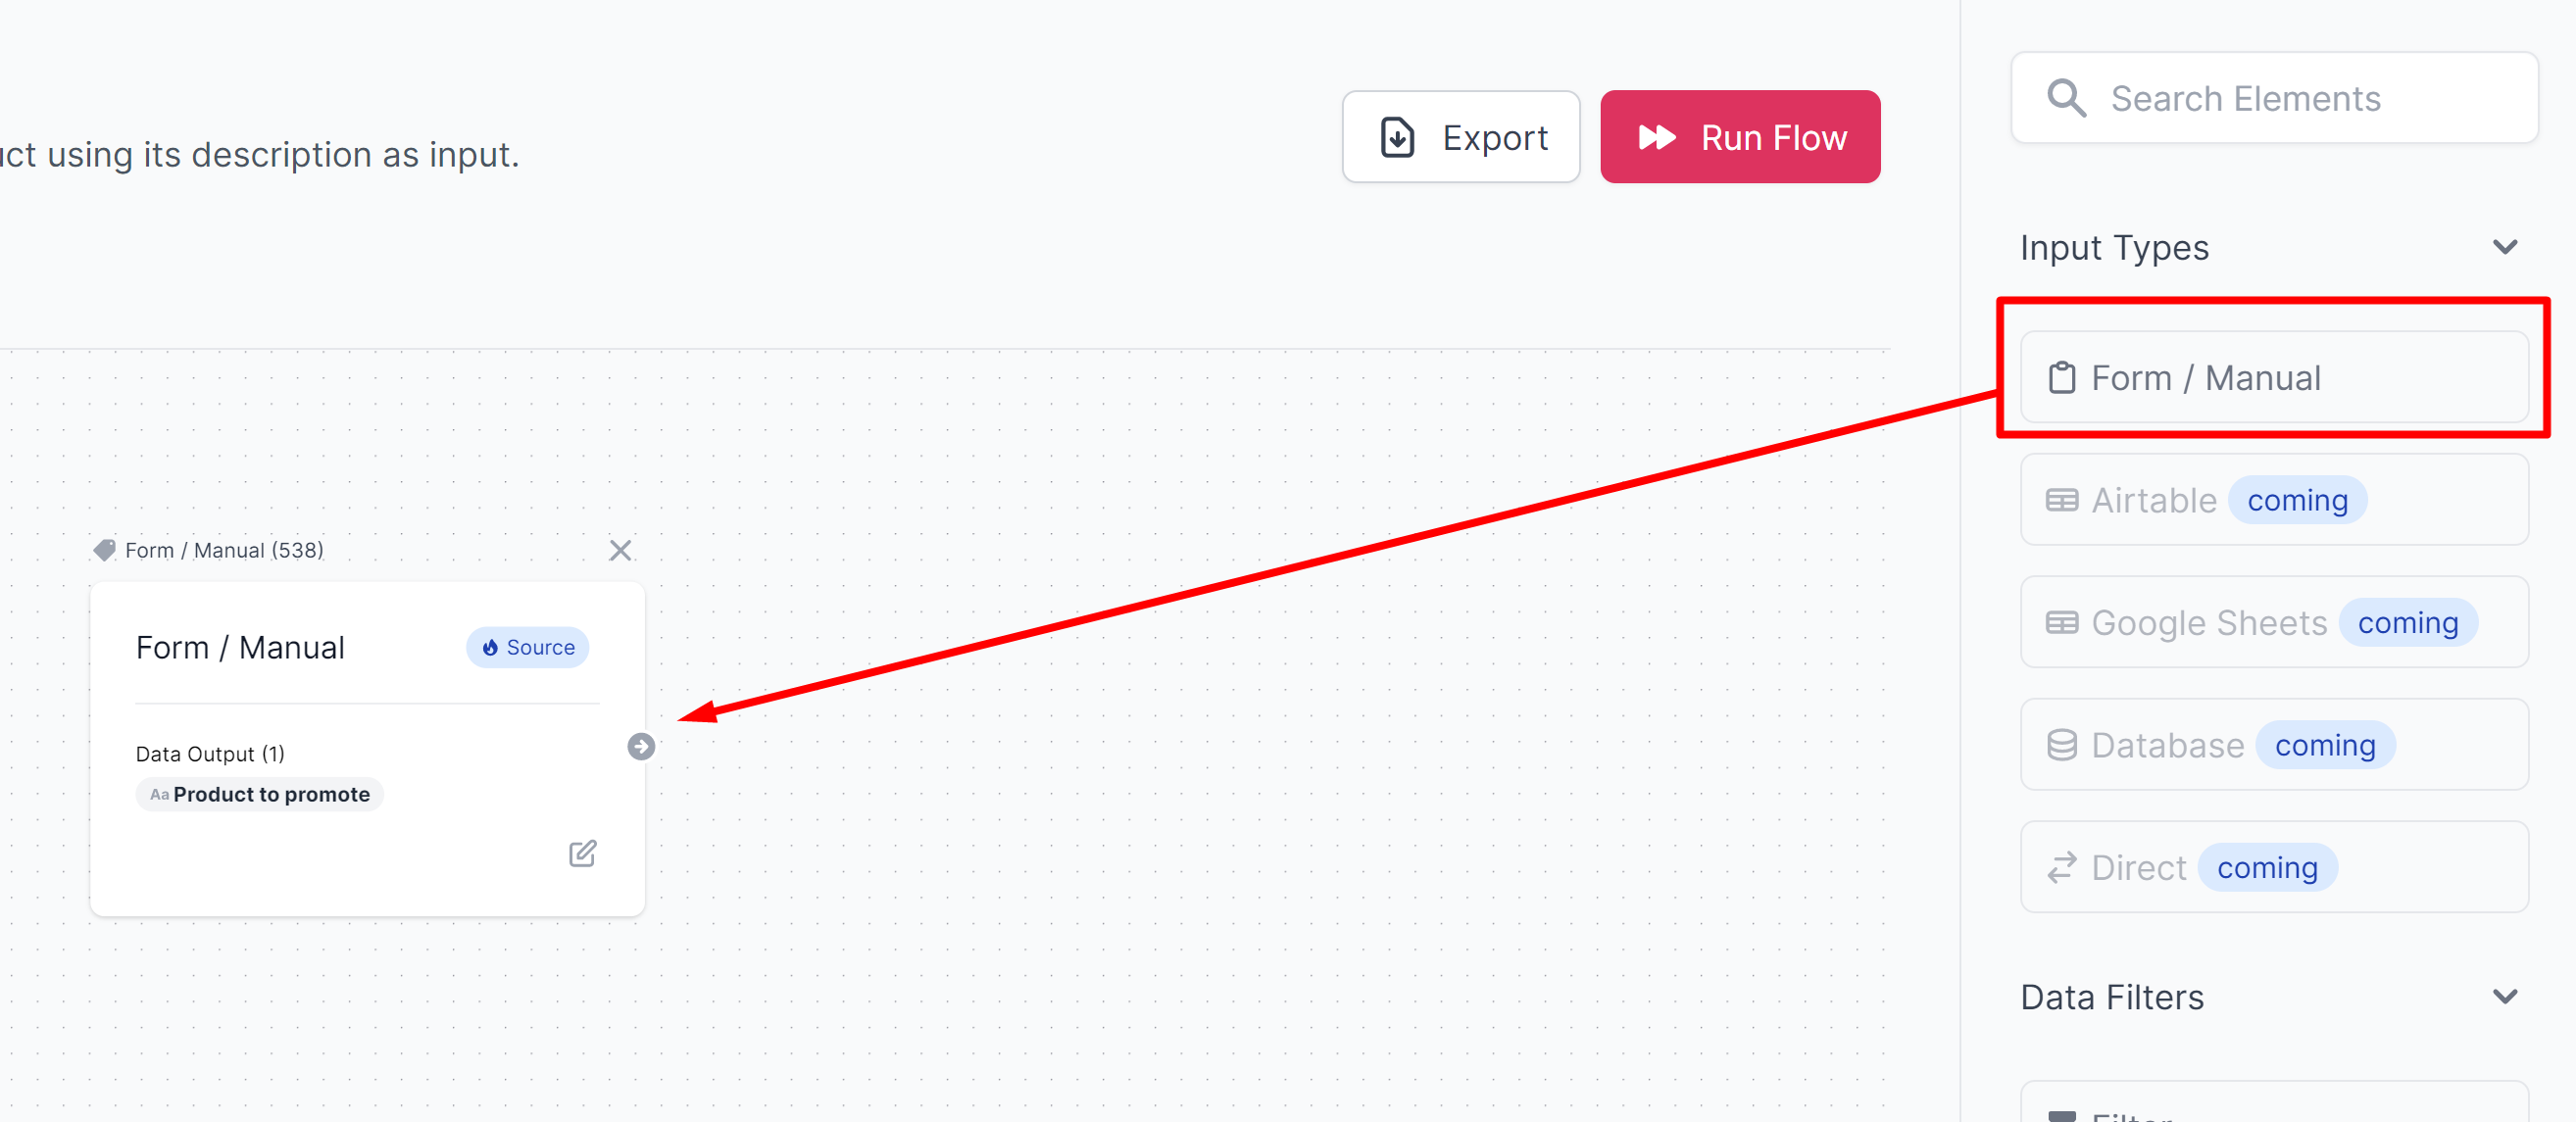
To add it to the working area drag-drop it from the right toolbar:

<figure><img src="/files/keV0M5lbIMsO0qfjbgGE" alt=""><figcaption><p>Adding input</p></figcaption></figure>

#### How to configure input

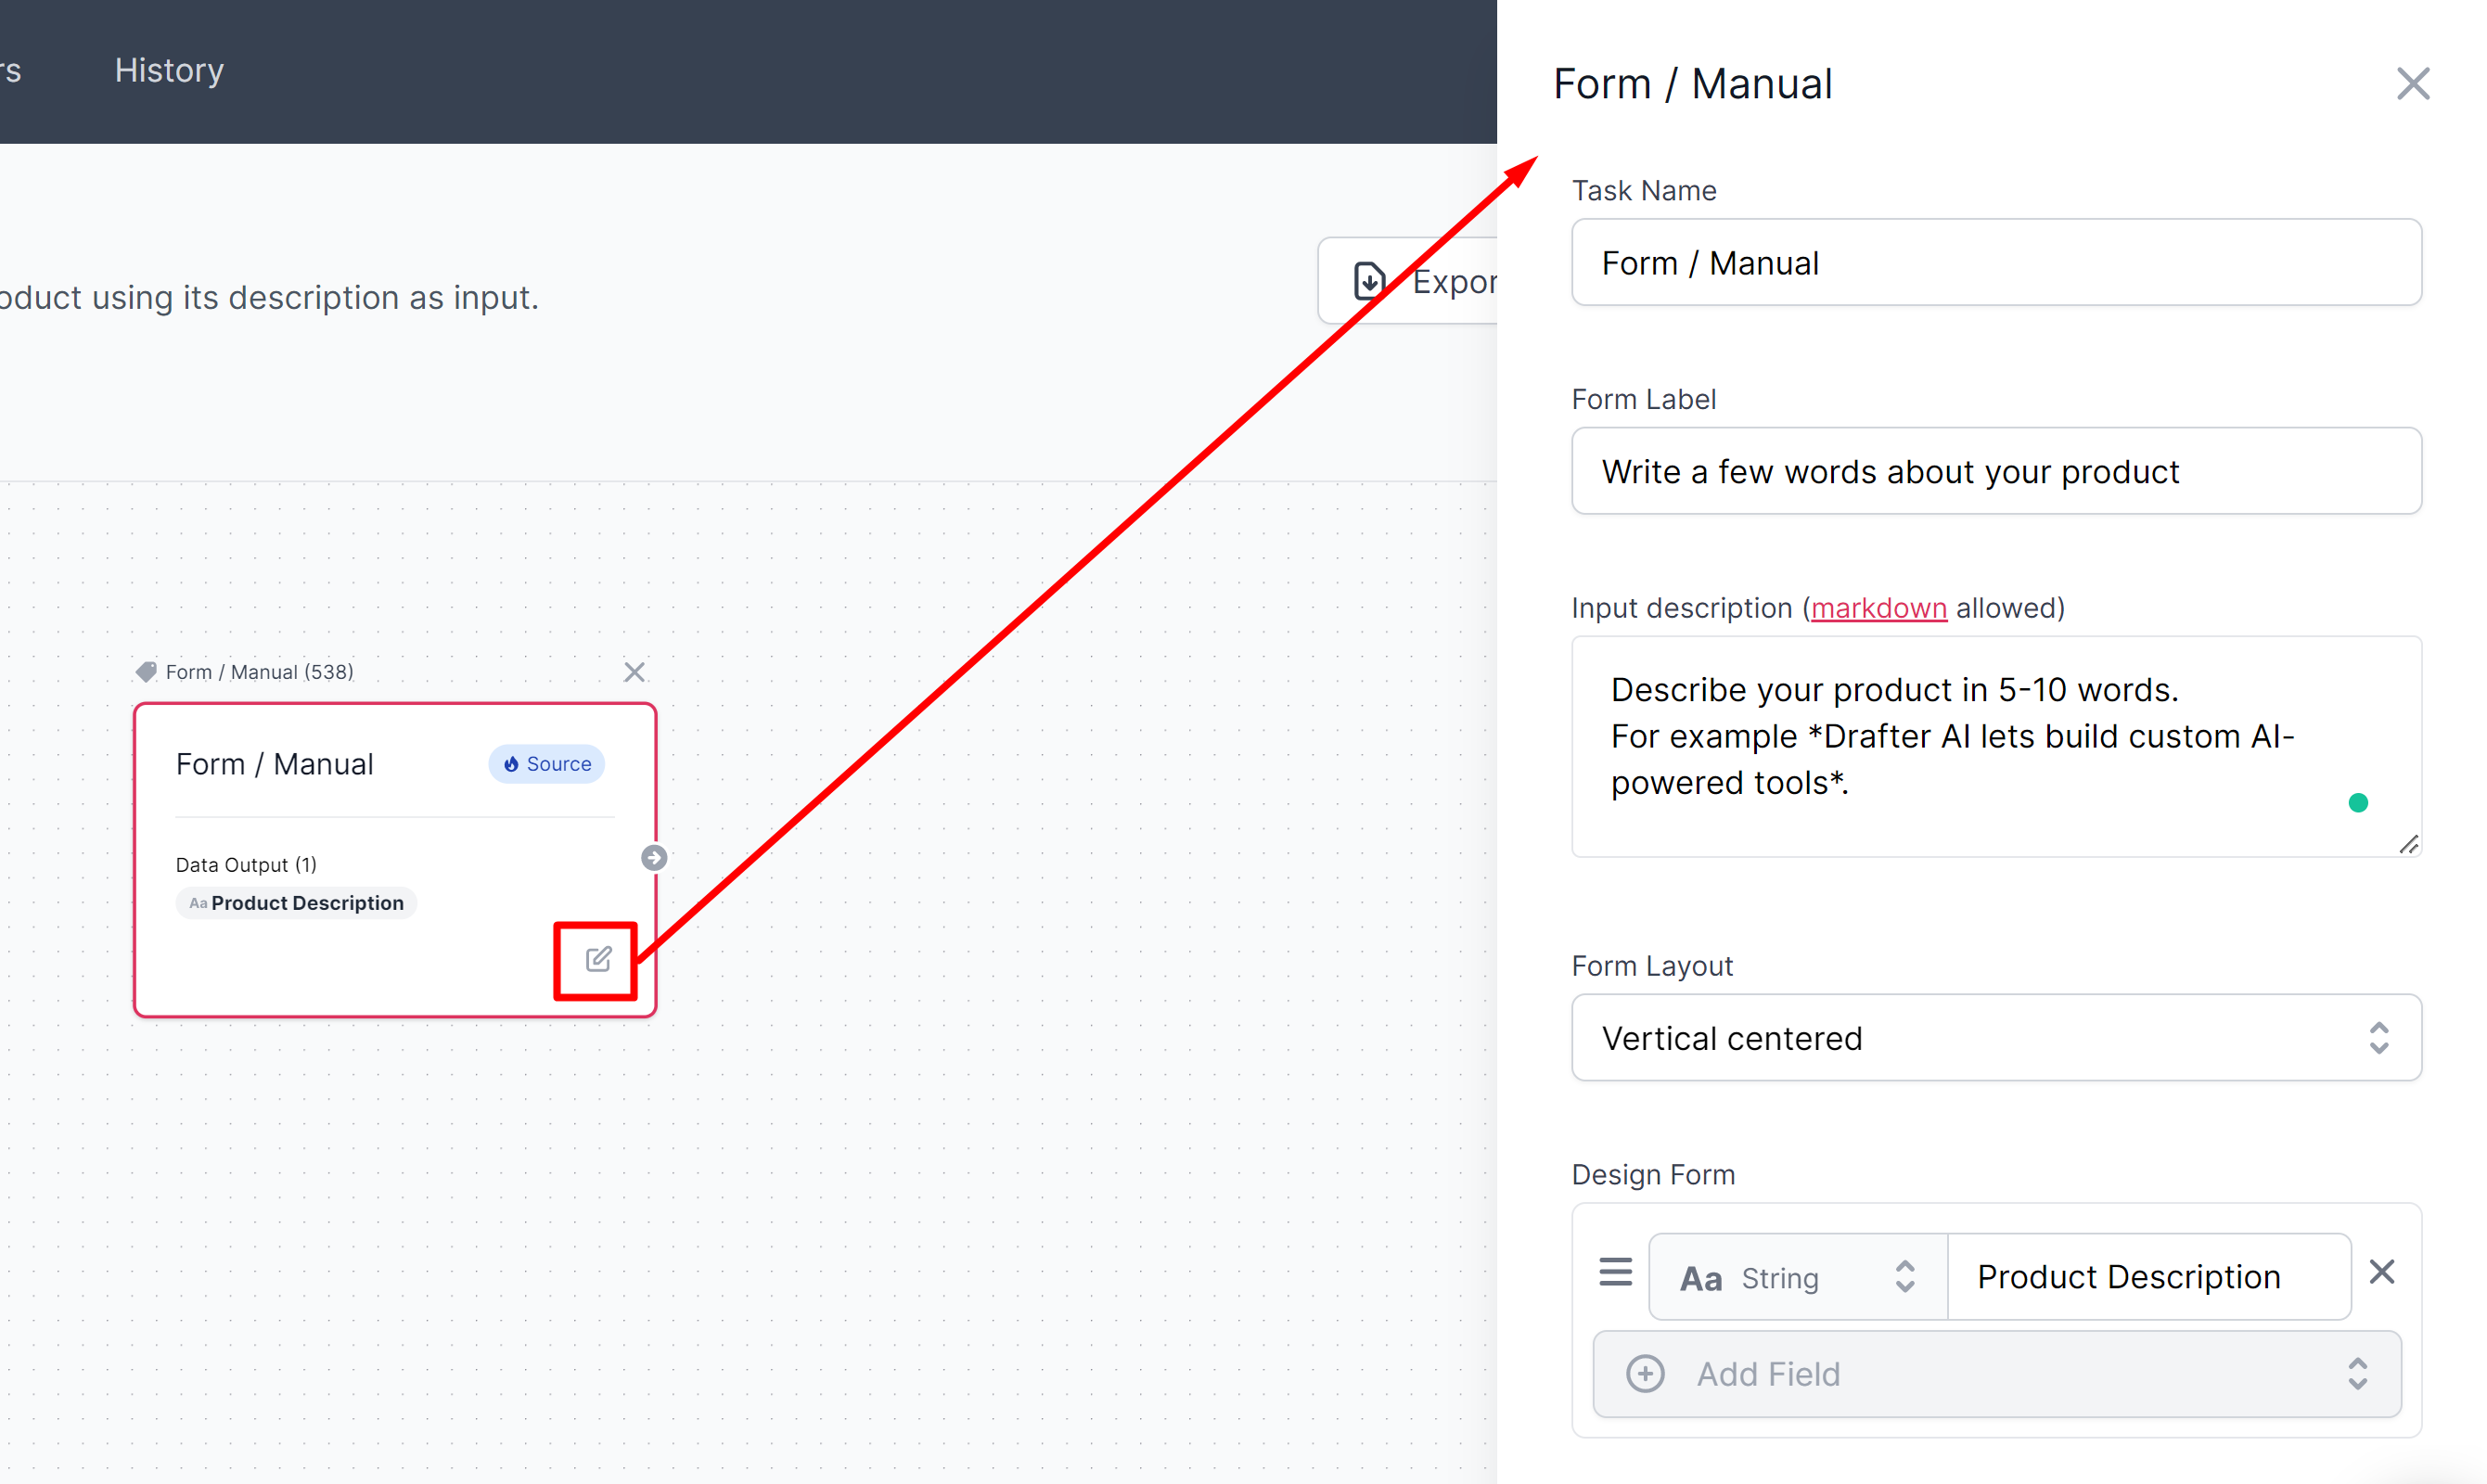
To do that, click the <mark style="background-color:blue;">**“Edit”**</mark> icon on the block in the working area:

<figure><img src="/files/tApn3mr91mv0RWpKQMYI" alt=""><figcaption><p>Configuring input</p></figcaption></figure>

Settings consist of the next fields:

<table data-column-title-hidden data-view="cards"><thead><tr><th>Field</th><th>What it does</th></tr></thead><tbody><tr><td><strong>Task name</strong></td><td>Defines how your input block is named in the workflow builder.</td></tr><tr><td><strong>Field label</strong></td><td>Defines a title of the workflow’s input in the Input step.</td></tr><tr><td><strong>Input description</strong></td><td><p>Provides details for end users about the way to input data. </p><p></p><p>You can use <a href="https://www.markdownguide.org/basic-syntax">markdown</a> there.</p></td></tr><tr><td><strong>Form layout</strong></td><td><p>Defines, how your input form looks like for end users.</p><p></p><p>Temporary deprecated.</p></td></tr><tr><td><strong>Design Form</strong></td><td><p>It’s the core of the input.</p><p></p><p>Defines data points (variables) that are used during the workflow as the input.</p></td></tr></tbody></table>

{% hint style="info" %}
Provide **an example of ideal input** in the description to ensure your users use the workflow properly.
{% endhint %}

### Design Form: Data Points

Every data point consists of:

a) **Data type** *(text(string), number, email, URL)*

b) **Name of the data point**

The name of the data point at the same time works as the label of the input field in the form for end users.

{% hint style="warning" %}
You can configure any number of input data points, but keep in mind that **all of them are mandatory** for end users.
{% endhint %}

{% hint style="info" %}
It’s not necessary to “use” all the input data points during the workflow - you can just save them from the input step to be mapped and displayed properly in the output.
{% endhint %}

Let’s learn about actions.


# Builder: Action

How to configure workflow actions

## Workflow Actions

There are several types of actions that could be used:

**a) Simple actions** - searches, text templates, website data extractors, different data sources, or regular expressions

**b) AI-powered actions** - text analysis, translations, classifications, text generation, image recognition, or speech recognition

Let’s see, how to set up actions.

## Setting Up Action

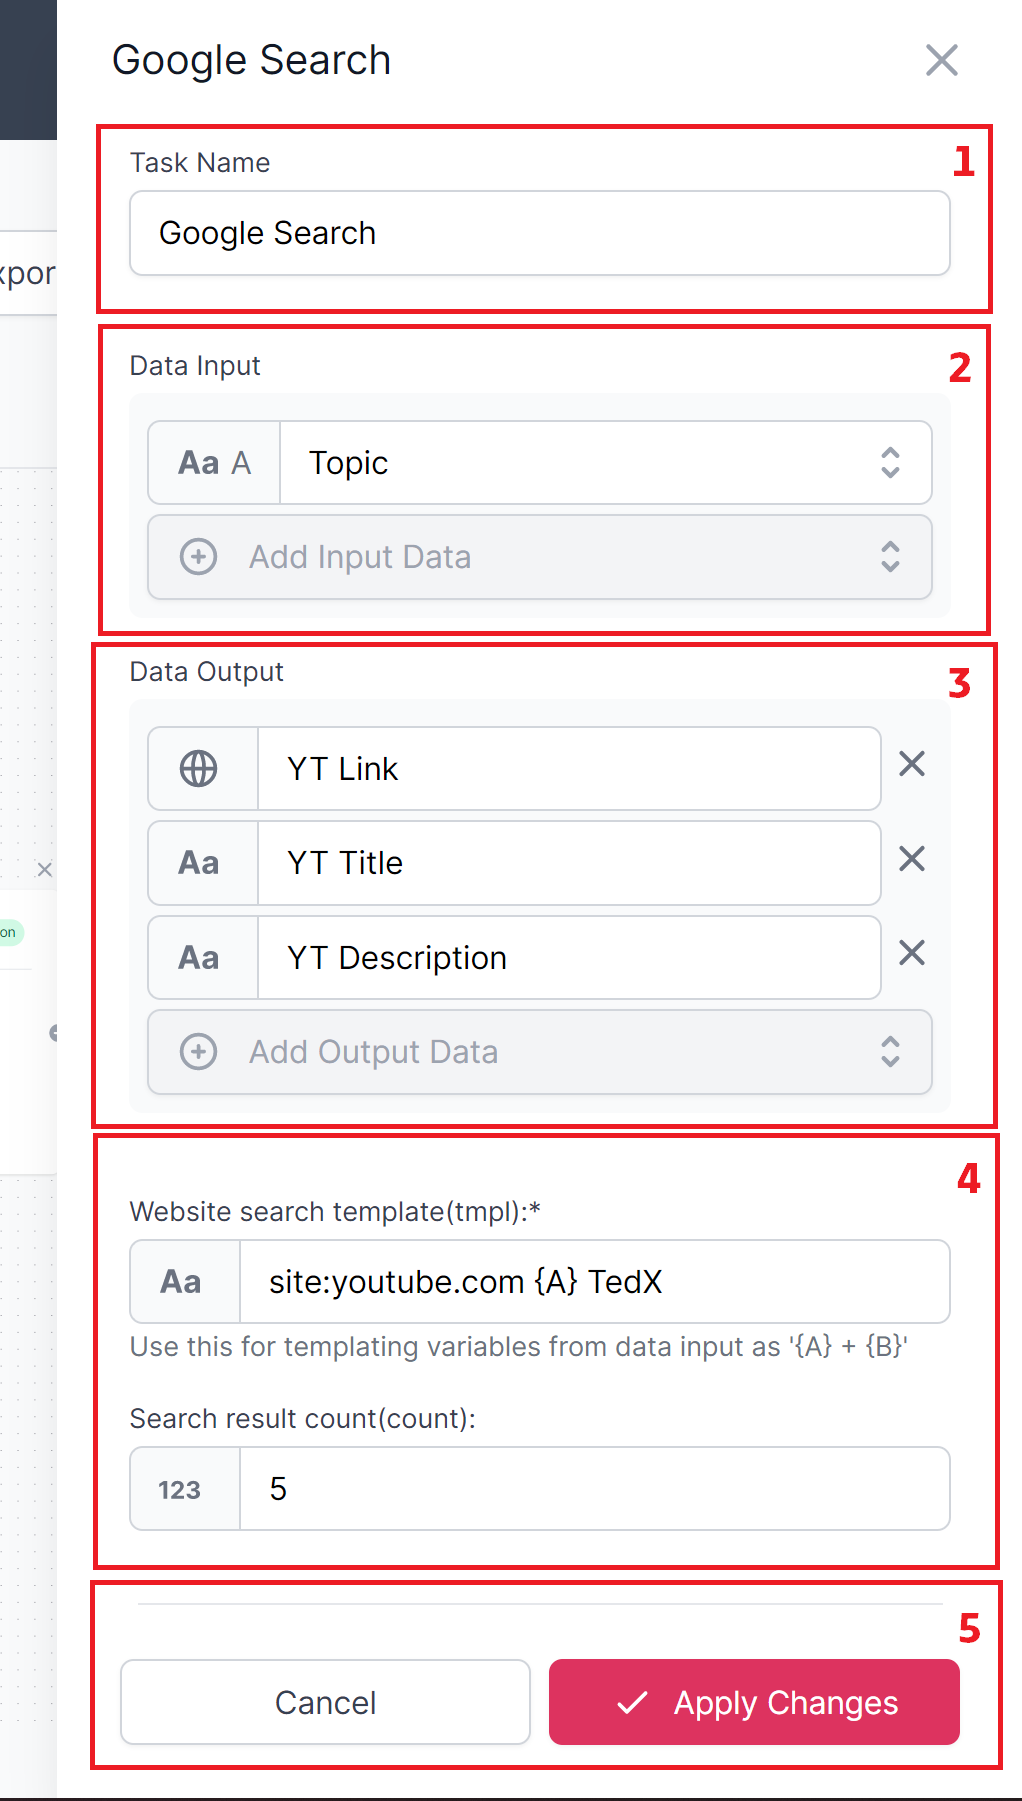
<table data-card-size="large" data-view="cards"><thead><tr><th></th><th></th><th></th></tr></thead><tbody><tr><td></td><td><p>Every action’s settings consist of the next elements:</p><ol><li><strong>Task Name</strong> - the displayed name of the module</li><li><strong>Data Input</strong> - data points (variables) that this module uses as input. There could be used several ones.</li><li><strong>Data Output</strong> - data points that are the results of this action. Could be several ones.</li><li><strong>Module-specific settings</strong> - some actions have specific settings. In the case of search, those settings are a search template (<a href="https://support.google.com/websearch/answer/2466433?hl=en">advanced search operators</a> could be used) and a number of search results to output.</li></ol></td><td></td></tr><tr><td></td><td><img src="/files/G77Hef8lxa82h9oLZeyF" alt=""></td><td></td></tr></tbody></table>

{% hint style="info" %}
Use data input as {A}, {B}, {C} variables to template your queries. In this example, the “Topic” input is {A} variable.
{% endhint %}

When you’re ready, remember to apply changes using a button (5).

They’re not saved automatically.

## Dealing with multiple results of the action

{% hint style="warning" %}
Some workflow blocks (search actions or text generations) may produce multiple results.&#x20;

Every action block after it **will be applied for EVERY variation** produced.
{% endhint %}

**Example:**&#x20;

You're building a personalization workflow and looking for the info about a target person or a company.&#x20;

Your search block returned x5 results. After this, you decide to generate x3 variations of personalized messages atop every search result data.

At the end of the workflow, you have **x15 personalized messages.**

<img src="/files/fa1yWxduC11NrWCOxvRw" alt="" class="gitbook-drawing">

{% hint style="warning" %}
If you use batch input processing, the same logic will be applied to EVERY entry in your batch.

If you have x100 entries in your batch and the workflow above, you'll get x1500 outputs of the workflow.
{% endhint %}

To make workflow deliver predictable results, you’ll need a third element - **a filter.**

Learn, how to work with them.


# Builder: Filter

How to filter out the inaccurate results during the workflow execution

Filters enable you to clarify conditions for proceeding with the workflow execution.

If the data doesn’t match the filter the workflow execution is terminated.

It’s important to clean your output data and ensure there are no irrelevant or empty fields.

Depending on the data type, different filter conditions could be applied.

## Setting Up Filters
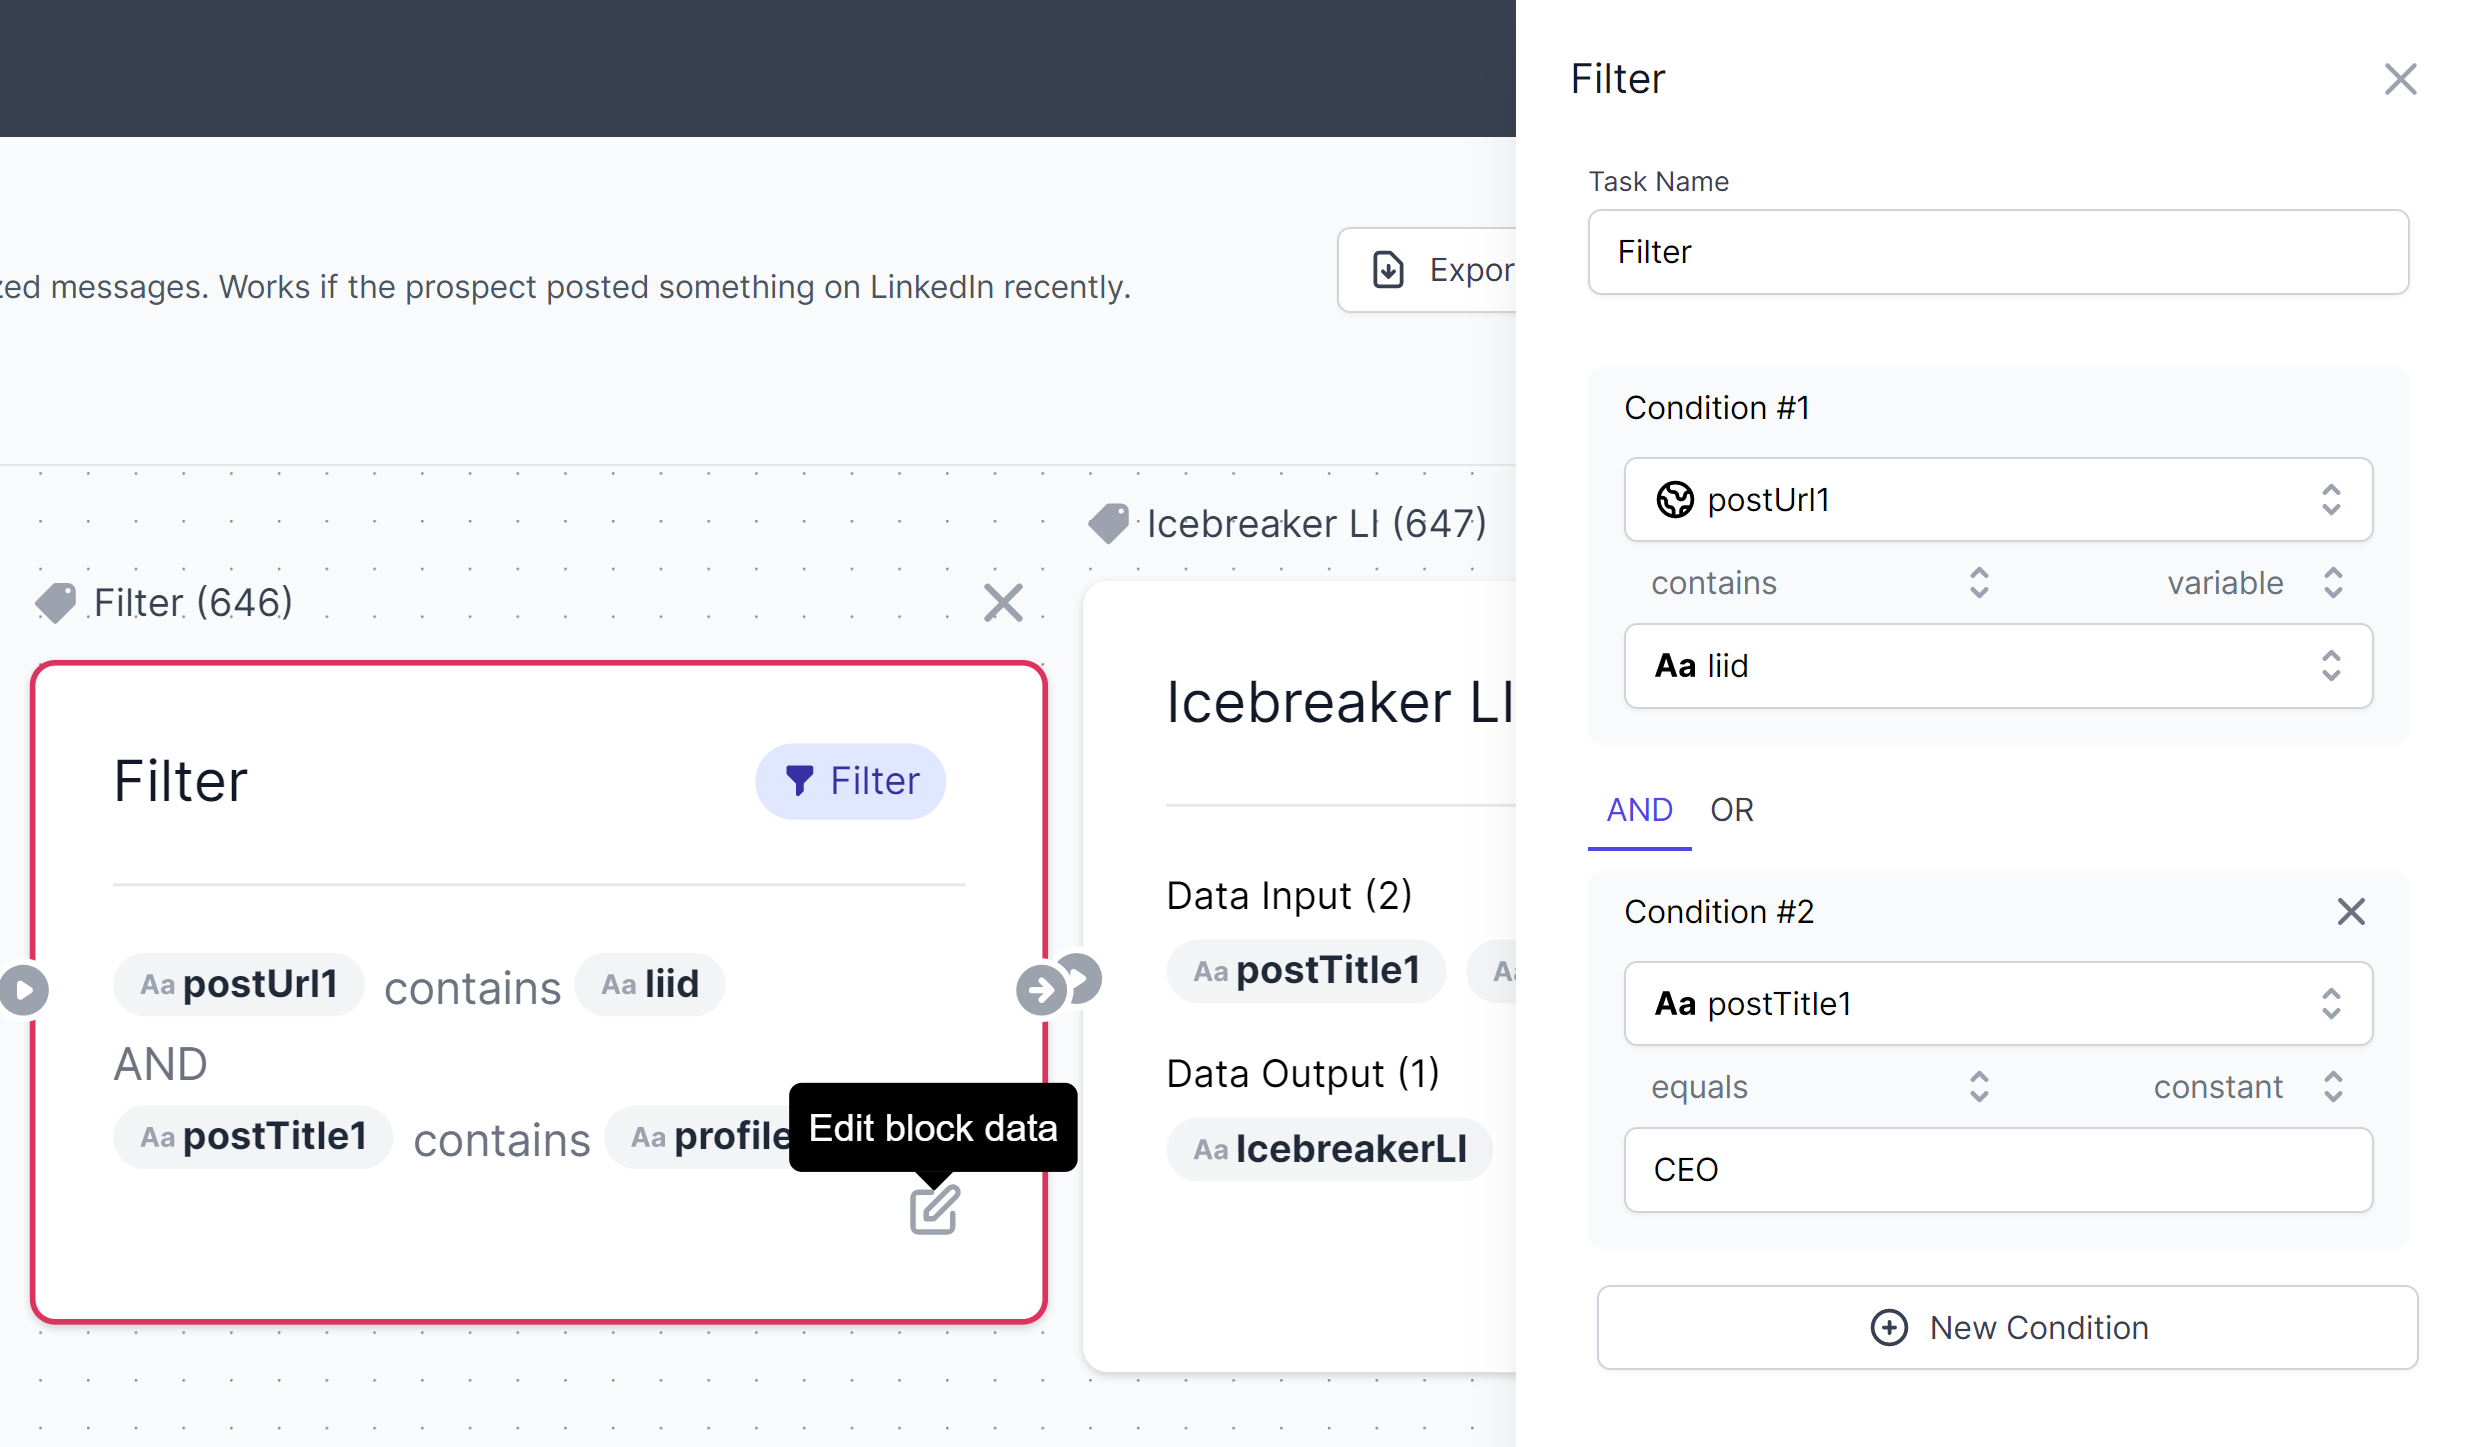
<figure><img src="/files/ZfWa6k6Z4cWTy7EGfWuK" alt=""><figcaption><p>How filter looks like</p></figcaption></figure>

The filter consists of conditions and relationships between them.

## Filter **Condition**

The singular rule for input data to match.

It consists of:

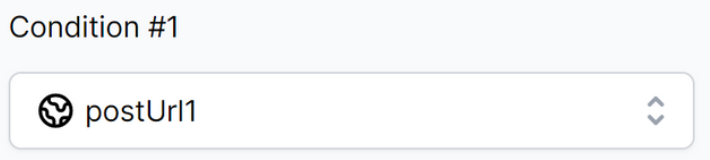
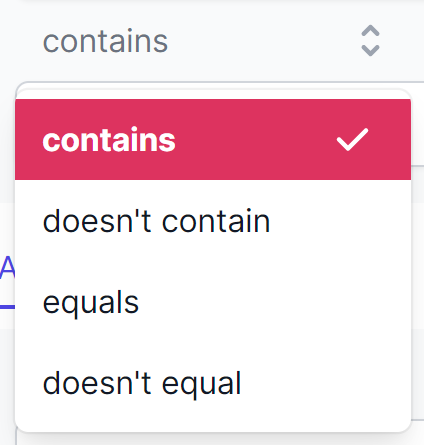
<table data-view="cards"><thead><tr><th></th><th></th><th></th></tr></thead><tbody><tr><td><strong>Input</strong> <strong>variable</strong></td><td>Data point variable, which is being filtered.</td><td><img src="/files/M3hM1HGwJdCeZ6ItuljW" alt=""></td></tr><tr><td><strong>Match class</strong></td><td>they’re different for texts/links and numbers.</td><td><img src="/files/uyU59Dr62HkOr0BCPY7L" alt=""></td></tr><tr><td><strong>Match type</strong></td><td>Could be compared to another variable or to regular text.</td><td>/</td></tr><tr><td><strong>Match Content</strong></td><td>We compare our input variable to it.</td><td>Could be provided manually or other data point variable. <img src="/files/ANmNHixfF5AHW0sSp14s" alt=""></td></tr></tbody></table>

## Conditions Relationships

Could be 2 types:

**1) AND.**

If two or more conditions are related to the *“AND”* option, it means that **ALL** of them should be met by input data to pass the filter.

**2) OR**

If two or more conditions are related to the *“OR”* option, it means that **ANY** of them should be met by input data to pass the filter.

## Adding and removing conditions

![](/files/p2SdETuDJdjqT6bsxz5M)

To add a new filter condition, click the <mark style="background-color:blue;">**“New Condition”**</mark> button.&#x20;

To remove the filter condition, click the <mark style="background-color:blue;">**“X”**</mark> icon in the top right of the condition block.

The first condition can’t be removed. If you don’t need any of the filter conditions to work, just remove the filter block from the workflow itself.

As we learn all the basic elements of the workflow, let’s build one.


# Create workflow

How to create your first workflow step by step.

Let’s create a simple workflow, that generates Google Ads for our products. It will require only a brief product description as input.

Give a try to this interactive demo:

{% @arcade/embed flowId="FvDdAwCjLULlOAUqWQnd" url="<https://app.arcade.software/share/FvDdAwCjLULlOAUqWQnd>" %}

To start creating a new workflow, proceed to the <mark style="background-color:blue;">**“Workflows”**</mark> menu item and click the <mark style="background-color:blue;">**“New Workflow”**</mark> button in the top right.

<figure><img src="/files/PTLcRhsfWx1Vp59VOLNz" alt=""><figcaption></figcaption></figure>

## Step 1: Edit General Settings

The first thing to do is to configure is general settings of the newly created workflow.

![](/files/0Zp1iABYZbk8a8OZbE1H)

### **Workflow Name**

Your workflow will be displayed under this name:

* in the list of workflows
* as a workflow title for other users
* in the 3rd party integrations

{% hint style="info" %}
This name should be: descriptive, brief, and unique.&#x20;

It answers the question: ***“What does this workflow do?”***
{% endhint %}

###

### **Workflow Status**

Statuses define the access and execution rights for the workflow.

There are two statuses:

**A. Draft**

The default state for any newly created workflow. It means that:

* Only owners can see it
* Only owners can use it
* It’s unavailable via API and 3rd party integrations
* It can be deleted

{% hint style="info" %}
It’s highly recommended to keep your workflow in the **“Draft”** state until you completed building and tested it.
{% endhint %}

**B. Published**

When the workflow is built you change its status to *“Published”*.

It means that:

* Everyone can see it
* Everyone can use it
* It’s available via API and 3rd party integrations
* It can’t be deleted until its status is changed back to *“Draft”* again.

###

### **Workflow Description**

The description provides additional info for users about the purpose of the workflow to set proper expectations.

{% hint style="info" %}
Keep it short yet concise.&#x20;

Answer the next questions: *“What does it do?”* and *“What I need to get started”*?
{% endhint %}

Don’t worry about its length limitations - you’ll be able to provide more details while setting up the input.

###

### **Workflow Icon**

It’s just a visual representation of your workflow in the list of workflows or in the left bar (if the workflow is “favorite”).

{% hint style="info" %}
Make it unique and relevant to the purpose of the workflow.&#x20;

Ideally, all the icons for your workflows should be consistent.
{% endhint %}

Everything could be edited later.

Click <mark style="background-color:blue;">**“Start Creating”**</mark> to build workflow.

## Step 2: Add input

Let’s start building the workflow.

Each workflow starts with the “Input”.

It defines:

1. Properties of the data necessary for the workflow to get started.
2. How the input form looks like for the end users.

Follow the next steps.

### 2.1 Add input block/task.

To add it to the working area drag-drop it from the right toolbar:

<figure><img src="/files/keV0M5lbIMsO0qfjbgGE" alt=""><figcaption><p>Adding input to the workflow builder</p></figcaption></figure>

### 2.2 Edit input settings

To do that, click the <mark style="background-color:blue;">**“Edit”**</mark> icon on the block in the working area.

<figure><img src="/files/tApn3mr91mv0RWpKQMYI" alt=""><figcaption></figcaption></figure>

Settings consist of the next fields:

**Task name**

Define how your input block is named in the workflow builder.

Leave it as is.

**Field label**

Define the title of the workflow’s input in the Input step.

**Input description**

Provide details for end users about the way to input data. You can use [markdown](https://www.markdownguide.org/basic-syntax) there.

**Form layout (deprecated)**

Do nothing there.

**Design Form**

Add one text (string) variable and name it **“Product Description”.**

Let’s configure the actions of the workflow.

## Step 3: Add actions

Google Ads consists of two parts: Headline and Body.

As we already have AI models to generate them in the inventory, just add them to the workflow.

### 3.1 Find actions

To find them out, use the search bar on the right.

![](/files/jKm52nJqjabu9ZdmECNl)

### 3.2 Add actions

Add them to the workflow by drag-n-dropping them into the working area:

<figure><img src="/files/PvR2ODtQ78nUQiSVolsq" alt=""><figcaption><p>Blocks to connect to make Google Ads generator work</p></figcaption></figure>

They won’t work until:

**a) they’re connected**

**b) they have proper input.**

{% hint style="warning" %}
Currently, all the actions are executed in a strict order.&#x20;

**Don’t try to make actions work in parallel** - actions configured earlier will be broken.&#x20;

Every action must be connected to others.
{% endhint %}

### 3.3 Connect actions

For actions to start working, connect them by connecting the dots.

Hover the output of the previous action or input, and drag the connection to the input dot of the next action.

<figure><img src="/files/b6FztJCU21iqyYMCNc76" alt=""><figcaption><p>Connecting blocks to make workflow work</p></figcaption></figure>

Ensure they’re connected before proceeding.

### 3.4 Configure actions

To make the action work, choose the required input data point from the previous input blocks or actions.

{% hint style="info" %}
By default, action blocks have output data points suggested, but **have Empty input data points.**
{% endhint %}

<figure><img src="/files/D4qxqxwe5ZuNglzvKOIw" alt=""><figcaption><p>Configuring action block</p></figcaption></figure>

Let's configure the action block:

**3.4.1 Open the settings of the action block**

**3.4.2 Choose&#x20;**<mark style="background-color:blue;">**“Product Description”**</mark>**&#x20;as an input for both modules**

It’s the one we set as the input of the whole workflow.

**3.4.3 Rename output data points to be more understandable.**

Let’s use *<mark style="color:blue;">“GA Headline”</mark>* and *<mark style="color:blue;">“GA Body”</mark>* for outputs of Google Ads Headline and Google Ads Body modules respectively.

When every action is set properly, the green labe*l “action”* appears in the top right corner of the block.

![](/files/TLns8IuXKVRA3f1vMviX)

Let’s test how this workflow works.


# Launch workflow

How to launch and test your workflow to ensure it's workable.

After creating the workflow test it yourself first.

To do that, click the <mark style="background-color:blue;">**“Run Flow”**</mark> button in the top right corner of the workflow builder.

<figure><img src="/files/tBS7CHzkgxMECK2w8al9" alt=""><figcaption><p>Launching the workflow</p></figcaption></figure>

After that, you’ll be redirected to the input tab.

This is the automatically-generated input form, as seen both by owners and end users.

<figure><img src="/files/dWQllt7rf8pev92iLz2l" alt=""><figcaption><p>Auto-generated input form based on the workflow logics</p></figcaption></figure>

All the fields there are mandatory and with validation.

The list on the right enables you to choose between three types of input:

1. **Single entry** - enables you to work with the workflow by sending it one input and getting its results.
2. **Upload Batch** - enables you to test input at scale by providing a CSV or XSLX with up to 200 input data entries at once.
3. **Integrations** give you a quick start for integrating your workflow with 3rd party apps and tools.

Use <mark style="background-color:blue;">**“Single entry”**</mark> for now.

### 1. Enter the input

For the first time let’s try *“Drafter AI lets build custom AI-powered tools”*

<figure><img src="/files/5emkUIbj0SynLSzetBhX" alt=""><figcaption><p>Providing test input</p></figcaption></figure>

Click <mark style="background-color:blue;">**“Get Results**</mark>*<mark style="background-color:blue;">**”**</mark>* to start the workflow execution.

### 2. Wait a bit

It usually takes up to 2 mins to execute any workflow.

The current one should be handled in less than 1 min.

<figure><img src="/files/NrR7xjO0Dy6IV9NOJWXs" alt=""><figcaption><p>Processing results</p></figcaption></figure>

### 3. Check the output

After launching a new or modified workflow you can see two screens.

**A) There are data results but it’s not displayed yet:**

<figure><img src="/files/u6EqnmYqzvh59Oa7ngXr" alt=""><figcaption><p>There are results. You just need to visualize them.</p></figcaption></figure>

It means that the workflow has been processed successfully, but you need to configure, how to display its results.

To do that, proceed to:

{% content-ref url="/pages/l029h2rUrPS5THOSyVGz" %}
[Design output](/build/create-workflow/design-output)
{% endcontent-ref %}

**B) There are no data results at all:**

<figure><img src="/files/BErIfH0vDt2IuHdD0HMb" alt=""><figcaption><p>No results at all</p></figcaption></figure>

It means that something went wrong due to three reasons:

1. **Input data is incorrect.**
2. **Something wrong with the workflow itself.**
3. **There is no data from external or public sources used in the workflow.**

Learn how to dive deeper into identifying reasons using *Debug* module:

{% content-ref url="/pages/UXBOnVir9iz93MLCqf7C" %}
[Debug workflows](/maintain/debug-workflows)
{% endcontent-ref %}

Learn more about possible issues:

[Possible issues and how to handle them](https://www.notion.so/Possible-issues-and-how-to-handle-them-9501b2938ebb43d6b0bbcbe30b76e458)

Jump to batch processing:

{% content-ref url="/pages/8XHyN5oBPrzgafwVqC7m" %}
[Process inputs in batches](/scale/process-inputs-in-batches)
{% endcontent-ref %}

Jump to integrations:

{% content-ref url="/pages/GL2EFOEVf1opG9ebqe5g" %}
[Integrate Drafter AI to other apps with Make.com](/scale/integrate-drafter-ai-to-other-apps-with-make.com)
{% endcontent-ref %}


# Design output

How to visualize workflow results.

After launching a new or modified workflow you can see this:

<figure><img src="/files/XaNPzQwgxyWwdgHk0boN" alt=""><figcaption><p>How workflow output looks like for the first time</p></figcaption></figure>

It means that there is data, but you need to display it.

Also, there are cards added as a visualization by default.

{% hint style="info" %}
You can change the way to visualize data later.
{% endhint %}

Let’s add some data outputs.

### Add data outputs

For our Google Ads generator, we have to output both Headlines and Bodies generated.

To do that, proceed to the sidebar and expand the data output list:

<figure><img src="/files/j9NhEzDyVOeR3svJ7G33" alt=""><figcaption><p>Add some data points to the cards</p></figcaption></figure>

There are both Google Ads headlines and bodies generated during the workflow’s execution as well as input we provided before.

{% hint style="info" %}
A list of data outputs for the workflow stores **every data point** provided as input or generated during the workflow’s execution.&#x20;

With displaying both inputs and data output results you can compare them on the go.
{% endhint %}

Display headlines and bodies in the cards by drag-n-dropping them from the right sidebar to the card area:

<figure><img src="/files/tqLYoo7G4mH2TAbs4Pcp" alt=""><figcaption><p>How results look like on cards</p></figcaption></figure>

Those results will be displayed in as many cards as it’s required to cover all the combinations of Google Ads headlines and bodies generated by AI.

In our case, we have 3 variations of Google Ads headlines and 3 variations of Google Ads Bodies which results in 9 combos and 9 cards displayed respectively.

{% hint style="info" %}
Only the first card in the group is editable in terms of adding, removing, or re-ordering the data outputs.
{% endhint %}

###

### Add visualizations

Sometimes we need different visualization for different types of data outputs.

For example, rows work better to display long texts while tables are great for quickly checking multiple results before exporting them.

{% hint style="info" %}
You can have multiple visualizations in the same output view.

It works best when you need to display different data outputs in different ways.
{% endhint %}

To add another visualization for the same data output:

1. Expand the <mark style="background-color:blue;">**“Visualization”**</mark> menu on the right sidebar.
2. Drag-n-drop the visualization to the empty space of the output area.

Try displaying our Google Ads variations as a table:

<figure><img src="/files/egQYXSgTwDn69cFXU6e6" alt=""><figcaption><p>Displaying the same results but in a table</p></figcaption></figure>

The tables cover all the data points provided as input and generated during the workflow execution in a designed order.

### Remove visualizations

If you don’t need any of the visualizations anymore, simply remove them by clicking <mark style="background-color:blue;">**“X”**</mark>:

<figure><img src="/files/1xAtbRKEnjwhUiDhug37" alt=""><figcaption><p>Removing visualization components (data remains safe)</p></figcaption></figure>

###

### Reorder visualizations or data outputs

To reorder data output blocks or visualizations just click the related icon, drag the block to change their order, and release the button:

<figure><img src="/files/p94OojyczUduiXiJ3TqS" alt=""><figcaption><p>Reordering visualization components</p></figcaption></figure>

The order of data outputs on other cards or rows will be changed automatically in the same way as you did it for the first card/row.

The same works with visualizations.

{% hint style="info" %}
Regular users can’t change the order of data outputs or visualizations.
{% endhint %}

Need to give a try to different input?

### Provide different input

To do that you don’t need to go back to the *“Input”* tab.

Just click the <mark style="background-color:blue;">**“New Input”**</mark> button in the top actions bar and provide input data again:

<figure><img src="/files/L5pu34r3Wt26JMzCf04X" alt=""><figcaption><p>Providing another input query right from the output interface</p></figcaption></figure>

Not happy with the results?

### Execute workflow once more

AI is about probabilities. Sometimes it delivers exactly what you need, sometimes results may be irrelevant or poor.

It’s easy to give AI another try.

Just click the <mark style="background-color:blue;">**“Generate More”**</mark> button:

<figure><img src="/files/cCXPPbeWWWZ3xomD1J87" alt=""><figcaption><p>Repeating workflow execution with the same input but expecting different result from generative AI</p></figcaption></figure>

It will start the workflow execution with **the same data input** you had before.

After that, proceed to copying or exporting results for further use.


# Export output results

How to export results to work with them outside.

After getting the output you can:

1. Copy the best results from a specific card or row
2. Export all of them as CSV.

### Copying selected results

To copy workflow results, just click the <mark style="background-color:blue;">**“Copy”**</mark> button in the card or row:

![](/files/QIlX13AURzPPHDMmi029)

All the data outputs from the card will be copied to the clipboard automatically in the same order you have them in the card.

### Exporting all results

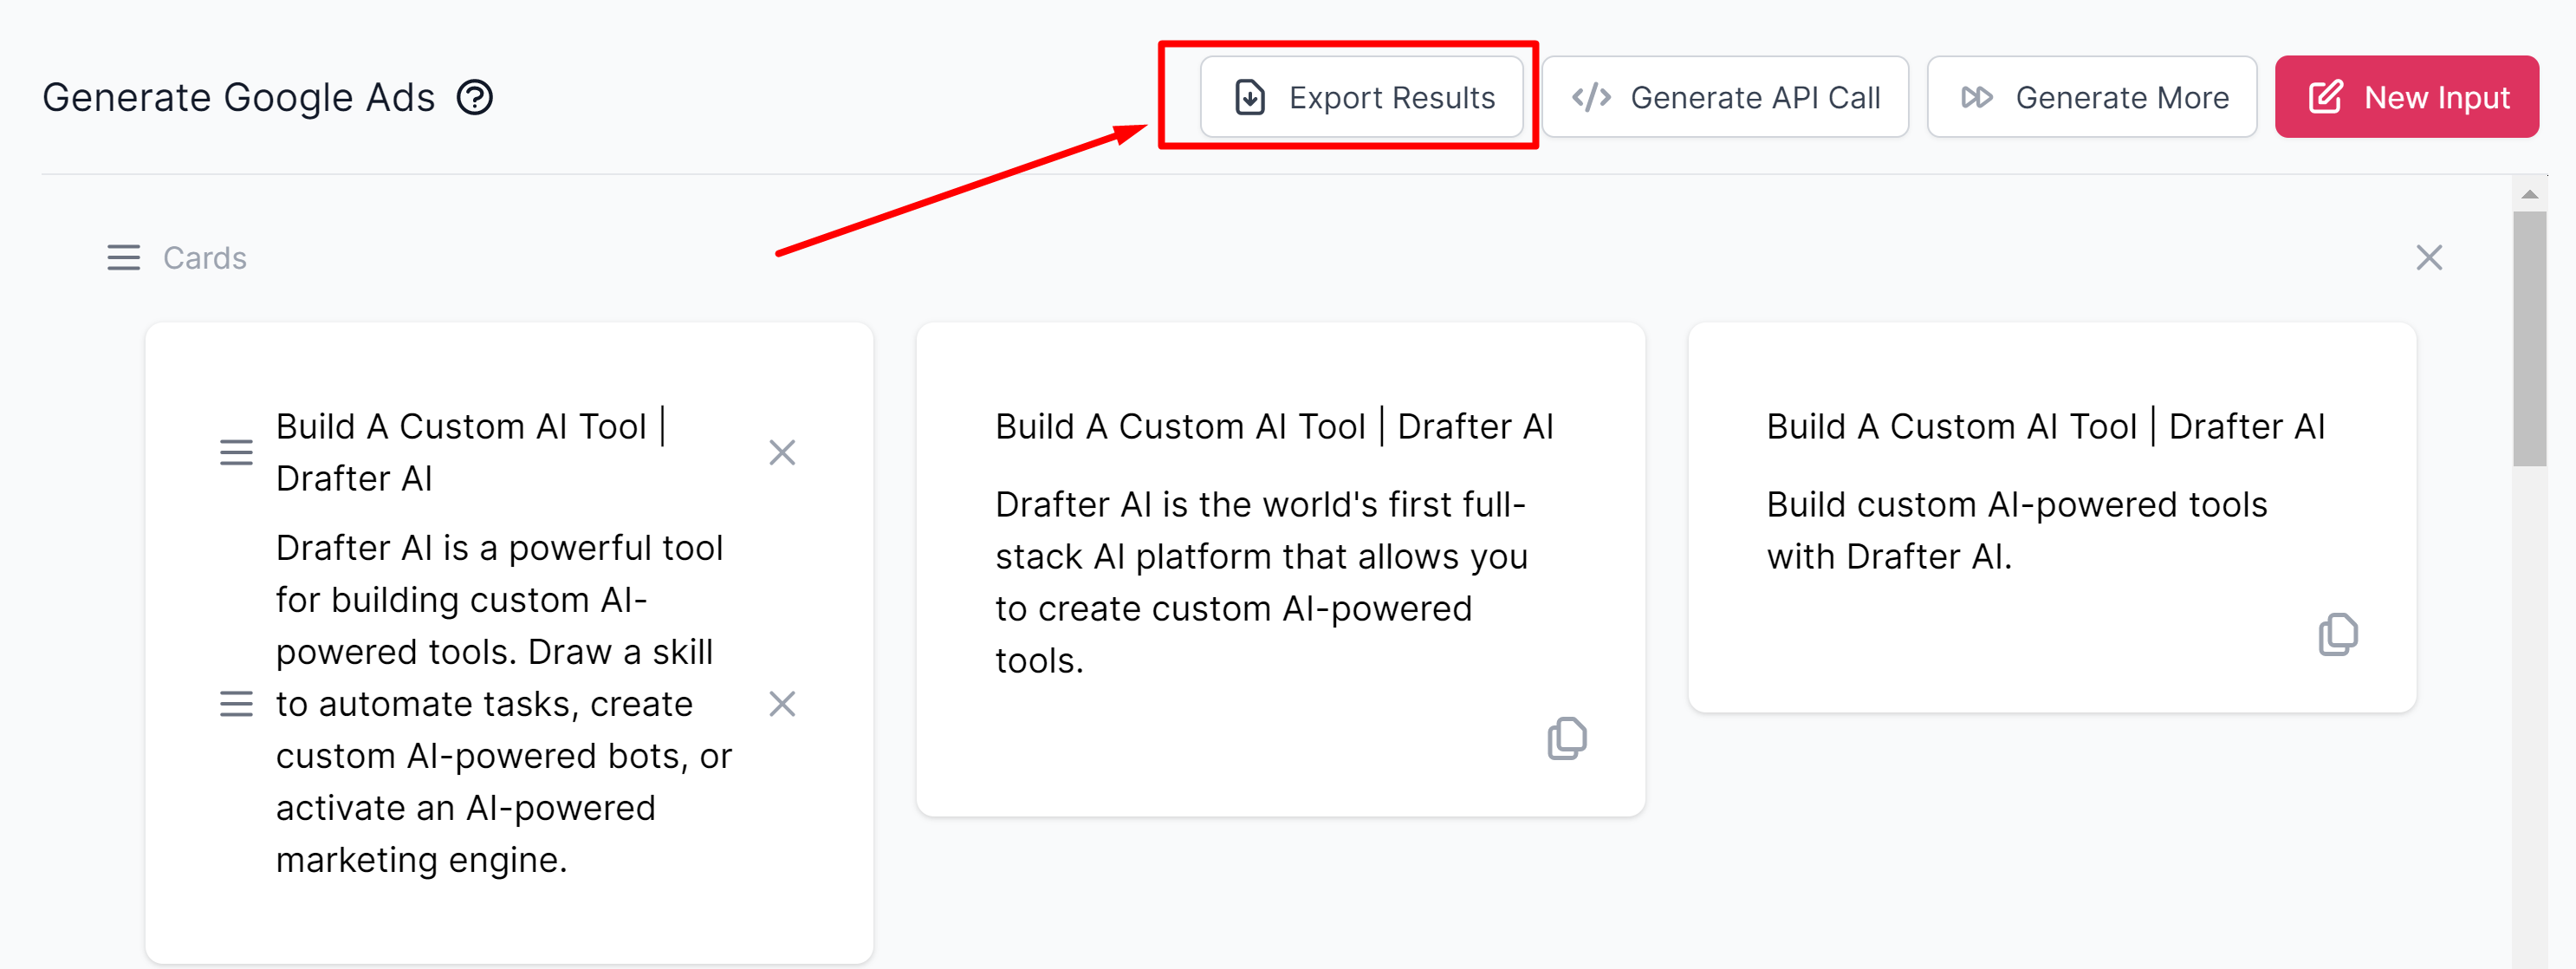
To export all the data outputs and every combination of them as CSV, click the <mark style="background-color:blue;">**“Export Results”**</mark> button in the top action bar:

<figure><img src="/files/hXYI6ryvaPecHmX77c1h" alt=""><figcaption><p>Exporting results</p></figcaption></figure>

Save the CSV file on your PC to review later or import it to other tools you use.

If everything worked fine for your workflow once, let's dive deeper into the pricing model.


# Align Pricing Model

Make workflows fit your business model or budget

## Pricing model

Pricing for Drafter AI works on a pay-per-use basis.

You have packages of 1,000,000 credits each, and the overall bill increases depending on the number of credits spent during the month.

For example, if you spend less than 1,000,000 credits monthly, you’re charged for only one package at the end of the billing period (month).

If you exceeded the package size and spent 1,500,000 credits during the same month, you’ll be billed for 2 packages and so on.

{% hint style="info" %}
If your credit consumption drops, the price goes down as well.
{% endhint %}

## What is an AI credit?

Credits are a universal measurement of computational resources specific tasks consume.

While Drafter AI has hundreds of different data sources and AI modules, all of them consume resources differently.

{% hint style="info" %} <mark style="color:blue;">**Example**</mark>&#x20;

It may take 7000 credits to recognize an image but just around 100 to generate ads headline.
{% endhint %}

## How to keep track of your credits

You can keep track of your credits in 3 ways.

**1. Check the overall number of credits left.**

First of all, track how many credits are left in your current package:

![](/files/WCeDBfqx0uqC2pRyynwv)

**2. Keep track of workflow estimations**

When building workflow, refer to the estimated number of credits that it will consume (per one entry) using the tracker at the bottom of the workflow builder page:

<figure><img src="/files/6XMOFLtLGa1p4TooEdVu" alt=""><figcaption><p>Estimating cost of a single workflow execution</p></figcaption></figure>

**3. Check “History”**

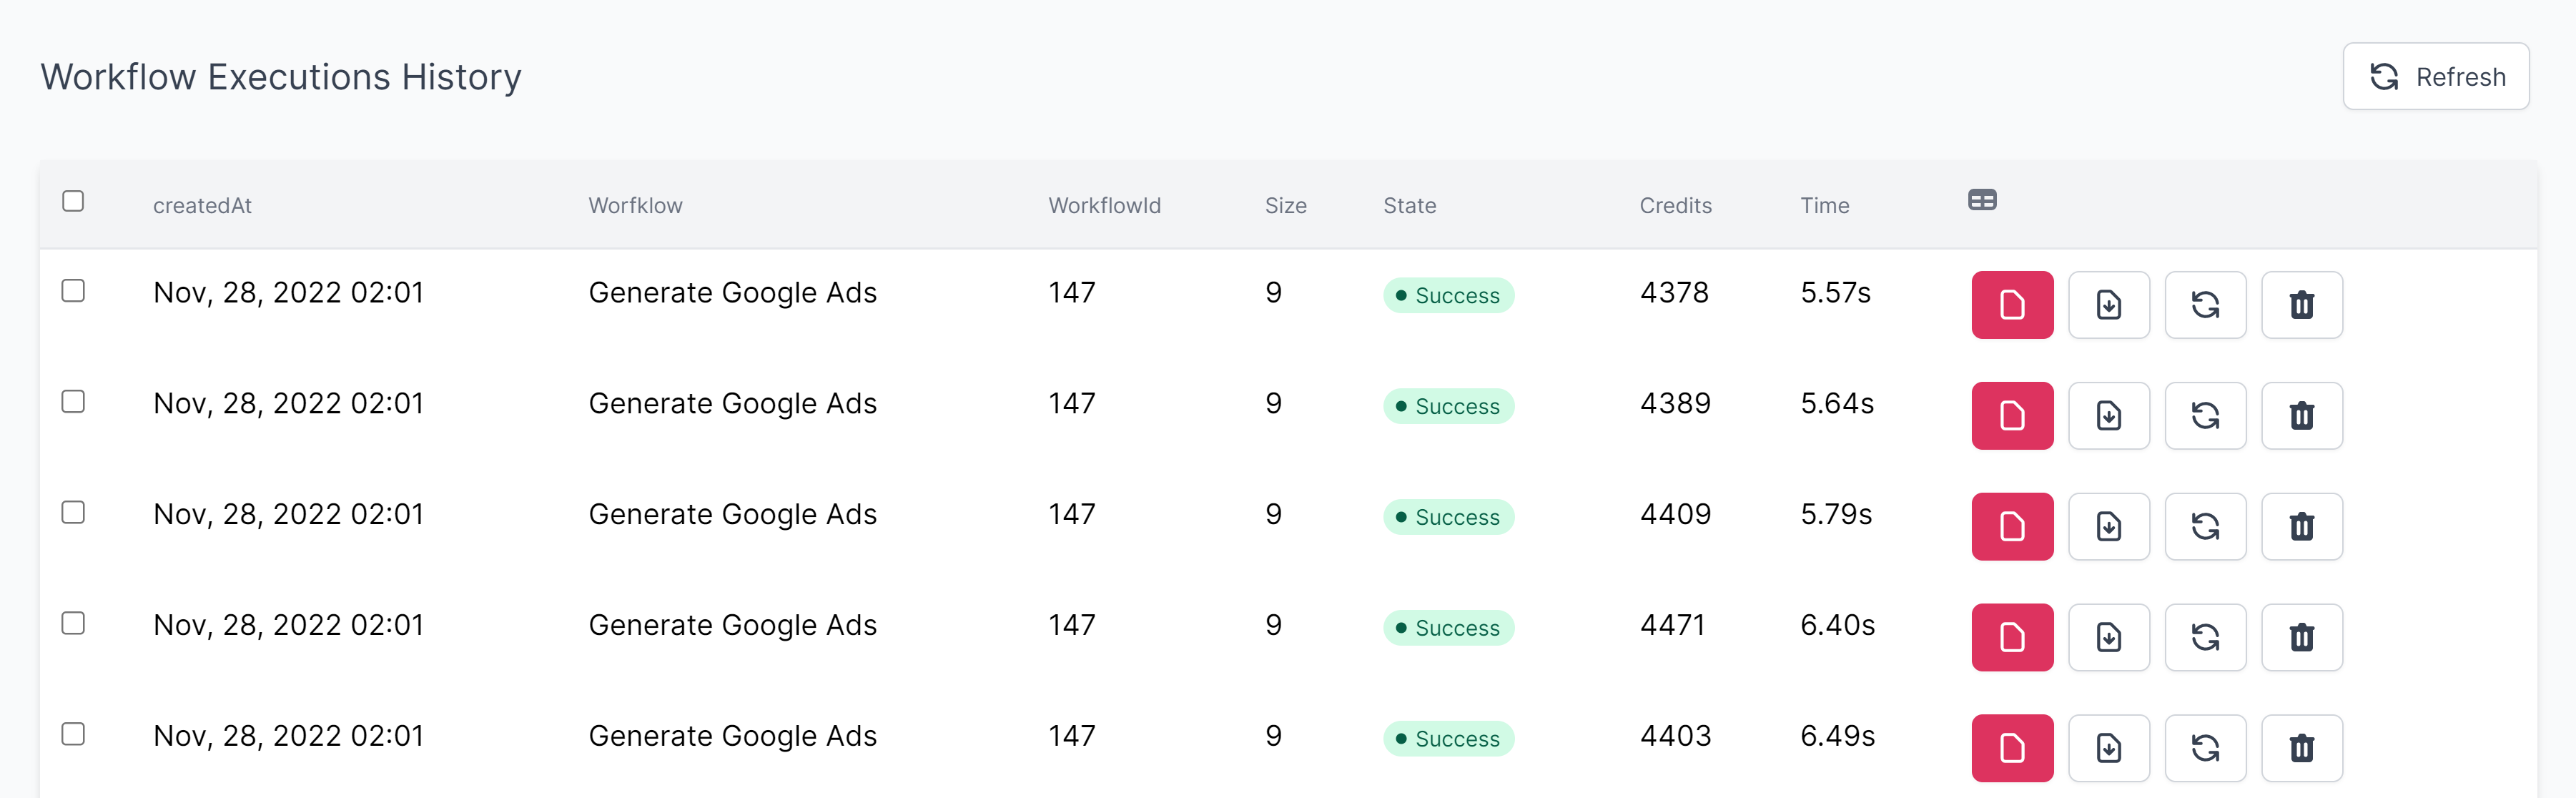
Refer to <mark style="background-color:blue;">**“History”**</mark> to check, how many credits were spent on workflow executions before:

<figure><img src="/files/4jZ9HwQAq5DJRf1qGzCS" alt=""><figcaption><p>Getting real costs in credits and time</p></figcaption></figure>

To make initial calculations easier, refer to the table of approximate consumption for different AI blocks.

## How much do different AI blocks cost in credits?

5 March 2023

<table><thead><tr><th width="270">AI Block</th><th width="88">Pack</th><th width="160">Type of unit</th><th>Cost in AI credits</th></tr></thead><tbody><tr><td>GPT Text Generation</td><td>1000</td><td>Words</td><td>1000</td></tr><tr><td>GPT Text Generation - Economy</td><td>1000</td><td>Words</td><td>100</td></tr><tr><td>Sentiment Recognition</td><td>1000</td><td>Words</td><td>100</td></tr><tr><td>Language Detection</td><td>1000</td><td>Words</td><td>100</td></tr><tr><td>Key Phrases Extraction</td><td>1000</td><td>Words</td><td>100</td></tr><tr><td>Topic Identification</td><td>1000</td><td>Words</td><td>100</td></tr><tr><td>Custom Classification</td><td>1000</td><td>Words</td><td>100</td></tr><tr><td>Entity Extraction</td><td>1000</td><td>Words</td><td>100</td></tr><tr><td>Web Data Extraction</td><td>1</td><td>Page</td><td>5</td></tr><tr><td>Public Search</td><td>10</td><td>Results</td><td>50</td></tr><tr><td>Internal Search</td><td>10</td><td>Results</td><td>50</td></tr><tr><td>Translation</td><td>1000</td><td>Words</td><td>2000</td></tr><tr><td>PDF Recognition</td><td>1</td><td>Page</td><td>100</td></tr><tr><td>Twitter Global Search</td><td>1</td><td>Request (Up to 500 Tweets)</td><td>10000</td></tr><tr><td>Twitter Profile Info</td><td>1</td><td>Request (Up to 500 Tweets)</td><td>10000</td></tr><tr><td>Check Readability</td><td>TBD</td><td></td><td></td></tr><tr><td>Image Recognition</td><td>TBD</td><td></td><td></td></tr><tr><td>Image Generation</td><td>TBD</td><td></td><td></td></tr><tr><td>Speech Recognition</td><td>TBD</td><td></td><td></td></tr><tr><td>Speech Generation</td><td>TBD</td><td></td><td></td></tr><tr><td>Video Generation (Actors)</td><td>TBD</td><td></td><td></td></tr></tbody></table>

Now you're ready to launch.

If you're building integration, proceed to:

{% content-ref url="/pages/GL2EFOEVf1opG9ebqe5g" %}
[Integrate Drafter AI to other apps with Make.com](/scale/integrate-drafter-ai-to-other-apps-with-make.com)
{% endcontent-ref %}

{% content-ref url="/pages/P89ekv9EFnMhZoW5dZmk" %}
[Get started with developer API](/scale/get-started-with-developer-api)
{% endcontent-ref %}

If you're using it for internal purposes, proceed to:

{% content-ref url="/pages/t04dBvpGaOIEHYWzYsZR" %}
[Invite users](/launch/invite-users)
{% endcontent-ref %}

If you plan to use Drafter AI's web platform for public access, let's start with applying your brand.


# Apply your brand

How to create branded instance of Drafter AI for other users

You can re-brand Drafter AI to make it look like part of your product or company.

It includes changing the name, logo, metadata, and color palette (coming soon).

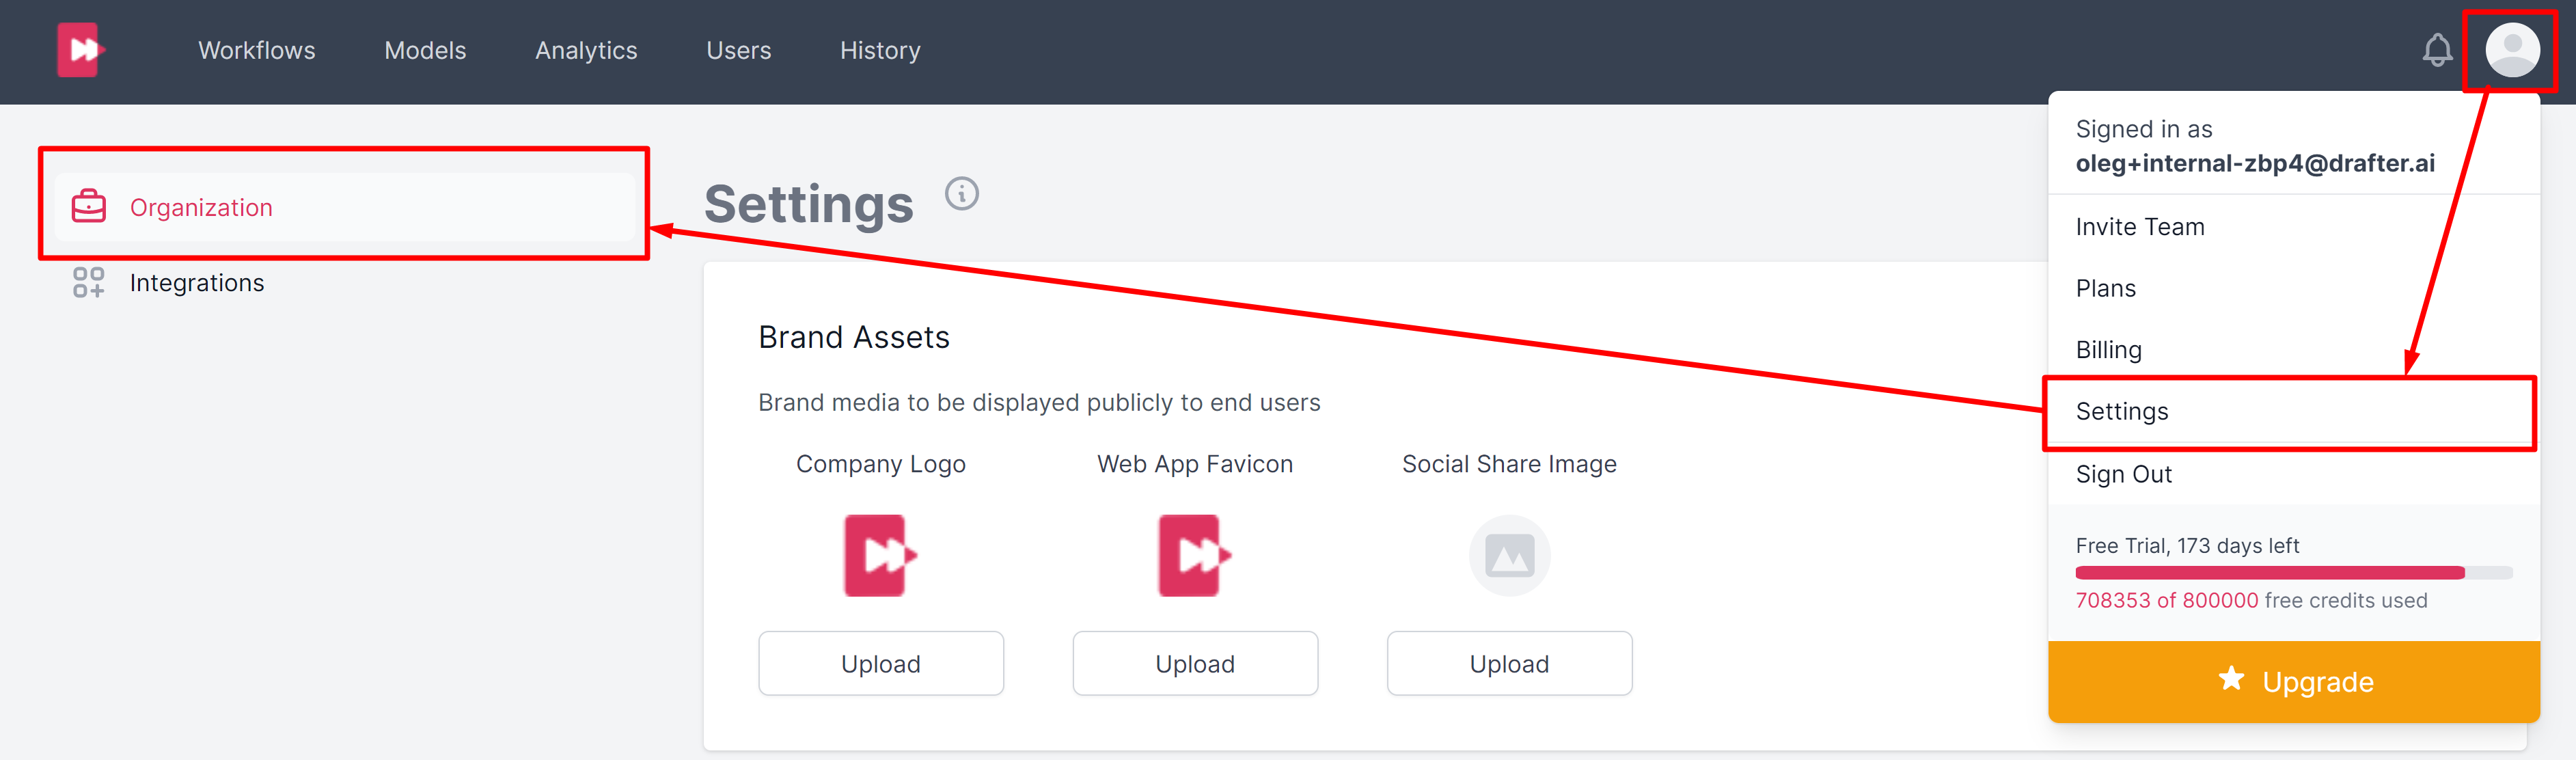
To do that, proceed to <mark style="background-color:blue;">"</mark><mark style="background-color:blue;">**Settings"**</mark> > <mark style="background-color:blue;">**"Organization"**</mark>:

<figure><img src="/files/nwxhg4u8E8BIGkLvvQaq" alt=""><figcaption><p>Changing brand assets</p></figcaption></figure>

Upload a new logo to change it.

Keep in mind that it will be displayed both on Sign In and Sign up pages as well as at the top of your web app.

{% hint style="warning" %}
All of the images provided should be **more than 500px wide** - the system will resize them automatically to the size necessary.
{% endhint %}

You can apply your own domain or subdomain for your Drafter AI instance.


# Connect a custom domain

How to connect custom domain for Drafter AI's instance.

Reach out to **<support@drafter.ai>** if you need this.

We’ll make this feature self-service in Q2 2023.


# Invite users

How to invite collaborators or public users to your Drafter AI app.

In most cases, you need to let your colleagues or public users access, collaborate and use your workflows.

It’s easy to do that.

### Step 1: Proceed to <mark style="background-color:blue;">“Invite team”</mark>

![](/files/81aX995QMOp3ggHpn9RC)

###

### Step 2: Invite collaborators by emails

Enter their emails and don’t forget to click <mark style="background-color:blue;">**“Enter”**</mark> after each input:

![](/files/dj9KW99BvFVLynDALnl4)

###

### Step 3: Define their roles

Every user can have one of two roles:

1. **Owners** - they can create, edit, and modify organization settings, workflows, and models.
2. **Users** - they can only use workflows without having the right to modify anything.

To assign the necessary role, choose it from the dropdown while sending email invitations:

![](/files/HUz8sBbLcA5ilaan4OmA)

When you're ready to scale your AI ops, proceed to:

{% content-ref url="/pages/8XHyN5oBPrzgafwVqC7m" %}
[Process inputs in batches](/scale/process-inputs-in-batches)
{% endcontent-ref %}


# Process inputs in batches

How to perform hundreds of executions of the same workflow.

In most cases, you need to scale your task execution.

It can be done either by using batch processing or using integrations/automations.

Let’s process input in batches.

## 1. Get back to the input tab

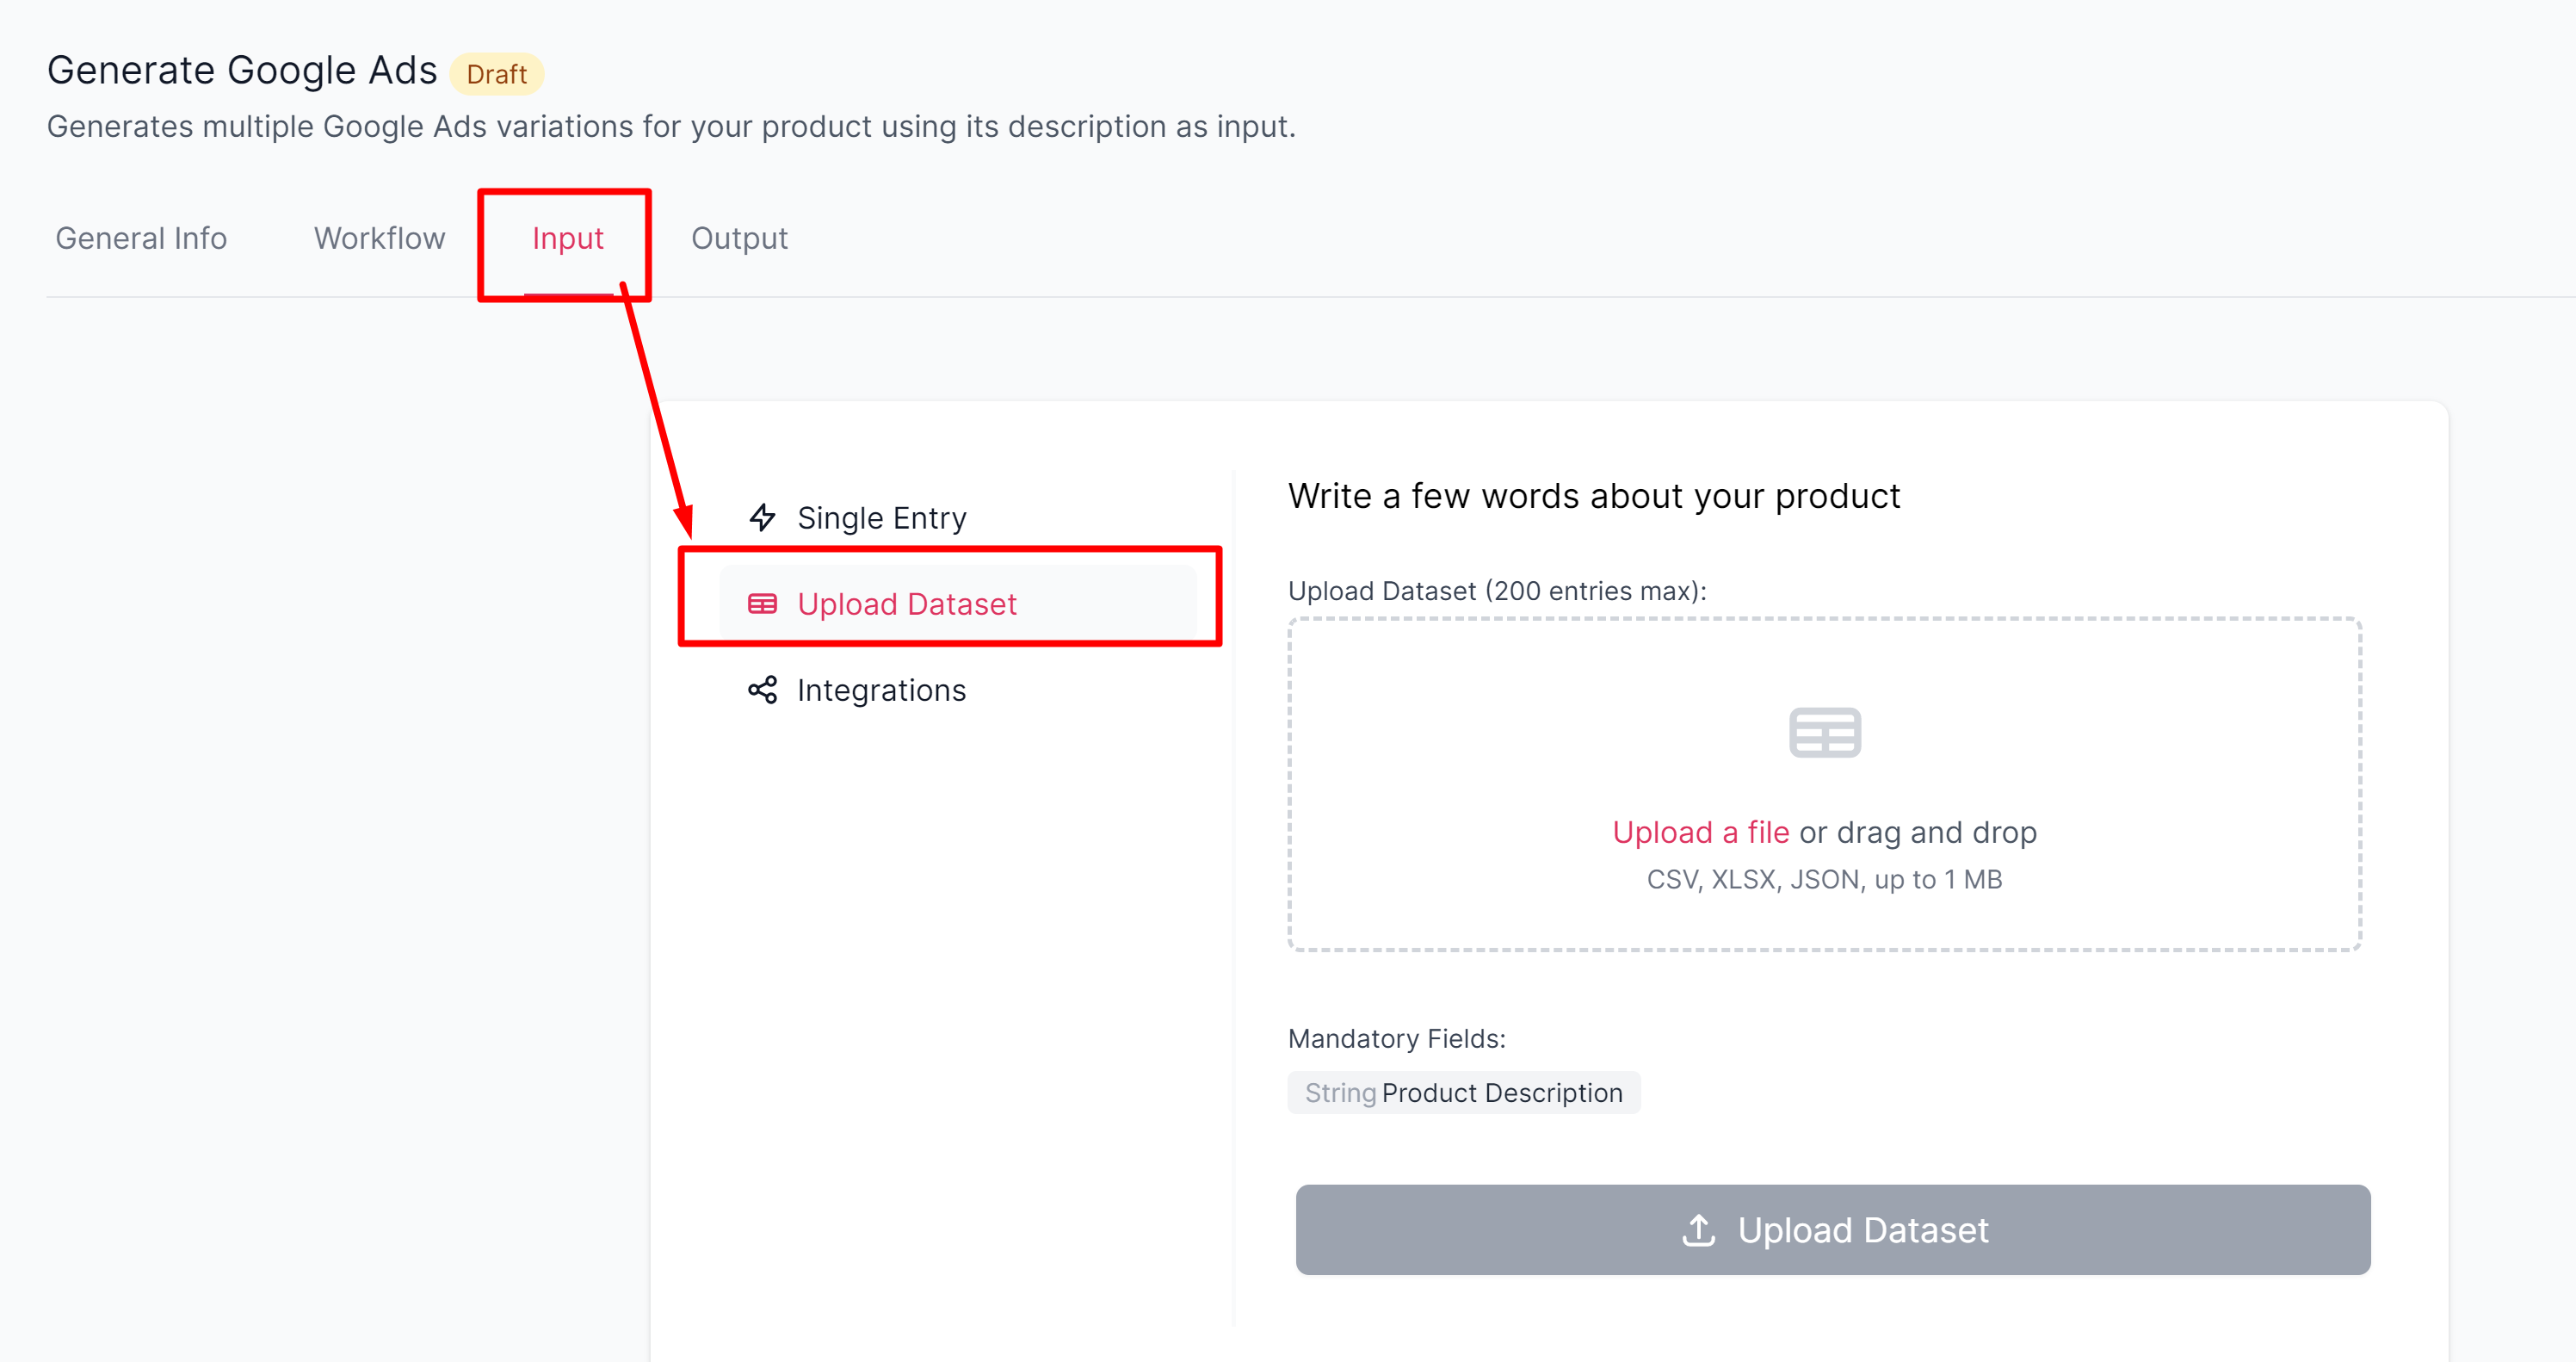
Choose the <mark style="background-color:blue;">**"Upload Dataset"**</mark> input option:

<figure><img src="/files/Eo4H5DiT6dUIcOOZrUiE" alt=""><figcaption><p>Starting batch input processing</p></figcaption></figure>

## 2. Prepare a CSV with the required input data.

Let's generate Google Ads for multiple products at once.

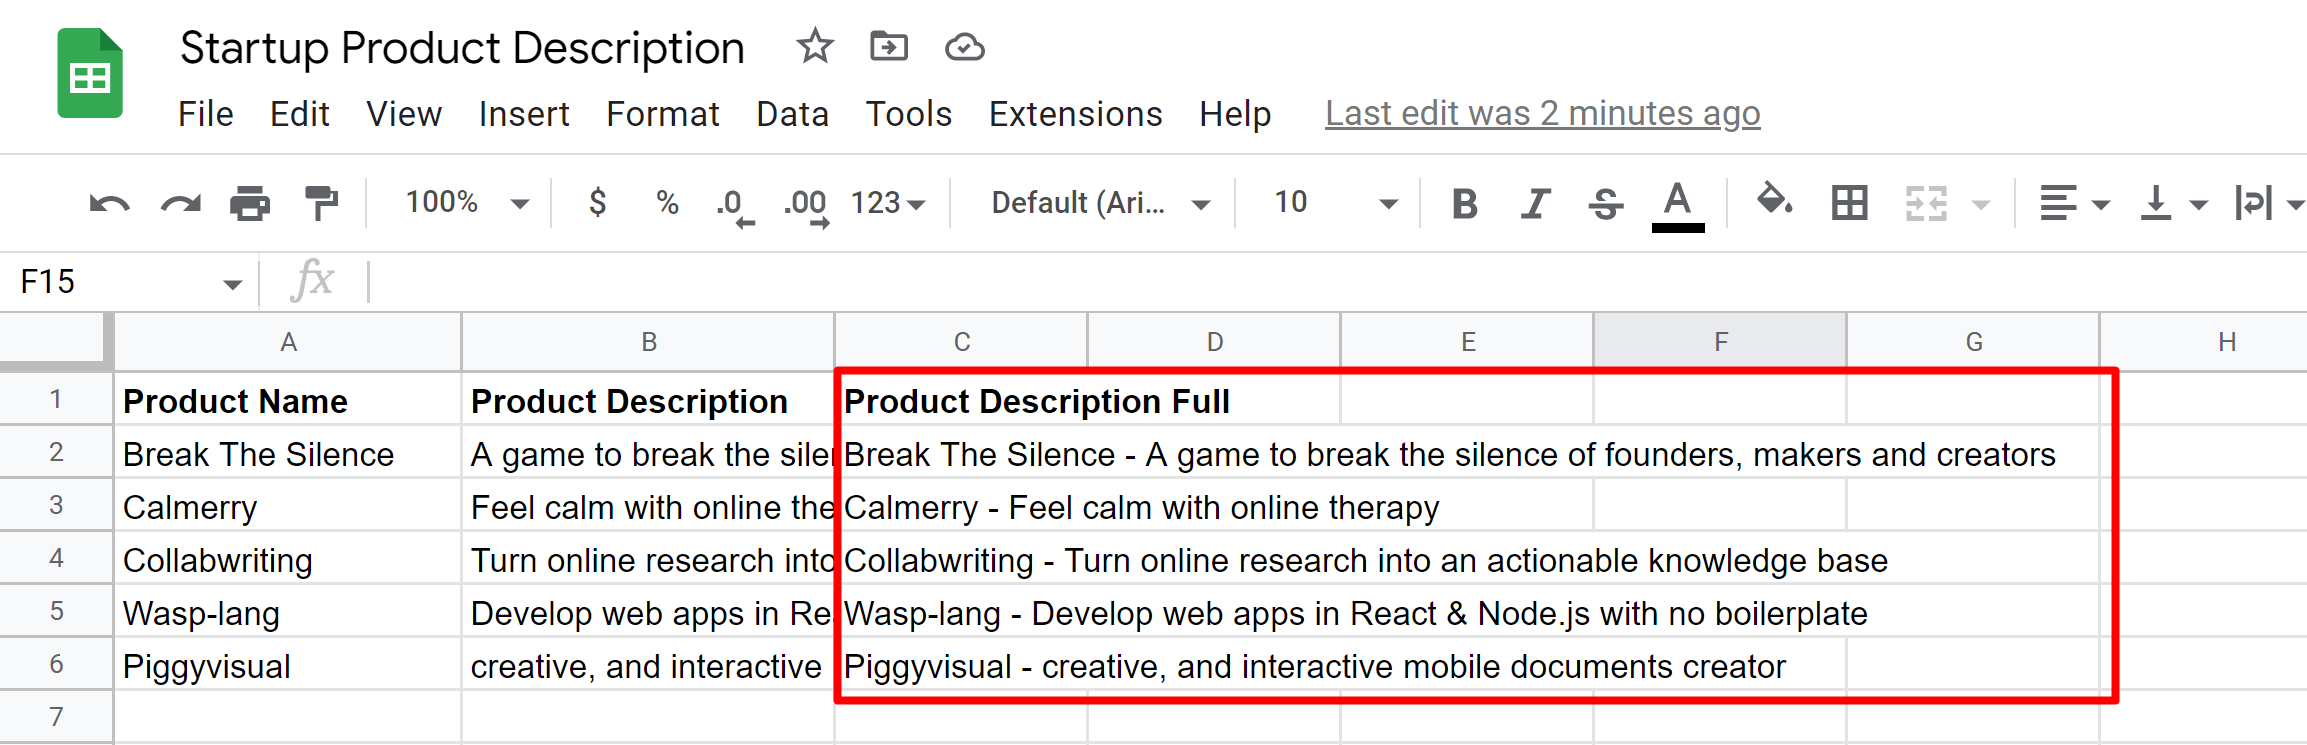
In our case, it’s a list of 5 products from Producthunt:

<figure><img src="/files/ZD9ha3DIOBy7b9Nttwtj" alt=""><figcaption><p>Formatting products data from Producthunt</p></figcaption></figure>

We’ll use the **full description field** as input.

This AI model delivers the best results when the name of the product is mentioned in the description.

## 3. Upload the CSV

Drag-n-drop the file into the upload field:

<figure><img src="/files/DIzKE1PVmmk95Hdj0MbT" alt=""><figcaption><p>Uploading a set of inputs</p></figcaption></figure>

{% hint style="warning" %}
There is a limit to the number of entries in the dataset to be processed at once.

Currently, it’s **200 maximum**.
{% endhint %}

Click the <mark style="background-color:blue;">**“Upload Dataset”**</mark> button to start matching fields.

## 4. Match data fields

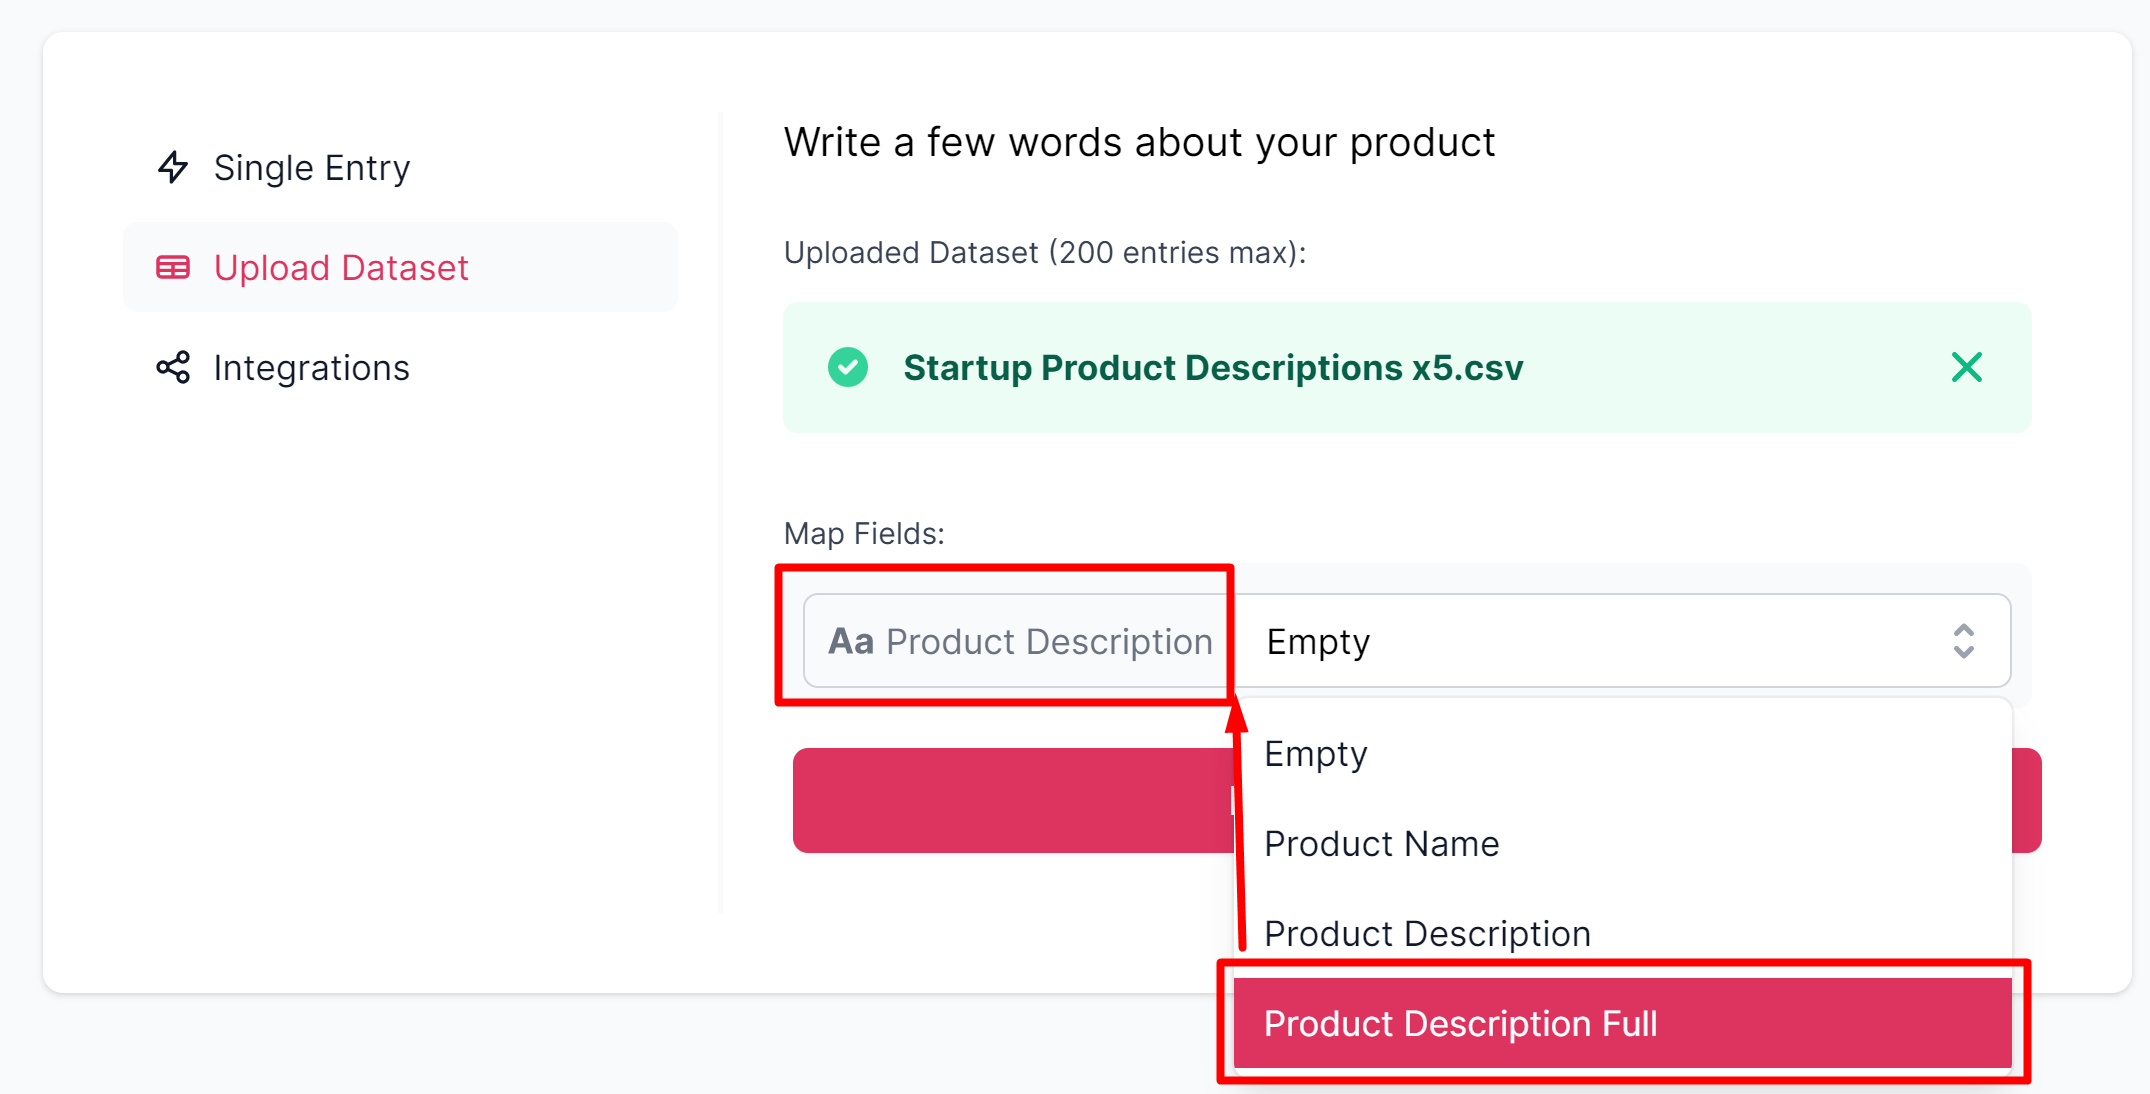
Select the fields from your CSV that match the mandatory input fields of this workflow.

In this case, it’s **Product Description:**

<figure><img src="/files/2bV0LgCDDG6KvIh6lu4Z" alt=""><figcaption><p>Matching data fields</p></figcaption></figure>

## 5. Launch it

{% hint style="warning" %}
This workflow should be **checked and published** for batch processing.
{% endhint %}

Wait a bit for all the entries to be processed.

<figure><img src="/files/j4GSBuHytHIeBU3htlI8" alt=""><figcaption><p>Processing in batch</p></figcaption></figure>

{% hint style="info" %}
Usually, it takes almost the same time as a single entry, because of the parallel processing.
{% endhint %}

## 6. Check the results

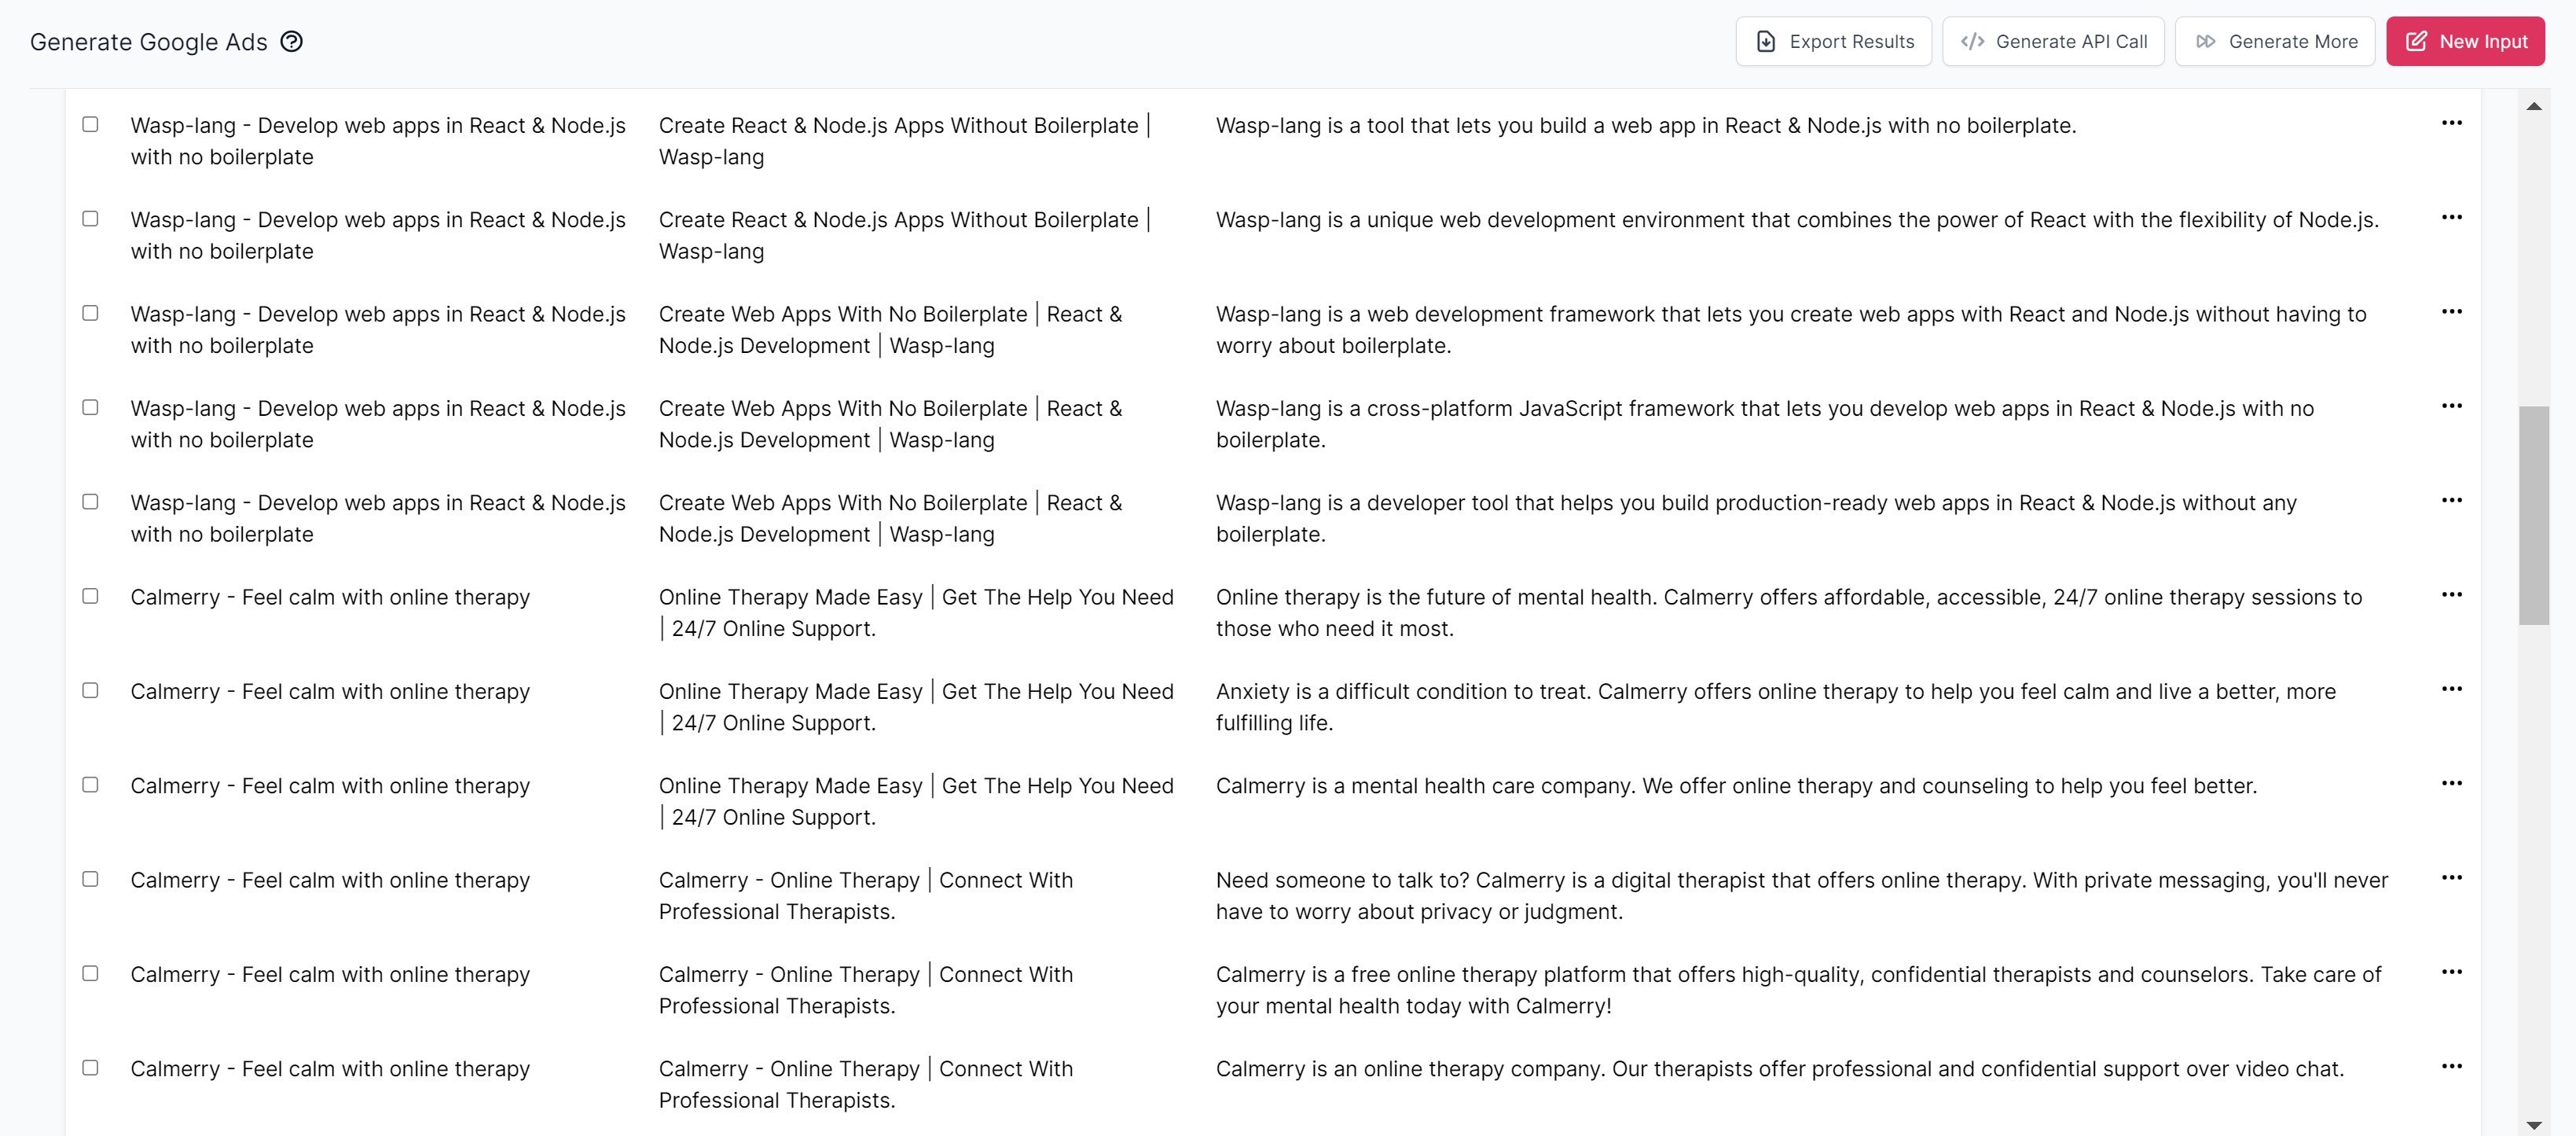
You get 9 variations for every input entry in this case (3 variations of Google Ads Headlines \* 3 variations of Google Ads Body):

<figure><img src="/files/PROg4ywu6OhWfnCBlzQ4" alt=""><figcaption><p>Results of batch processing</p></figcaption></figure>

Find out, how many of them are successful or failed.

After that, you can make changes to your workflow, and input to improve your success rate.

Or just keep it as is if you’re happy.

{% hint style="info" %}
**There is rarely a 100% success rate** when it comes to AI.&#x20;

To find the best combination of the credits spent and the quality of the output.
{% endhint %}

The next way to scale your AI ops - integrate AI workflows with the tools you use every day.


# Organize internal knowledge base

Answer questions and generate content basing on your internal documents, support systems info and knowledge bases.

AI (GPT models) tends to generate inaccurate content or answers in case of niche or specific questions/queries.

It's especially dangerous when you use AI to provide customer or employee support.

That's why you need to ensure that AI uses only reliable sources of information about your products, services, or processes.

With Drafter AI, create your own curated collections of documents, audio files, videos, knowledge base, or support system integrations and make AI get info from them only.

In this way, AI will be "restricted" to following your content guidelines while performing workflows.

Let's see how it works.

## **Step 1: Setup workflow**

<figure><img src="/files/bCtozRHKw9PLyOa5jnW1" alt=""><figcaption><p>AI-powered question answering using internal search and interpretation</p></figcaption></figure>

Learn more about how to build workflows at:

{% content-ref url="/pages/jcbjZ8kky4djVUghpiEc" %}
[Create workflow](/build/create-workflow)
{% endcontent-ref %}

## Step 2: Add Documents to internal storage

For the documents to be accessed by search/AI workflow combo, you need to upload them to the storage first.

See how to add documents to the internal storage:

{% @arcade/embed flowId="y1vul5TZgUhWi6XwVwsi" url="<https://app.arcade.software/share/y1vul5TZgUhWi6XwVwsi>" %}

{% hint style="warning" %}
Now you can work [only with PDFs. ](https://app.arcade.software/share/y1vul5TZgUhWi6XwVwsi)

Audio, images, and text files will be available soon.
{% endhint %}

## Step 3: Use the "internal search" block to access the info

Learn more about configuring it at:

{% content-ref url="/pages/GwPoYOKpcHRuE41qw0BR" %}
[Internal Search](/building-blocks/actions/internal-search)
{% endcontent-ref %}


# Template GPT3 prompts

How to use prompt templates to save and reuse best working prompts across multiple workflows.

You can save the prompts you often use in different workflows as templates.

In this case, you can set them once and use them as a regular action block in the workflow builder.

See, how to create a custom prompt template for Google Ads:

{% @arcade/embed flowId="wP5HJ4I7JSiEwoe83oNH" url="<https://app.arcade.software/share/wP5HJ4I7JSiEwoe83oNH>" %}

{% hint style="danger" %}
Don't delete the default **"GPT3 Prompt"** from the list of prompt templates. Without them, you won't be able to use GPT3 capabilities in your workflows.

In case you deleted them, create a blank prompt template with just "{TEXT}" variable in it
{% endhint %}


# Integrate Drafter AI to other apps with Make.com

How to integrate Drafter AI workflows with other tools.

Sometimes you need Drafter AI’s flows to work in a background mode, as an addition to the tools you use in everyday work.

To do that, use [Make](https://make.com) (former Integromat) to integrate Drafter AI’s workflows with 1000+ other tools.

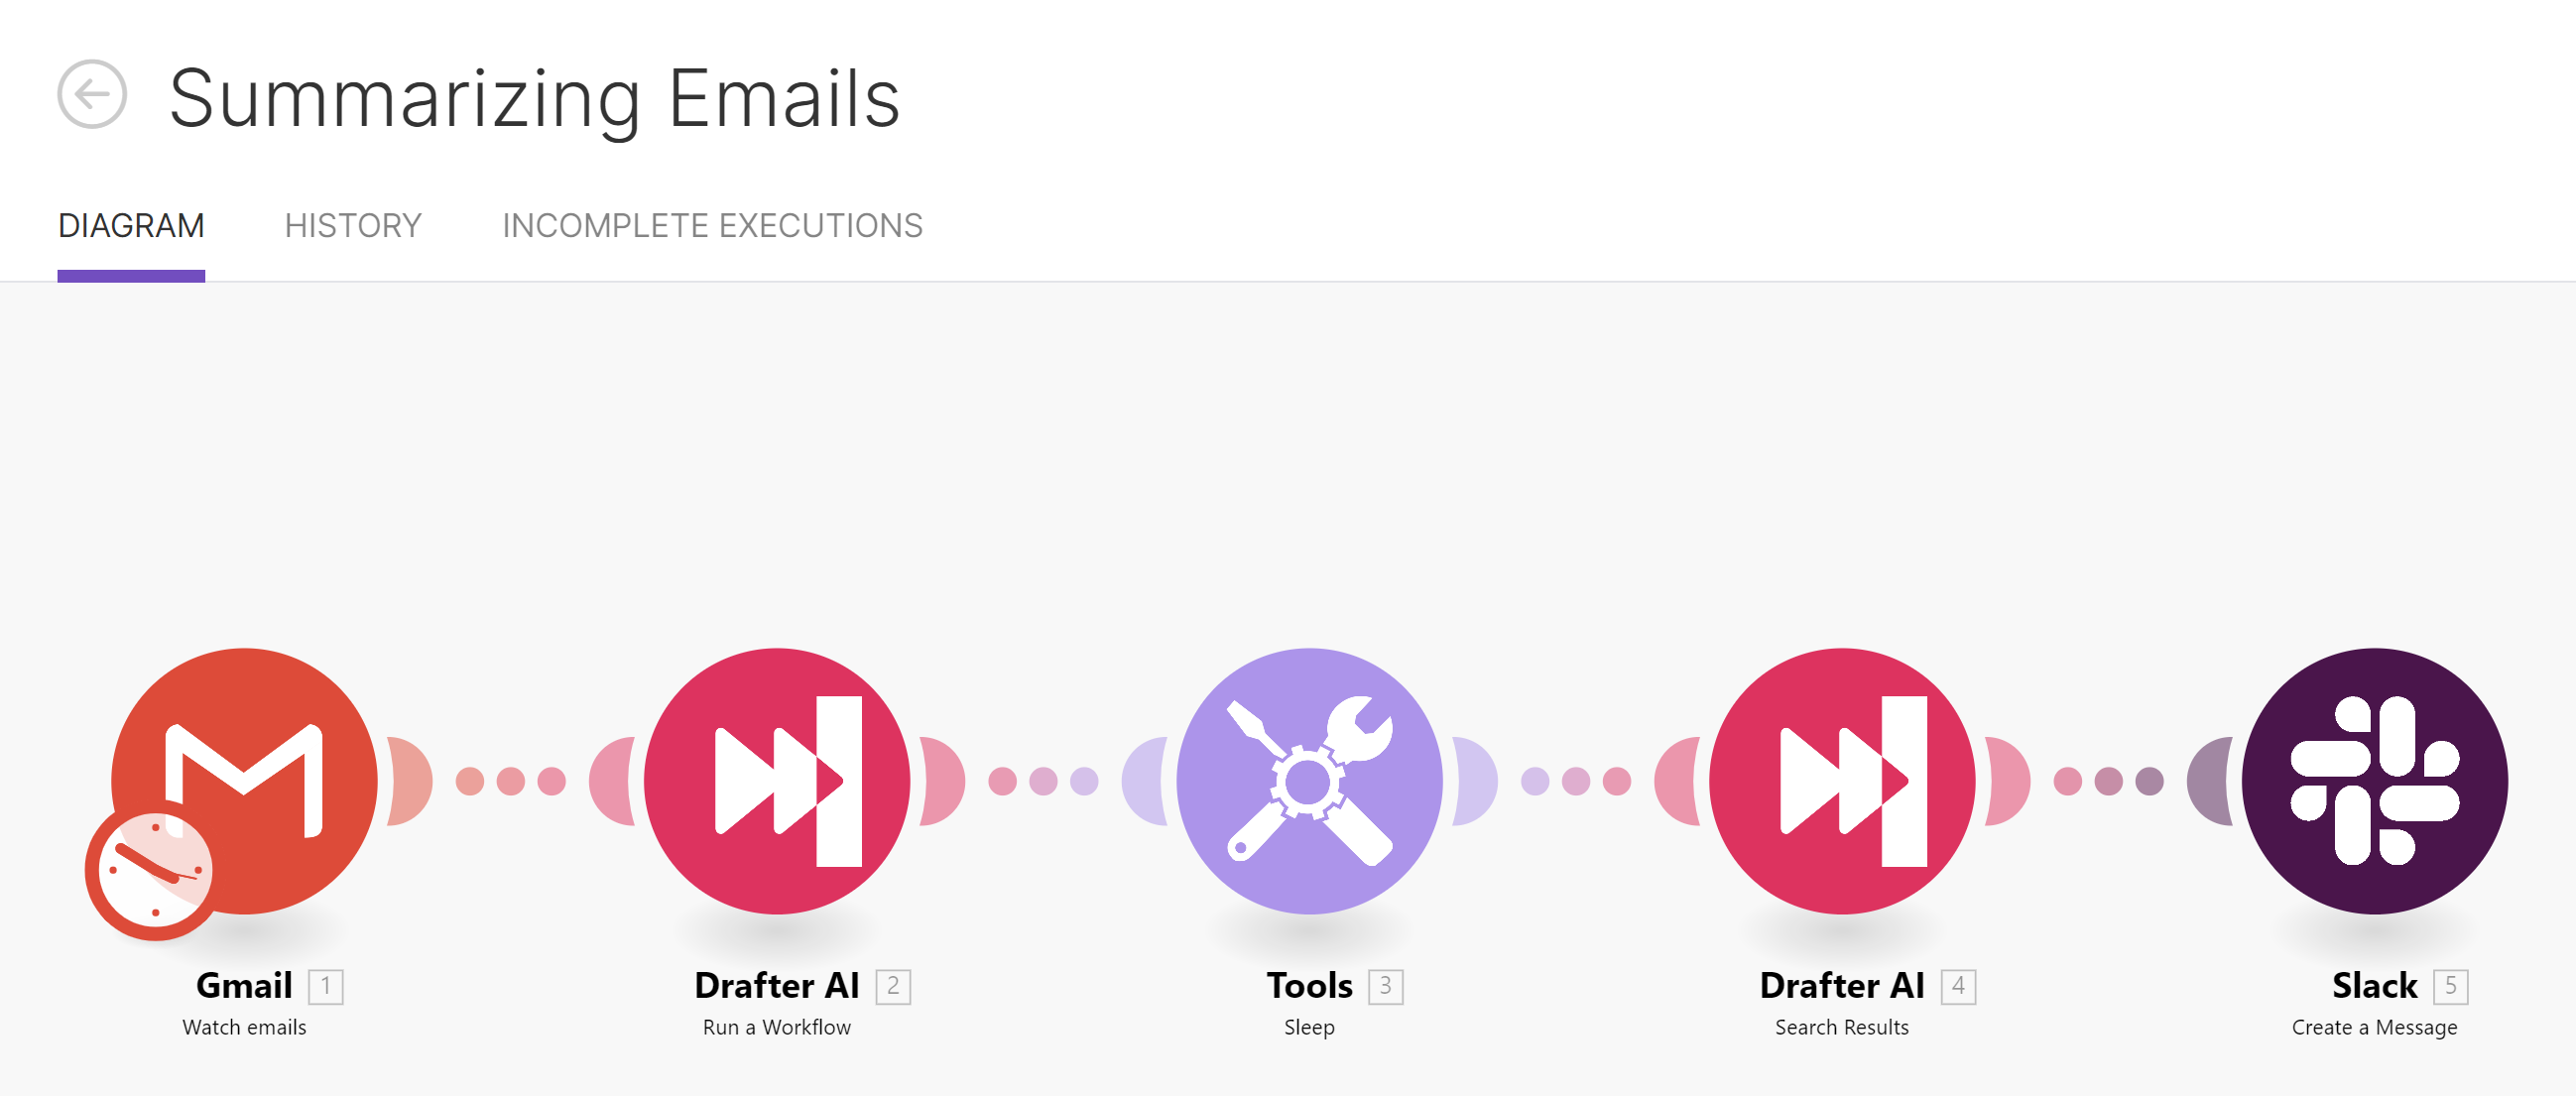
**Example:** This is how the email summarization flow looks like with Drafter AI - Make:

<figure><img src="/files/qafhqd5cwm1k4TyW8WqL" alt=""><figcaption><p>Summarizing emails to Slack with Drafter AI-Make connection</p></figcaption></figure>

It reads incoming emails, and then drops them into a specific category, and sends it to Drafter AI to summarize.

After that, the email summary is displayed in your Slack channel.

Let’s see, how to build such flows.

If you have no Make.com account - register (It's free and takes 5 mins)

{% embed url="<https://www.make.com/en>" %}

## 1. Get your API Key

To get your API key, proceed to <mark style="background-color:blue;">**"Settings"**</mark> > <mark style="background-color:blue;">**"Integrations"**</mark>:

<figure><img src="/files/fpLlOZ7zsLXAwOplcBhT" alt=""><figcaption><p>Getting API key</p></figcaption></figure>

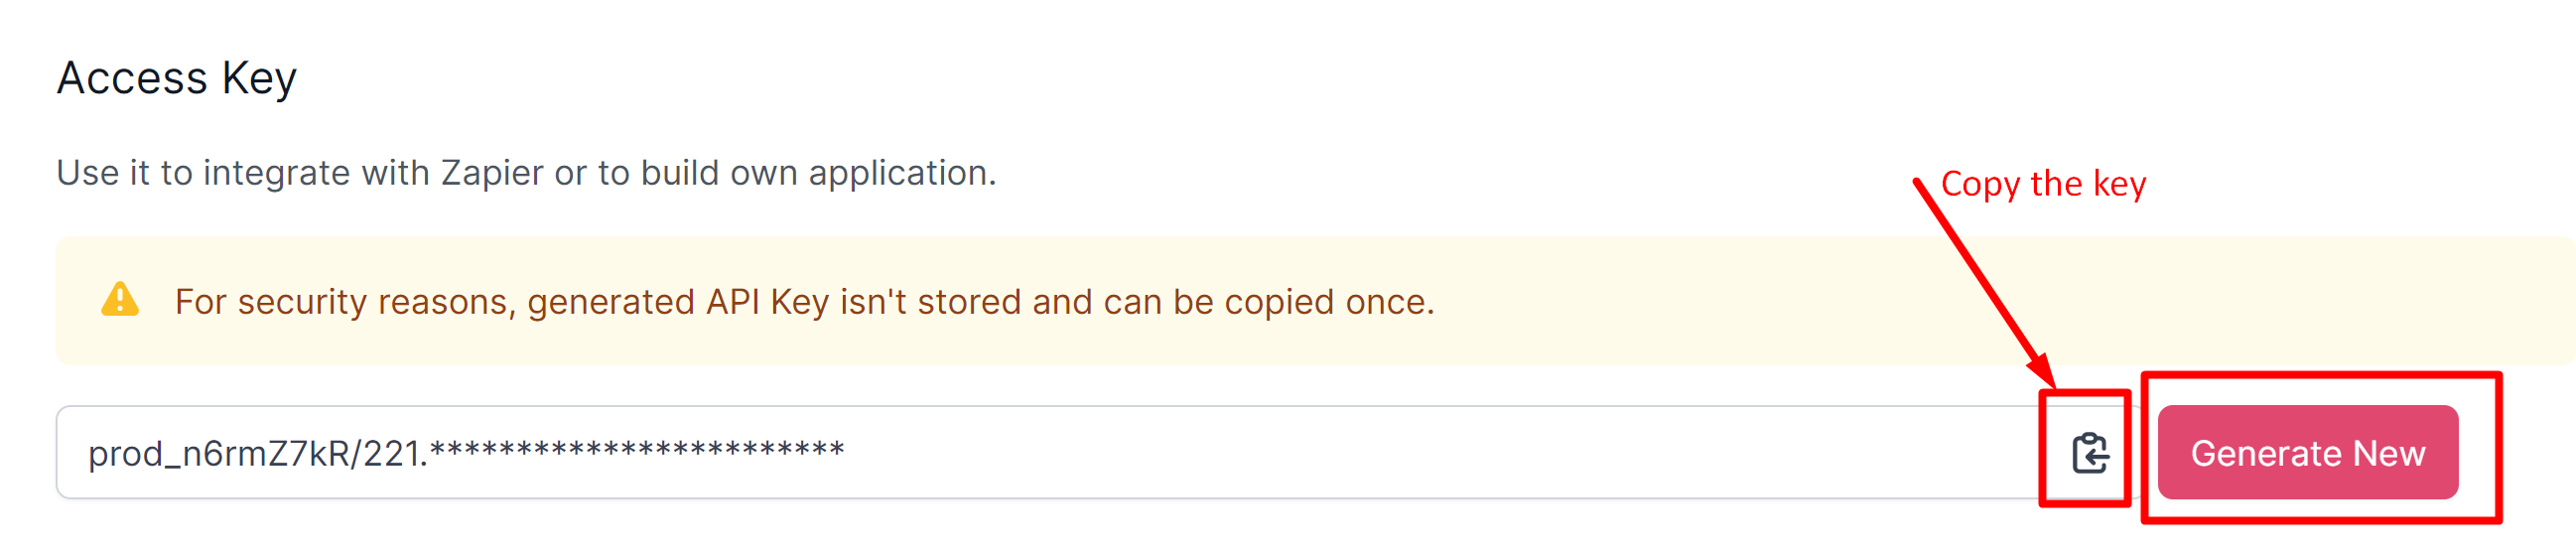
**Generate API Key:**

<figure><img src="/files/VC4ugIACEMMAaTriGMsI" alt=""><figcaption><p>Generating API Key</p></figcaption></figure>

{% hint style="warning" %}
You can generate and copy your API key **only once.**

If you forget or lose it, to use it again you'll need to re-generate it.

It's done to comply with the current security policies and protect your instance,
{% endhint %}

##

## 2. Connect the Drafter AI app and Make.com

To get access to it, follow the [invitation link](https://www.make.com/en/hq/app-invitation/fac6a7ed0349793e6c3df9f955d7fe3c) (Make).

{% embed url="<https://www.make.com/en/hq/app-invitation/fac6a7ed0349793e6c3df9f955d7fe3c>" %}
Getting access to Drafter AI's connection for Make.com
{% endembed %}

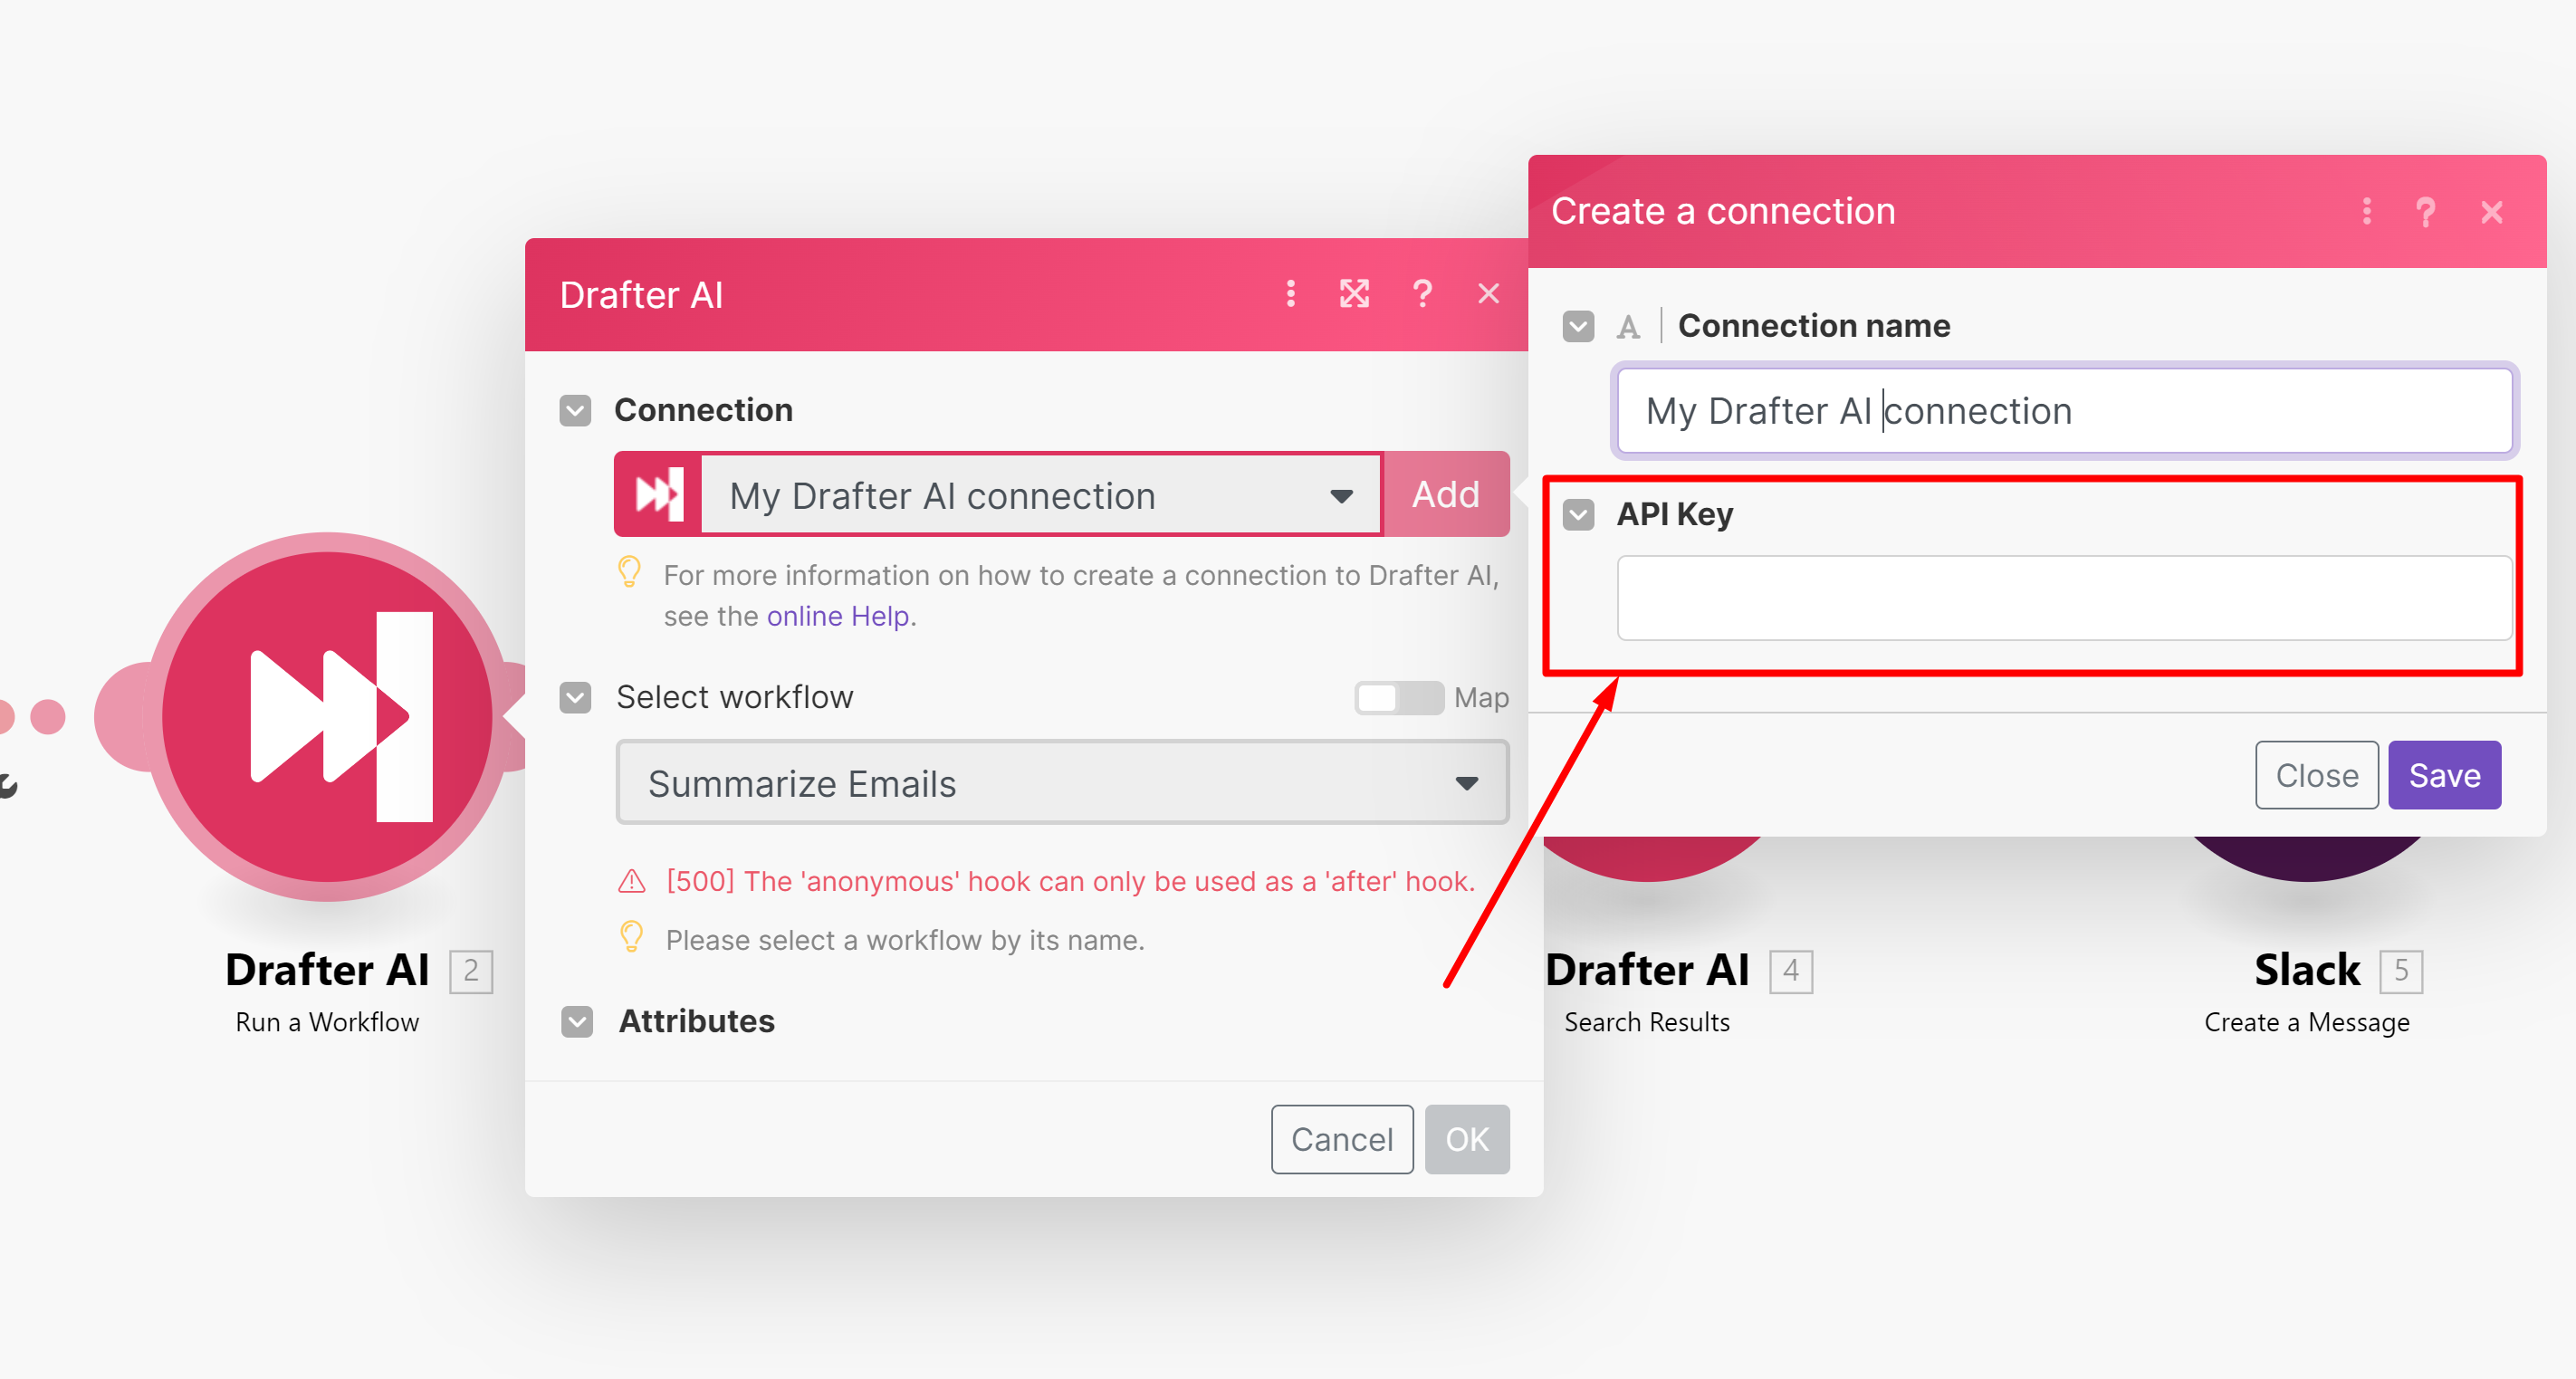
Use your API Key to create a connection with Drafter AI on Make.com:

<figure><img src="/files/3IYuCXEILy8SKjk0FN5o" alt=""><figcaption><p>Providing API Key to connect Drafter AI and Make.com</p></figcaption></figure>

## 3. Use Drafter AI events in Make.com scenarios

#### Run a Workflow

Triggers execution of the workflow on Drafter AI's side in the middle of the workflow.

{% hint style="info" %} <mark style="color:blue;">Use Case</mark>

You're getting data from 3rd party tools and sending it to Drafter AI to analyze, search or generate new data points.
{% endhint %}

#### Search Workflow

Searches for data from results of specified workflow executions on your Drafter AI instance.

{% hint style="info" %} <mark style="color:blue;">Use Case</mark>

You started workflow execution before, waited till it ends, and would need to extract results to send to other tools.
{% endhint %}

#### Trigger: Workflow Execution

Make.com flow starts automatically when the workflow on Drafter AI's side is finished.&#x20;

{% hint style="info" %} <mark style="color:blue;">Use Case</mark>

You need to automatically send data to other tools when batch processing on Drafter AI's side ends.
{% endhint %}

## Some ideas for No-code integration scenarios

<table data-view="cards"><thead><tr><th></th><th></th><th></th></tr></thead><tbody><tr><td><strong>Hubspot + Drafter AI</strong></td><td>Automaticaly generate personalized messages for new leads in Hubspot CRM.</td><td></td></tr><tr><td><strong>Salesforce + Drafter AI</strong></td><td>Answer manager's questions automatically by interpreting RevOps data from Salesforce.</td><td></td></tr><tr><td><strong>Slack + Drafter AI</strong></td><td>Get corporate ChatGPT that uses both public and internal knowledge to answer your team's questions precisely.</td><td></td></tr><tr><td><strong>Airtable + Drafter AI</strong></td><td>Empower Airtable with automated search, translation, classification or content generation features.</td><td></td></tr><tr><td><strong>Bubble.io + Drafter AI</strong></td><td>Build AI-powered web apps that perform all kinds of AI actions for users.</td><td></td></tr><tr><td><strong>Gmail + Drafter AI</strong></td><td>Automatically extract data from incoming emails and draft relevant emails and replies in seconds.</td><td></td></tr></tbody></table>

And many more.&#x20;

Here's what our customers do with Drafter AI integrated with other tools.

**TBD**

If you need to integrate Drafter AI directly - use developer API.


# Get started with developer API

How to start integrating tools with Drafter AI directly.

You can build your own apps and products using Drafter AI’s API.

It enables you to execute Drafter AI’s workflows within your app in addition to other features you have.

To do that, follow the next steps:

## 1. Get your API Key

To get your API key, proceed to <mark style="background-color:blue;">**"Settings"**</mark> > <mark style="background-color:blue;">**"Integrations"**</mark>:

<figure><img src="/files/fpLlOZ7zsLXAwOplcBhT" alt=""><figcaption><p>Getting API key</p></figcaption></figure>

**Generate API Key:**

<figure><img src="/files/VC4ugIACEMMAaTriGMsI" alt=""><figcaption><p>Generating API Key</p></figcaption></figure>

{% hint style="warning" %}
You can generate and copy your API key **only once.**

If you forget or lose it, to use it again you'll need to re-generate it.

It's done to comply with the current security policies and protect your instance
{% endhint %}

## Check the examples of API calls

Every workflow has an API call, that leads to it, to use as a reference.

To access it, while in the workflow’s output view, click the <mark style="background-color:blue;">**“Generate API call”**</mark> button at the top right:

<figure><img src="/files/QQw47TwxKoWE4Q82EiJg" alt=""><figcaption><p>Getting API call for specific workflow</p></figcaption></figure>

## Get the SDK: NodeJS

{% embed url="<https://www.npmjs.com/package/@phonal-technologies/drafterai-js>" %}
Getting started with ModeJS SDK
{% endembed %}

## Follow the API docs

{% embed url="<https://phonal-technologies.github.io/drafter-js/>" %}
Getting started with API
{% endembed %}


# Restore output results

How to get back to previous workflow results and restore them.

Sometimes you need to get back to the results of previous workflow executions.

To do that proceed to the <mark style="background-color:blue;">**“History”**</mark> menu item at the top menu.

## General view

You’ll see there all the executions performed before:

<figure><img src="/files/4YIdtMDQTvh2Gu2Q4XYw" alt=""><figcaption><p>Interface of "History" table</p></figcaption></figure>

Every historical entry has:

1. Timestamp[^1]
2. Name of the workflow
3. Id of the workflow
4. Size[^2] - Number of results for the execution
5. Status - success, queued, or failed
6. A number of credits spent for the execution
7. The time it took (in seconds)
8. Actions

## Actions

To **view the output** of a specific workflow, click:

<figure><img src="/files/2wGTC7tvAa2EDBBbOYXo" alt=""><figcaption><p>Viewing output results</p></figcaption></figure>

Other actions for the entry are:

* **Download results** as CSV
* **Restart the workflow** - repeats the same workflow with the same input but with the latest updates (either in external data sources or after your recent changes in the workflow).
* **Delete entry** from the history log

## Refreshing history

In case you restarted a workflow, click the [<mark style="background-color:blue;">**“Refresh”**</mark>](#user-content-fn-3)[^3] button on the top right to see its results:

<figure><img src="/files/ZpMju4J6qjka2IQvvzyz" alt=""><figcaption></figcaption></figure>

[^1]: Displays, when this workflow was executed

[^2]: I.e. pages for document processing, # variations for content generation, results found etc.

[^3]:


# Export/Import workflows

How to export and import workflows to backup them.

## Exporting workflows

When you built your own workflows that work, it’s always a good idea to save them locally.

To do that:

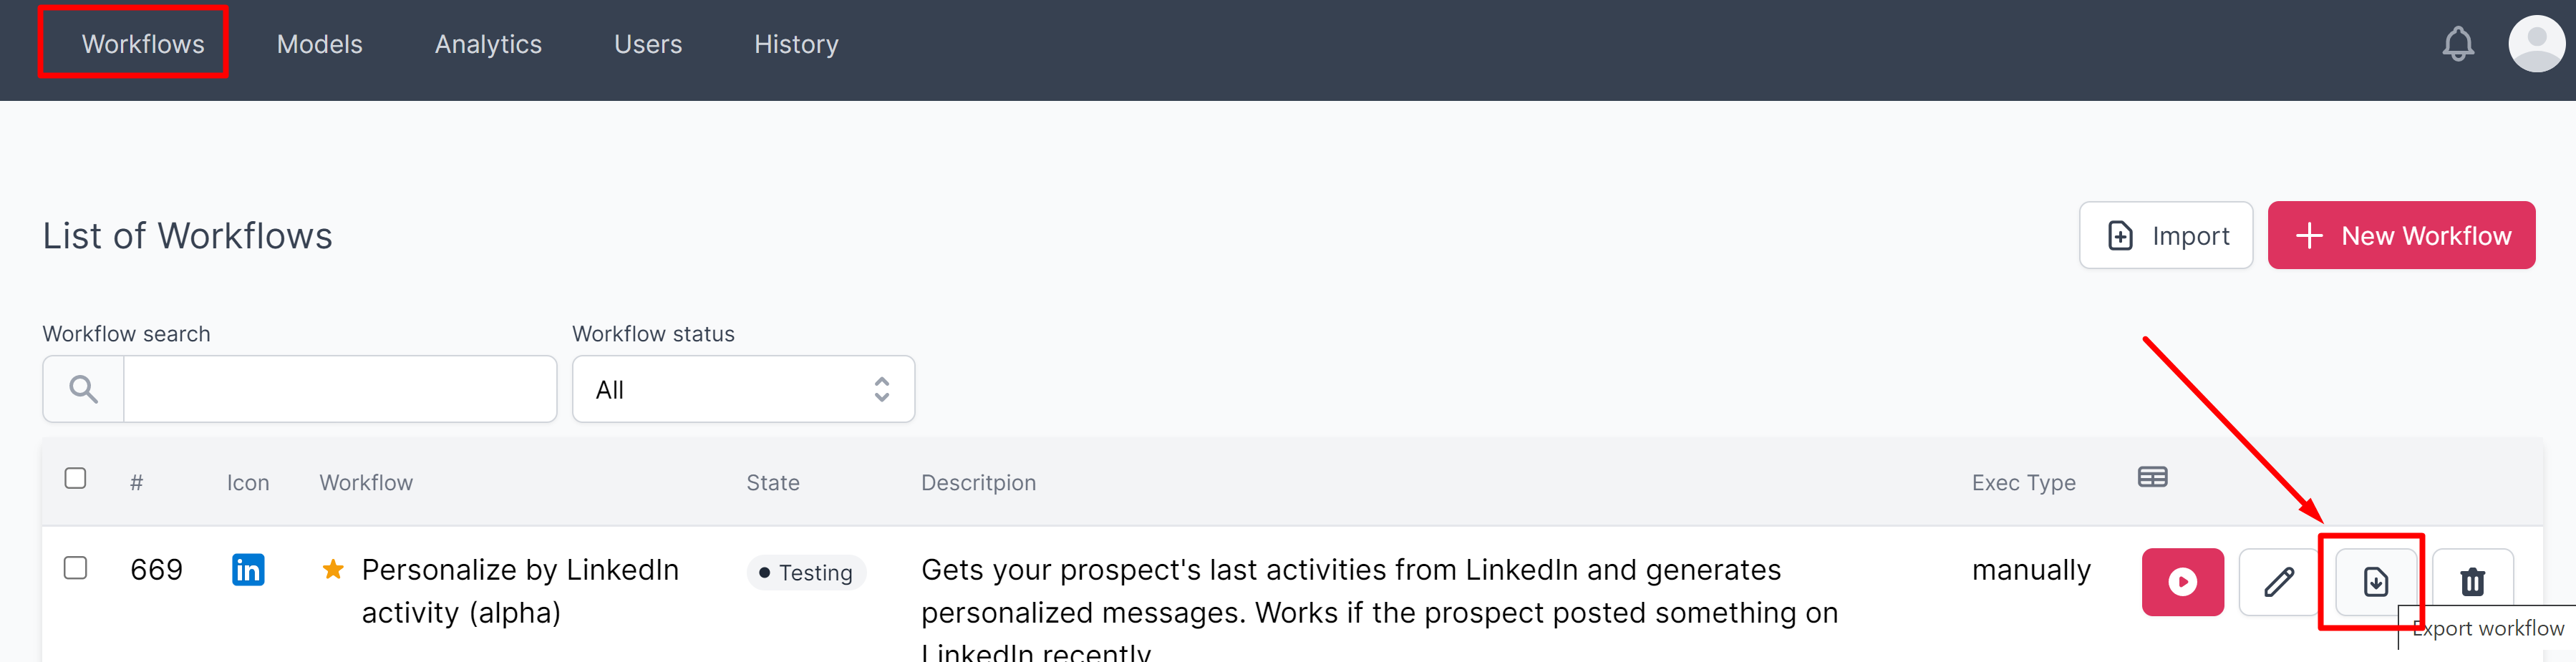
1. Proceed to the <mark style="background-color:blue;">**“List of workflows”**</mark> page
2. Choose the workflow you want to backup
3. Click the <mark style="background-color:blue;">**“Export workflow”**</mark> icon

<figure><img src="/files/t4fZwMd4OuxnbyvTSoct" alt=""><figcaption><p>Exporting workflows from the list as JSON</p></figcaption></figure>

As a result, you’ll have a JSON file with the workflow that can be imported later.

## Importing workflows

Sometimes you need to restore the previous version of the workflow, create new workflows from templates outside or import it to a different Drafter AI instance.

To do that:

1. Proceed to the <mark style="background-color:blue;">**“List of workflows”**</mark> page
2. Click the <mark style="background-color:blue;">**“Import”**</mark> button at the top right of the page.
3. Drag-drop the JSON file of the workflow you exported/saved before to the ***Upload area***.
4. Click <mark style="background-color:blue;">**“Apply changes”**</mark>

<figure><img src="/files/WZ9mAlZUPmD8wdeG3OJu" alt=""><figcaption><p>Importing new workflows</p></figcaption></figure>

Now your newly imported workflow appears in the list of workflows.


# Debug workflows

How to find an issue in the workflow.

When workflow delivers poor results, you need to figure out, what happened.

Poor results may happen due to 4 cases:

1. Poor input data
2. Poor data from public sources
3. Poorly formatted prompts
4. Poor workflow design

Every case has its own solution, but you need to find a reason first.

Debug lets you do that.

## How to use Debug in Drafter AI:

Every workflow block has a <mark style="color:blue;">**"Debug"**</mark> view after you tried to execute the workflow.

By clicking it you get access to a JSON view of all the inputs and outputs that were processed in the specific AI block during the last workflow run.

It lets you understand, at what point something went wrong, and make relevant changes.

{% hint style="info" %}
Flow controls and inputs don't have a "Debug" view.
{% endhint %}

See, how to use it:

{% @arcade/embed flowId="CAWnhSzecN9ahevhjAFe" url="<https://app.arcade.software/share/CAWnhSzecN9ahevhjAFe>" %}


# Inputs

Learn the basic components you can use in your workflow


# Manual / Form

Collects data from end users to process with AI workflow.

## Overview

Collects input from users directly in the web app (as a form) or via API from 3rd party sources.

When you provide data inputs required for the workflow to get started (both field names and field types), this block automatically generates a form for the users, that is displayed in the "Input" part.

![](/files/GmLuYZaRookPvB35npAj)

## How to setup

Provide the next info:

1. Form title
2. Form description (markdown allowed)
3. Data fields to display in the form (or get using integrations)

{% @arcade/embed flowId="eGxmeEp1SZzVCk4EMJ4J" url="<https://app.arcade.software/share/eGxmeEp1SZzVCk4EMJ4J>" %}

## Inputs and outputs

<table><thead><tr><th width="188">Input</th><th width="163.33333333333331">Output</th><th>Output Description</th></tr></thead><tbody><tr><td>Manual</td><td>Any Text</td><td>Sends texts from users to the workflow</td></tr><tr><td></td><td>Any URL</td><td>Sends URLs from users to the workflow</td></tr><tr><td></td><td>PDF file</td><td>Sends PDF files from users to the workflow</td></tr><tr><td></td><td>TXT file</td><td>Sends TXT files from users to the workflow</td></tr></tbody></table>

## Additional Settings

None


# Actions


# Text Generation (GPT)

Generates texts by using input, instructions and examples.

## Overview

GPT3 Text Generation allows you to generate high-quality texts by using input, instructions, and examples. It helps technical writers, content creators, and other professionals who need to produce large volumes of text quickly and efficiently.&#x20;

This AI block is highly customizable, allowing you to adjust the settings to suit their specific needs. Instruct it on the length of the generated text, the level of detail, and the complexity of the language used.

{% hint style="info" %}
Specify the target audience and adjust the tone and style accordingly.
{% endhint %}

## How to setup

Provide the next mandatory info:

1. Data input (text) - variables from other blocks or provided by a user as manual input
2. Data output (text) - result variable, that the block produces. Change its name for ease of further use.
3. Query template - GPT3 prompt template to define, how it goes to AI. Put input variables ({A}, {B}) in the proper places of the prompt template to change its content dynamically.

<figure><img src="/files/5VYSUD3VuCNfmR8f8dvk" alt=""><figcaption><p>How the block looks like</p></figcaption></figure>

## Inputs and Outputs

<table><thead><tr><th width="188">Input</th><th width="163.33333333333331">Output</th><th>Output Description</th></tr></thead><tbody><tr><td>Any Text (many variables)</td><td>Any Text (x1 variable)</td><td>Generates texts using the prompt template and input data variables.</td></tr></tbody></table>

Get some ideas of the prompts:

{% embed url="<https://promptbase.com/gpt3>" %}


# Web Data Extraction

Extracts metadata and full page content of the web page.

## Overview

<figure><img src="/files/54JYM5kgP5MJXeywQcrl" alt=""><figcaption><p>Get URL Block</p></figcaption></figure>

Web Data Extraction is a powerful block that allows you to extract metadata and full-page content from web pages. It is useful for a variety of applications, including web scraping, data mining, and content analysis.&#x20;

It is highly customizable, allowing you to specify the types of data you want to extract and the format in which you want to receive it.&#x20;

Whether you are a researcher, marketer, or data analyst, Web Data Extraction can help you extract valuable insights from the web.

Works best with web search components and knowledge extraction.

## How to Setup

1. Provide an input - URL data point. You can get it from another action block or manual input block.
2. Select the output data points you want to extract.

{% hint style="warning" %}
Web content that has **more than 4,000 characters** (around 1000 English words) can't be processed live during the workflow.
{% endhint %}

{% hint style="info" %}
To make using longer web page content possible, collect it to the "Documents" section first, and then perform "Internal Search" across it from the workflow.
{% endhint %}

## Inputs and Outputs

<table><thead><tr><th width="142">Input</th><th width="229.33333333333331">Output</th><th>Output Description</th></tr></thead><tbody><tr><td>Target link (URL)</td><td>Meta Title (Text)</td><td>Title of the web page</td></tr><tr><td></td><td>Meta Description (Text)</td><td>Description of the page</td></tr><tr><td></td><td>Meta Image (Image)</td><td>Social media image of the page</td></tr><tr><td></td><td>Full-page text  (Text)</td><td>Texts extracted from the full-page HTML, structured by headlines or paragraphs</td></tr><tr><td></td><td>Full page HTML (Text)</td><td>HTML of the target web page</td></tr><tr><td></td><td>Links to media on the page (URL) - Soon</td><td>Links to all the images or videos from the page</td></tr><tr><td></td><td>Links to other pages/websites on the page (URL) - Soon</td><td>Links to all other web pages from the target page</td></tr></tbody></table>


# Sentiment Recognition

Recognizes sentiment of the text.

## Overview

Sentiment Recognition AI block allows you to analyze the sentiment of any given text.&#x20;

It uses advanced natural language processing techniques to identify the emotions and attitudes expressed in the text, whether they are positive, negative, or neutral. This AI block is highly accurate and can be used to analyze large volumes of text quickly and efficiently.&#x20;

It is particularly useful for businesses and organizations that need to monitor customer feedback, social media posts, and other forms of online communication. With Sentiment Recognition, you can gain valuable insights into the opinions and attitudes of your customers, allowing you to make informed decisions and improve your products and services.

## How to Setup

Provide the next mandatory info:

1. Data input (text) - variables from other blocks or provided by a user as manual input
2. Data output - result variable, that the block produces. Change its name for ease of further use.

![](/files/btTm9qOYE8FPipVAyAuP)

## Inputs and Outputs

<table><thead><tr><th width="188">Input</th><th width="163.33333333333331">Output</th><th>Output Description</th></tr></thead><tbody><tr><td>Text (text)</td><td>Sentiment label (text)</td><td>"Positive", "negative" or "neutral" classification of the text input</td></tr><tr><td></td><td>Positive (score/number)</td><td>An exact score from 0 to 1 that defines the degree of positivity of the text input</td></tr><tr><td></td><td>Negative (score/number)</td><td>An exact score from 0 to 1 that defines the degree of negativity of the text input</td></tr><tr><td></td><td>Neutral (score/number)</td><td>An exact score from 0 to 1 that defines the degree of neutrality of the text input</td></tr></tbody></table>

{% hint style="info" %}
**Labeling** is useful for the general classification of texts at scale.

**Exact scores** are useful for:

A) Normalizing texts on the same axis&#x20;

B) Filtering them out using a filter with a specific threshold.
{% endhint %}


# Key Phrases Extraction

Extracts key phrases from the text.

## Overview

This Drafter AI block allows you to extract key phrases from any text. It uses advanced algorithms and natural language processing techniques to identify the most important words and phrases in the text.&#x20;

This makes it an invaluable tool for anyone who needs to quickly and accurately identify the main themes and topics in a piece of writing.&#x20;

Whether you're a content creator, a marketer, or a researcher, Key Phrases Extraction can help you save time and improve the quality of your work.&#x20;

Input your text and let Key Phrases Extraction do the rest.

## How to Setup

Provide the next mandatory info:

1. Data input (text) - variables from other blocks or provided by a user as manual input
2. Data output - result variable, that the block produces. Change its name for ease of further use.

![](/files/lMbMsXXtqgE3jC9WjLOP)

## Inputs and Outputs

<table><thead><tr><th width="188">Input</th><th width="163.33333333333331">Output</th><th>Output Description</th></tr></thead><tbody><tr><td>Any Text (Text)</td><td>Key Phrases (Text)</td><td>Extract key phrases from the texts</td></tr></tbody></table>


# Classification

Defines class or category of the text from the defined list.

## Overview

Drafter AI's Custom Classification allows you to define the class or category of text from a defined list.&#x20;

This is useful for organizing and categorizing large volumes of text, such as customer feedback, social media posts, or product reviews. AI analyzes the text input and assigns it to the appropriate category. You can define the categories and customize the classification rules to suit their specific needs.&#x20;

It can also be integrated with other AI blocks to provide a comprehensive text analysis solution.

## How to Setup

Provide the next mandatory info:

1. Data input (text) - variables from other blocks or provided by a user as manual input
2. Data output (text) - result variable, that the block produces. Change its name for ease of further use.

{% hint style="info" %}
You can provide a custom list of categories.

If you want AI to categorize your text input itself - leave it blank (Remove the "Categories" part)
{% endhint %}

<figure><img src="/files/Fq39LkMgp2og8WcBOJEH" alt=""><figcaption></figcaption></figure>

## Inputs and Outputs

<table><thead><tr><th width="188">Input</th><th width="163.33333333333331">Output</th><th>Output Description</th></tr></thead><tbody><tr><td>Any Text (text)</td><td>Category (text)</td><td>Defines a category of the text in general, or assigns to a specific category from the pre-defined list.</td></tr></tbody></table>


# Entity Extraction

Extracts entities like names, locations or numbers from any texts.

## Overview

<figure><img src="/files/OayvleRVP5xyehZODB9i" alt=""><figcaption><p>Entities extraction block</p></figcaption></figure>

Entity Extraction is a powerful tool that allows you to automatically identify and extract named entities from text.

This AI block uses advanced natural language processing techniques to analyze the input and identify entities such as people, organizations, locations, and dates. It can also identify other types of entities, such as products, events, and concepts.

Entity Extraction is useful for a wide range of applications, including information retrieval, content analysis, and data mining.

It can help you to quickly and accurately identify key information in large volumes of text, making it easier to analyze and understand.

You can adjust the confidence threshold, filter the types of entities to extract, and customize the output format after it.

## How to Setup

1. Provide text input to extract entities from.
2. Set the name of the output data variable (optional)
3. Change the confidence score (optional) - the higher it is, the fewer entities you have in the output, and vice versa.

![](/files/06QKjQ5FJbAIX81LaPyv)

{% hint style="warning" %}
All the entities are in the same text variable, separated by commas.
{% endhint %}

{% hint style="info" %}
If you need to split them into multiple entries for further processing in the workflow (i.e. searching for additional info on all of them using Google) - use [Split](/building-blocks/flow-controls/split) block after it.
{% endhint %}

## Inputs and Outputs

<table><thead><tr><th width="188">Input</th><th width="163.33333333333331">Output</th><th>Output Description</th></tr></thead><tbody><tr><td>Any Text (x1 text)</td><td>Entities (x1 text)</td><td>Extract named entities, like personal names, company names, numbers, or locations with their entity types.</td></tr></tbody></table>


# Public Search

Performs searches on the public websites using search query templates with Google or Bing.

## Overview

<figure><img src="/files/shGwTneoJHwE24cakhxm" alt=""><figcaption><p>Drafter AI | Public search action block</p></figcaption></figure>

Public Search allows you to search the internet for specific queries. It uses advanced algorithms to scan websites and retrieve relevant information based on the user's search terms.

Public Search can be used for a variety of purposes, such as research, finding products or services, or simply browsing the web.

The AI block is highly customizable, allowing the user to adjust the search parameters to suit their specific needs. Choose the search engine, language, and location to refine the search results. You can also specify the type of content you want to search for (such as images, videos, or news articles) as well as narrow down the search to specific web resources you trust.

## How to Setup

1. Choose between Google and Bing
2. Provide input data variables (text only)
3. Specify what types of output data you need
4. Change names of output variables
5. Form a query template, using search operators and input text data variables (can be many)
6. Specify the number of search results to output
7. Specify a language (optional, EN by default)
8. Specify geo (optional, US by default)

![](/files/aAy2dEGsXUTZsMoZvgzU)

{% hint style="warning" %}
If you set 10+ search results to output - don't put credit-consuming blocks after the search in the same workflow (i.e. generating articles).

It may lead both to slow performance and huge spending of the credits per 1 workflow execution.
{% endhint %}

{% hint style="info" %}
Narrowing down searches to specific websites may deliver great results.

To do so add "<mark style="color:blue;">site:website.com</mark>" at the beginning of your search query template.

With it, you can perform searches on specific product documentation, credible resources, or websites found before.
{% endhint %}

## Inputs and Outputs

<table><thead><tr><th width="188">Input</th><th width="231.33333333333331">Output</th><th>Output Description</th></tr></thead><tbody><tr><td>Multiple data variables (text)</td><td>Website URL (URL)</td><td>A link to the web search results</td></tr><tr><td></td><td>Website Name (Text)</td><td>A meta title displayed for the link</td></tr><tr><td></td><td>Website Snippet (Text)</td><td>A meta description displayed for the link</td></tr><tr><td></td><td>Website Language (Text)</td><td>The language of the web search results</td></tr><tr><td></td><td>Website Crawled at (Text)</td><td>date of the last indexing of the web search results</td></tr></tbody></table>

## Public Search Operators

1. **AND**: Used to narrow down the search by including only results that contain both terms (e.g. "apples AND oranges").
2. **OR**: Used to expand the search by including results that contain either term (e.g. "apples OR oranges").
3. **NOT**: Used to exclude results that contain the following term (e.g. "apples NOT oranges").
4. **“ ”**: Used to search for an exact phrase (e.g. "“apple pie”").
5. **( )**: Used to group multiple terms together to create a complex search (e.g. "apples OR oranges NOT (bananas OR grapes)").
6. **-**: Used to exclude a word or phrase from the search (e.g. "apples -oranges").
7. **\***: *Used as a wildcard to match any term (e.g. "appl*").
8. **site**: Used to limit results to a specific website (e.g. "site:example.com").
9. **intitle:** Used to search for a keyword in the title of the page (e.g. "intitle:apple").
10. **inurl:** Used to search for a keyword in the URL of the page (e.g. "inurl:apples").
11. **related:** Used to find related websites (e.g. "related:example.com").
12. **filetype:** Used to search for a specific file type (e.g. "filetype:pdf").
13. **allintext:** Used to search for a keyword in the body of the page (e.g. "allintext:apple").
14. **allinurl:** Used to search for multiple keywords in the URL of the page (e.g. "allinurl:apple oranges").
15. **allintitle:** Used to search for multiple keywords in the title of the page (e.g. "allintitle:apple oranges").
16. **daterange:** Used to search for results within a specific date range (e.g. "daterange:2018-01-01..2018-12-31").
17. **cache:** Used to view a cached version of the page (e.g. "cache:example.com").
18. **define:** Used to search for the definition of a term (e.g. "define:apple").
19. **stocks:** Used to search for stock information (e.g. "stocks:AAPL").
20. **info:** Used to search for additional information about a topic (e.g. "info:apple").


# Internal Search

Searches internal content and knowledge bases for information.

## Overview

Drafter AI's Internal Search allows you to search your organization's internal content and knowledge for information. It helps you find the information you need quickly and easily, without having to spend hours searching through multiple sources.

You can search for documents, presentations, media files, spreadsheets, and other types of content, as well as information stored in knowledge bases and support systems. Internal Search is highly customizable, allowing you to refine your search criteria and filter the results to meet your specific needs.

## How to Setup

Provide the next mandatory info:

1. Data input (text) - variables from other blocks or provided by a user as manual input
2. Data output - search result variable, that the block produces. Change its name for ease of further use.

![](/files/mXdtOwuNyvuyBxwQB2Kz)

## Inputs and Outputs

<table><thead><tr><th width="188">Input</th><th width="163.33333333333331">Output</th><th>Output Description</th></tr></thead><tbody><tr><td>Search query (text)</td><td>Search Result (Text)</td><td>Generates texts using the prompt template and input data variables.</td></tr><tr><td></td><td>Document Name (Text)</td><td>Displayed name of the document in the storage</td></tr><tr><td></td><td>Path (Text)</td><td><p>Path to a specific element, where relevant search result was detected.</p><p>Can be a title, paragraph, reference, table of content element, list element, or table element.</p></td></tr><tr><td></td><td>Page (number)</td><td>Number of the page where search result was located</td></tr><tr><td></td><td>Document URL (url)</td><td>Link to the original document as PDF</td></tr></tbody></table>


# Translation

## Overview

## How to Setup

## Inputs and Outputs

<table><thead><tr><th width="188">Input</th><th width="163.33333333333331">Output</th><th>Output Description</th></tr></thead><tbody><tr><td>Any Text (many variables)</td><td>Any Text (x1 variable)</td><td>Generates texts using the prompt template and input data variables.</td></tr></tbody></table>


# PDF Recognition

## Overview

## How to Setup

## Inputs and Outputs

<table><thead><tr><th width="188">Input</th><th width="163.33333333333331">Output</th><th>Output Description</th></tr></thead><tbody><tr><td>Any Text (many variables)</td><td>Any Text (x1 variable)</td><td>Generates texts using the prompt template and input data variables.</td></tr></tbody></table>


# Regular Expression

## Overview

## How to Setup

## Inputs and Outputs

<table><thead><tr><th width="188">Input</th><th width="163.33333333333331">Output</th><th>Output Description</th></tr></thead><tbody><tr><td>Any Text (many variables)</td><td>Any Text (x1 variable)</td><td>Generates texts using the prompt template and input data variables.</td></tr></tbody></table>


# Template

## Overview

## How to Setup

## Inputs and Outputs

<table><thead><tr><th width="188">Input</th><th width="163.33333333333331">Output</th><th>Output Description</th></tr></thead><tbody><tr><td>Any Text (many variables)</td><td>Any Text (x1 variable)</td><td>Generates texts using the prompt template and input data variables.</td></tr></tbody></table>


# Twitter Search Data

## Overview

## How to Setup

## Inputs and Outputs

<table><thead><tr><th width="188">Input</th><th width="163.33333333333331">Output</th><th>Output Description</th></tr></thead><tbody><tr><td>Any Text (many variables)</td><td>Any Text (x1 variable)</td><td>Generates texts using the prompt template and input data variables.</td></tr></tbody></table>


# Twitter Profile Data

## Overview

## How to Setup

## Inputs and Outputs

<table><thead><tr><th width="188">Input</th><th width="163.33333333333331">Output</th><th>Output Description</th></tr></thead><tbody><tr><td>Any Text (many variables)</td><td>Any Text (x1 variable)</td><td>Generates texts using the prompt template and input data variables.</td></tr></tbody></table>


# Youtube Captions Extraction (soon)

## Overview

## How to Setup

## Inputs and Outputs


# Speech Recognition (Soon)


# Speech Generation (Soon)


# Image Generation (Soon)


# Video Generation (Soon)


# Flow Controls


# Filter

## Overview

## How to Setup

## Inputs and Outputs


# Aggregate

## Overview

## How to Setup

## Inputs and Outputs


# Split

## Overview

## How to Setup

## Inputs and Outputs


# Make.com \*


# Google Sheets

How to use AI workflows right in Google Sheets.

## Overview

Perform all your Drafter AI workflows right in Google Sheets for hundreds of entries.&#x20;

With this integration, you can do the following tasks without leaving Google Sheets:

* Analyze text for sentiment, topics, entities, and more
* Generate texts automatically from prompt templates, using multiple variables
* Generate content for hundreds of landing pages
* Classify hundreds of text entries into categories
* Perform multiple public search queries
* Provide examples (shots) at scale for AI to follow them

and many more.

Start scaling your AI ops right in your Google Sheets.

## How it works

{% embed url="<https://www.youtube.com/watch?v=w9JIrBCEw8k>" %}
Generating ads in Google Sheets
{% endembed %}

## Getting started

### 1. Install Extension

To install it, proceed to Google Workspace Marketplace:

{% embed url="<https://workspace.google.com/marketplace/app/drafter_ai/1018718532774>" %}
Reaching the extension
{% endembed %}

### 2. Get the API Key

{% hint style="warning" %}
&#x20;You should be signed up to Drafter AI first, to get your API key to the web application
{% endhint %}

{% @arcade/embed flowId="qMRmn4XQRxRRyjo6NMV3" url="<https://app.arcade.software/share/qMRmn4XQRxRRyjo6NMV3>" %}

{% hint style="warning" %}
You can generate and copy your API key **only once.**

If you forget or lose it, to use it again you'll need to re-generate it.

It's done to comply with the current security policies and protect your instance,
{% endhint %}

### 3. Give it a try

{% @arcade/embed flowId="7fFiO9nrrTk5ZRtGxdJo" url="<https://app.arcade.software/share/7fFiO9nrrTk5ZRtGxdJo>" %}


# Slack (soon)


# Zapier (soon)